Inserting a Table
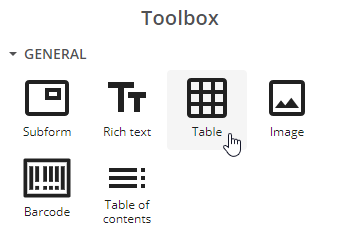
To insert a table, locate the table icon in the toolbox to the top right of the screen.
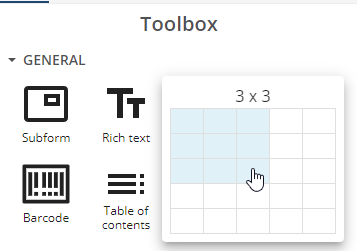
Drag the mouse arrow to select the required number of columns and rows.
The table is inserted in the editing canvas and Structure tree to the left of the canvas is populated with all the elements of the inserted table:
-
table: select this element to set properties that apply to the whole table
-
table-colgroup: this is a parent element for the table columns, it has no properties
-
table-col: select this element to set properties for a column (the element is repeated for every column)
-
table-body: select this element to set properties that apply to all cells in the table
-
table-row: select this element to set properties that apply to the selected row, the element is repeated for every row in the table
-
table-cell: select this element to set properties that apply to the selected cell, the element is repeated for every cell in the row.
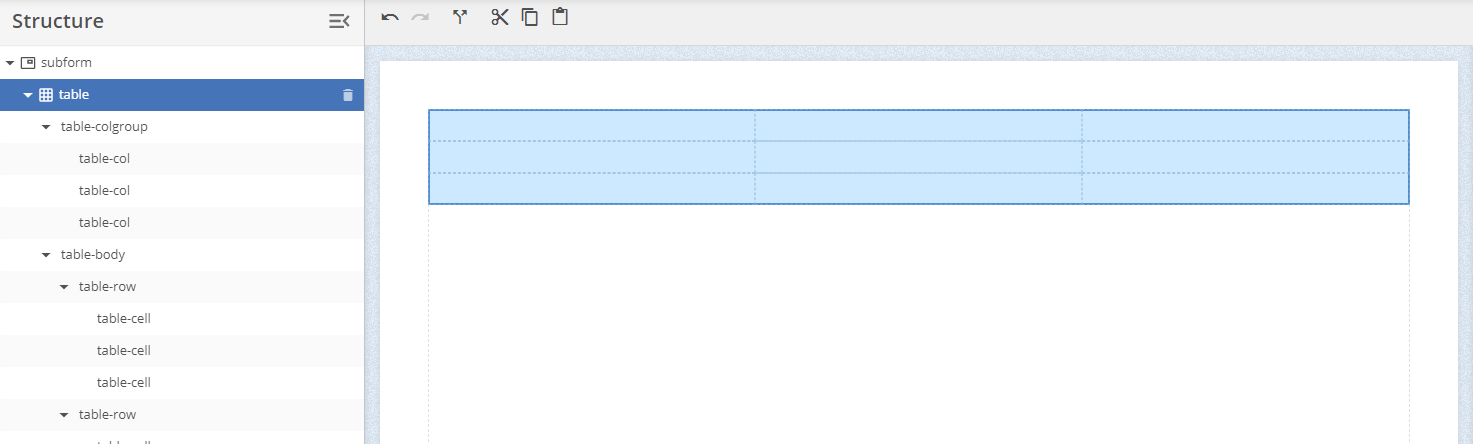
Table Properties
To set table properties, select one the table element or one of its children in the Structure tree. By pressing down the Ctrl-key, you can select multiple elements of the same type (e.g. multiple table cells) at the same time. When an element is selected, you can change its properties in the properties pain on the right of the screen.
Alternatively you can select table elements directly on the canvas by just clicking them. Press down Ctrl to select multiple elements.
Properties
If you select the table element (the top element of a table in the Structure tree), then you can set properties that apply to the whole table. If you select a table row element, then you can set properties that apply to the table row, when you select a table cell, then you can set properties that apply to only the selected cell. Properties are inherited from a higher level (e.g. table) in the Structure tree and can be overridden on a lower level (e.g. table cell). The section below outlines the properties on the table level. The same properties are available on a lower level.
-
BaseAnchor: define an anchor to be able to link to this table from another place in the document via a hyperlink in a rich text element.Style: type the name of a CSS style you want to apply to the table.
-
DataName: set a name for this table which can be used in referralsData Bind: bind this table to a field in the data collection. Typically, this feature can be used to bind the table to an array in the data collection, so the full table will be repeated for every item in the array.If you bind a table to an array, you could also set a minimum or maximum number of repetitions.
Practical example:
If the table is bound to an array with 6 repeating items, and the minimum repetitions is set to 10 → this will result in 10 tables, 6 that are bound to an item in the array, and four additional ones to get to the set minimum of 10 repetitions.
If the table is bound to an array with 6 repeating items, and the maximum repetitions is set to 4 → this will result in 4 tables, bound to the first 4 items in the array.
-
Text StyleSet font, size, color and text decoration settings that will apply to all text in the table, unless overruled on a lower level. Set word and character spacing that will apply to all text in the table, unless overruled on a lower level.
-
Paragraph StyleSet alignment, indent and line height for all paragraphs inserted in table cells. These settings can be overruled on the row, cell or rich text element level.Insert page break after: use this setting to insert a page break after the table.
Practical example:
If you apply this setting to a table that is bound to an array, every table except the first one will start on a new page.
-
LayoutSet width, height of the table.Set a background color for the whole tableSet margins and paddings (padding is the distance between the table and surrounding elements - padding is the distance between the edge of the table and its inner elements)
-
BordersSet the outer borders of the table. Set weight, style color and radius of the table's outer borders.
Setting Column Width
To set table column with, select the table-col element in the Structure tree. Columns are listed in the templates reading order.
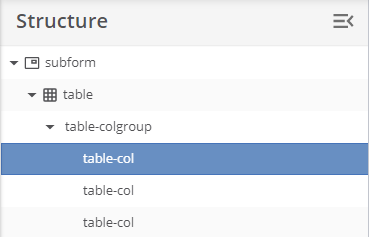
With the column selected, you can change the width of the selected column in the properties panel on the right. If no width values are specified, the available space is distributed evenly across the columns.
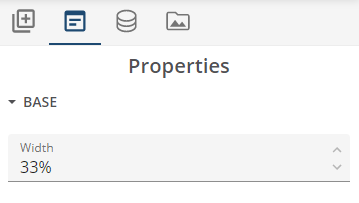
Table Controls
When you select a row, a column or a cell of a table, the contextual table menu will appear in the command bar above the editing canvas.

The table command bar contains these controls, from left to right:
-
add row above;
-
add row below;
-
delete row;
-
add column to the left;
-
add column to the right;
-
delete column;
-
merge selected cells (requires multiple adjacent cells to be selected);
-
split selected cell;
-
mark as header column;
-
mark as header row;
-
mark as footer row;
-
select row;
-
select column;
-
select table.
Repeating Table Rows
It is a very common requirement to build table rows or subforms that repeat for each item in an array (a one-to-many relationship in your data collection). Examples are for instance a table with line items in an invoice or a price quotation, or a list of covers in an insurance policy.
Inserting a Loop
Inserting a loop is a three step process.
Select the Element to Repeat
First, select the element in the canvas that you wish to repeat. Typically, this is a table row or a subform.
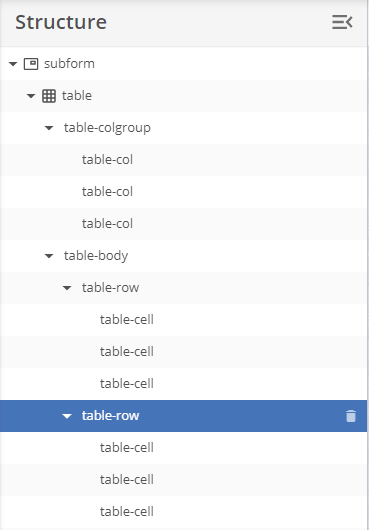
In many cases the row to be repeated is the second row of a table, while the first row is used as a header row.
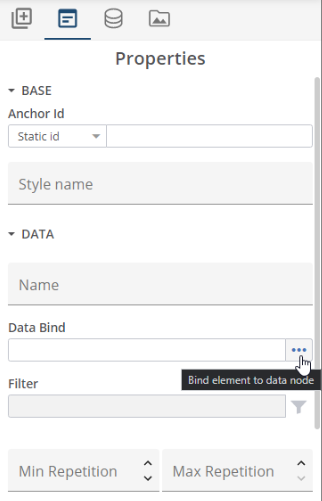
Bind The Element to a Field
Locate the Data Bind property in the Properties panel to the right of the editing canvas and click the three dots to bring up the field selection dialog. Select a repeating element in the data collection.
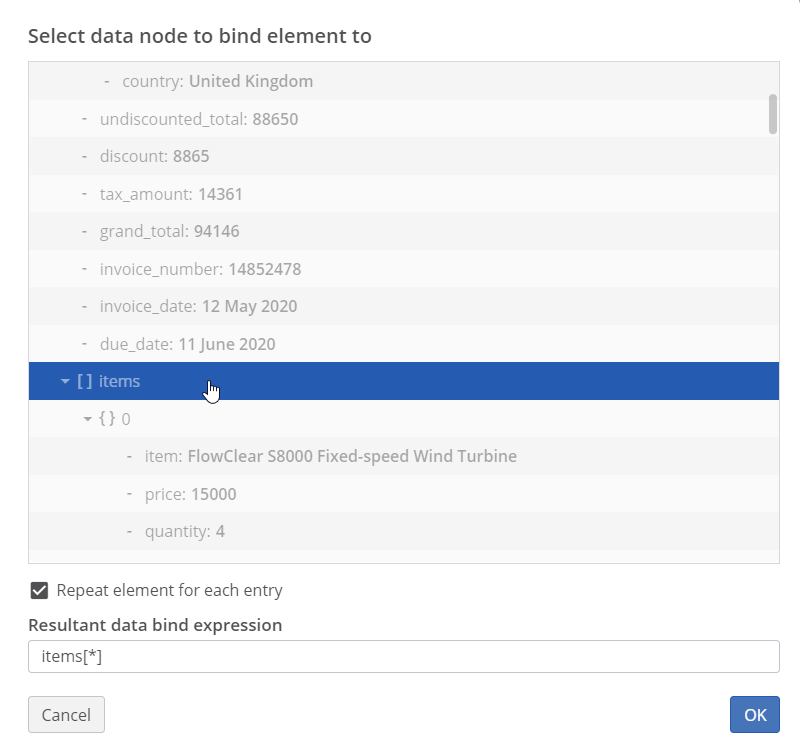
Mark as Repeating
Tick the box that says Repeat element for each entry. Most probably iText DITO will already tick this box for you.

Note that the resulting bind expression looks like this: items[*]. You can manually insert this expression in the Data Bind parameter as well.
Binding Data within a Loop
Once the loop is in place, you can start inserting fields in it. For line items in an invoice for instance, you could be required to bind an item description, a quantity, a unit price and a line item total for instance.
In the above scenario, insert rich text elements in the cells of the repeating row and start adding simple data bindings to those rich text elements. The same process applies if you insert other bound elements, like images for instance.
Instead of selecting fields via the wizard, you can also type the names of fields into the Data Bind property of the rich text element. Note that data binds which you insert inside a loop are relative to the root of the loop, not to the root of the data collection. You can use $ or $parent in the path if you have to bind a field relative to the root or to a parent item of the loop's root.
Loop Properties
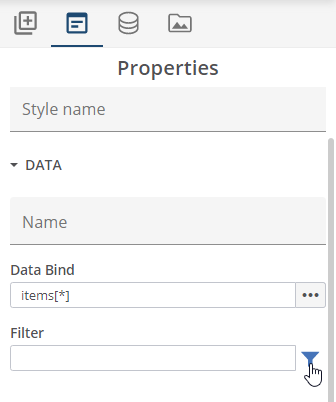
Filtering
You can create tables with repeating rows for any subset of a data array. Imagine that you have a list of line items in an invoice data set, and in the envisioned PDF document you want to build different tables, for instance to distinguish between line items of different types.
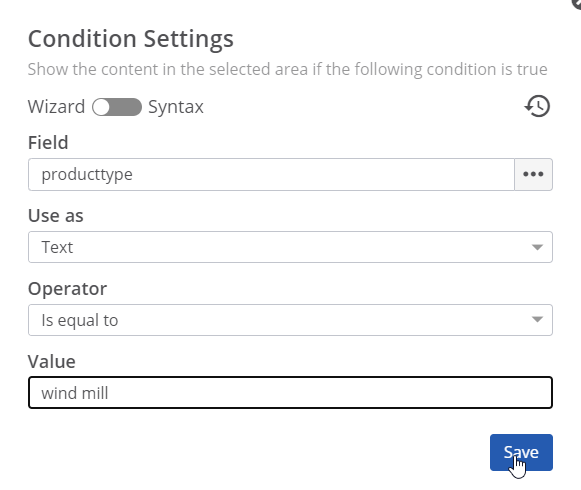
Use the filter property on your loop to set the filter. To set the filter condition, you can use the same wizard as for conditional insertion of content.
Note that you can also set the filter through syntax. The syntax to define the filtered loop looks like this:
iteratingElement[[conditionExpression]]
in which iteratingElement is the root element of the array and conditionExpression defines the filter.
To set the filter, you can use the operators in the table below. String values can be contained within single or double quotes.
|
Operator Name |
Type |
Syntax |
Expression Example |
|---|---|---|---|
|
Is equal to |
Text/Number |
== |
{{fieldname}}=="fieldvalue" |
|
Is not equal to |
Text/Number |
!= |
{{fieldname}}!="fieldvalue" |
|
Is empty (string length is zero) |
Text |
isEmpty() |
isEmpty({{fieldname}}) |
|
Is blank (no characters or only blank characters) |
Text |
isBlank() |
isBlank({{fieldname}}) |
|
Is not empty |
Text |
!isEmpty() |
!isEmpty({{fieldname}}) |
|
Is not blank |
Text |
!isBlank() |
!isBlank({{fieldname}}) |
|
Contains |
Text |
contains() |
contains({{fieldname}}, "fieldvalue") |
|
Does not contain |
Text |
!contains() |
!contains({{fieldname}}, "fieldvalue") |
|
Is greater than |
Number |
> |
{{fieldname}}>fieldvalue |
|
Is greater than or equal to |
Number |
>= |
{{fieldname}}>=fieldvalue |
|
Is less than |
Number |
< |
{{fieldname}<fieldvalue |
|
Is less than or equal to |
Number |
<= |
{{fieldname}<=fieldvalue |
|
And |
Logical |
&& |
contains({{fieldname}}, "fieldvalue1")&&!contains({{fieldname}},"fieldvalue2") |
|
Or |
Logical |
|| |
{{fieldname}}=="fieldvalue1"||{{fieldname}}=="fieldvalue2" |
The operators in the table can be combined with the calculation functions that iText DITO supports, such as sum(), product(), concat() and size(). In our example, the expression size({{items[[{{producttype}} == 'wind mill']]}}) would return the number of items in that subarray.
Limiting
You can also set a minimum or maximum number of repetitions for the loop.
Example
Imagine you have created a loop on table row, bound to an array with 6 iterations:
-
if you set the minimum number of repetitions to 10, a table with 10 rows will be generated. The first 6 rows will be bound to data iterations. 4 empty rows will be added to the end.
-
if you set the maximum number of repetitions to 5, a table with 5 rows will be generated. The first 5 iterations will be bound to the table, the sixth iteration will not be added to the table.