Which version?
This Tutorial was written with iText 7.0.x in mind, however, if you go to the linked Examples you will find them for the latest available version of iText. If you are looking for a specific version, you can always download these examples from our GitHub repo (Java/.NET).
In the first chapter of this tutorial, we created a Document with a certain page size and certain margins (defined explicitly or implicitly) and when we added basic building blocks such as Paragraph and List to that document object. iText made sure that the content was nicely organized on the page. We also created a Table object to publish the contents of a CSV file and the result already looked nice. But what if all of this isn't sufficient? What if we want more control over how the content is laid out on the page? What if you're not happy with the rectangular borders that are drawn by the Table class? What if you want to add content that appears on a specific location on every page, no matter how many pages are created?
Should you draw all the content at absolute positions as was explained in the second chapter to meet these specific requirements? By playing with the Star Wars examples, we've experienced that this could lead to code that is quite complex (and code that is hard to maintain). Surely there must be way to combine the high-level approach using the basic building blocks with a more low-level approach that allows us to have more influence on the layout. That's what this third chapter is about.
Introducing a document renderer
Suppose that we want to add text and images to a document, but we don't want the text to span the complete width of the page. Instead, we want to organize the content in three columns as shown in Figure 3.1.
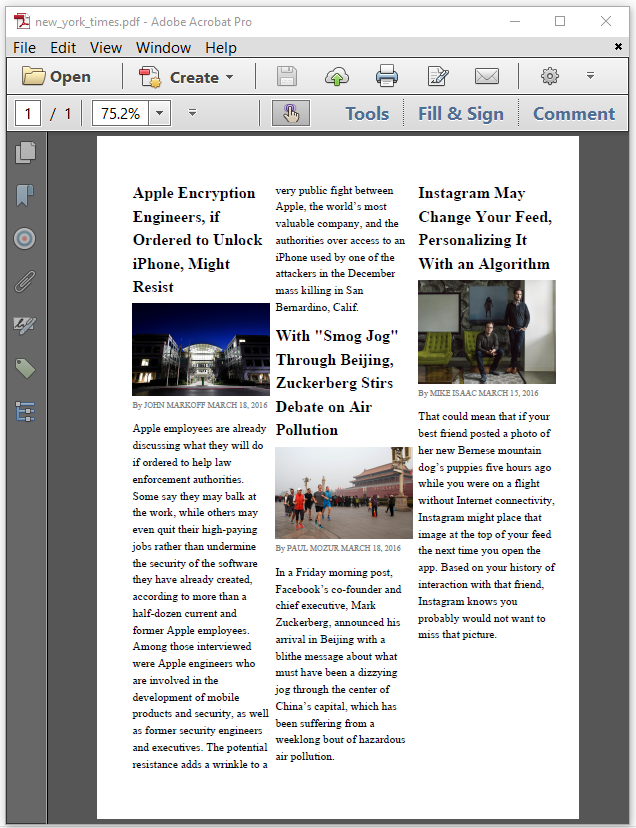
The NewYorkTimes example shows how this is done.
//Initialize PDF document
PdfDocument pdf = new PdfDocument(new PdfWriter(dest));
PageSize ps = PageSize.A5;
// Initialize document
Document document = new Document(pdf, ps);
//Set column parameters
float offSet = 36;
float columnWidth = (ps.GetWidth() - offSet * 2 + 10) / 3;
float columnHeight = ps.GetHeight() - offSet * 2;
//Define column areas
Rectangle[] columns = new Rectangle[] {
    new Rectangle(offSet - 5, offSet, columnWidth, columnHeight),
    new Rectangle(offSet + columnWidth, offSet, columnWidth, columnHeight),
    new Rectangle(offSet + columnWidth * 2 + 5, offSet, columnWidth, columnHeight)
};
document.SetRenderer(new ColumnDocumentRenderer(document, columns));
// adding content
Image inst = new Image(ImageDataFactory.Create(INST_IMG)).SetWidth(columnWidth);
String articleInstagram = File.ReadAllText(System.IO.Path.Combine(INST_TXT), Encoding.UTF8);
NewYorkTimes.AddArticle(document, "Instagram May Change Your Feed, Personalizing It With an Algorithm"
                , "By MIKE ISAAC MARCH 15, 2016", inst, articleInstagram);
document.Close();
The first five lines are pretty standard. We recognize them from chapter 1. In lines 7, 8, and 9, we define a couple of parameters:
-
an
offSetthat will be used to define the top and bottom margin, as well as for the right and left margin. -
the width of each column,
columnWidth, that is calculated by dividing the available page width by three (because we want three columns). The available page width is the full page width minus the left and right margin, minus two times 5 user units that we will deduct from the margin so that we have a small gutter between the columns. -
the height of each column,
columnHeight, that is calculated by subtracting the top and the bottom margin from the full page height.
We use these values to define three Rectangle objects:
-
a
Rectangleof which the coordinate of the lower-left corner is (X =offSet - 5, Y =offSet), widthcolumnWidthand heightcolumnHeight, -
a
Rectangleof which the coordinate of the lower-left corner is (X =offSet + columnWidth, Y =offSet), widthcolumnWidthand heightcolumnHeight, and -
a
Rectangleof which the coordinate of the lower-left corner is (X =offSet + columnWidth * 2 + 5, Y =offSet, widthcolumnWidthand heightcolumnHeight.
We put these three Rectangle objects in an array named columns, and we use it to create a ColumnDocumentRenderer. Once we declare this ColumnDocumentRenderer as the DocumentRenderer for our Document instance, all the content that we add to document will be laid out in columns that correspond with the Rectangles we've defined.
In line 17, we create an Image object and we scale the image so that it fits the width of a column. In line 18 and 19, we read a text file into a String. We use these objects as parameters for a custom addArticle() method.
public static void AddArticle(Document doc, String title, String author, iText.Layout.Element.Image img, String text) {
    Paragraph p1 = new Paragraph(title).SetFont(timesNewRomanBold).SetFontSize(14);
    doc.Add(p1);
    doc.Add(img);
    Paragraph p2 = new Paragraph().SetFont(timesNewRoman).SetFontSize(7).SetFontColor(Color.GRAY).Add(author);
    doc.Add(p2);
    Paragraph p3 = new Paragraph().SetFont(timesNewRoman).SetFontSize(10).Add(text);
    doc.Add(p3);
}
No new concepts were introduced in this code snippet. The objects timesNewRoman and timesNewRomanBold were defined as static PdfFont member-variables of the NewYorkTimes class. That's much easier than what we did in the previous chapter, isn't it? Let's continue with an example that is a tad bit more complex.
Applying a block renderer
When we published the contents of a CSV file listing information about the states of the USA, we created a series of Cell objects that we added to a Table object. We didn't define a background color, nor did we define what the borders should look like. The default values were used.
By default, a cell doesn't have a background color. Its borders consist of a black rectangle with a line width of 0.5 user units.
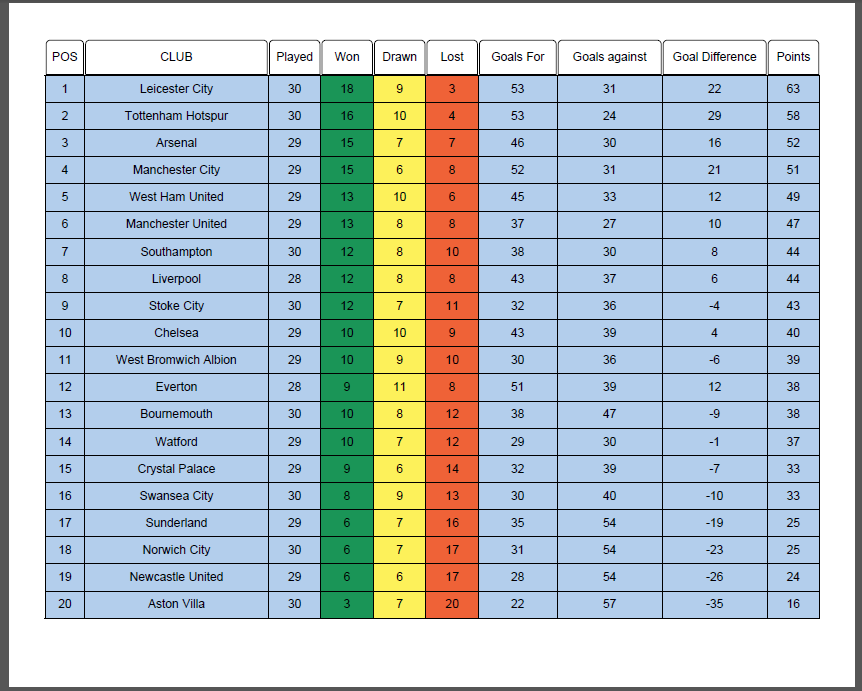
Now, we'll take another data source, premier_league.csv, and we'll put that data in a Table that we'll spice up a little; see Figure 3.2.
We won't repeat the boiler-plate code because it's identical to what we had in the previous example, except for one line:
    PageSize ps = new PageSize(
    842, 680
    )
    ;
Before, we always used a standard paper format such as PageSize.A4. In this case, we use a user-defined page size of 842 by 680 user units (17.7 x 9.4 in). The body of the PremierLeague example looks pretty straight-forward too.
Document document = new Document(pdf, ps);
PdfFont font = PdfFontFactory.CreateFont(FontConstants.HELVETICA);
PdfFont bold = PdfFontFactory.CreateFont(FontConstants.HELVETICA_BOLD);
Table table = new Table(new float[] { 1.5f, 7, 2, 2, 2, 2, 3, 4, 4, 2 });
table.SetWidth(UnitValue.CreatePercentValue(100)).SetTextAlignment(TextAlignment.CENTER).SetHorizontalAlignment(HorizontalAlignment
.CENTER);
StreamReader sr = File.OpenText(DATA);
String line = sr.ReadLine();
Process(table, line, bold, true);
while ((line = sr.ReadLine()) != null) {
    Process(table, line, font, false);
}
sr.Close();
document.Add(table);
There are only some minor differences when compared with the UnitedStates example. In this example, we set the text alignment of the content of the Table in such a way that it is centered. We also change the horizontal alignment of the table itself –note that this doesn't matter much as the table takes up 100% of the available width anyway. The process() method is more interesting.
public void Process(Table table, String line, PdfFont font, bool isHeader) {
    StringTokenizer tokenizer = new StringTokenizer(line, ";");
    int columnNumber = 0;
    while (tokenizer.HasMoreTokens()) {
        if (isHeader) {
            Cell cell = new Cell().Add(new Paragraph(tokenizer.NextToken()));
            cell.SetNextRenderer(new RoundedCornersCellRenderer(this, cell));
            cell.SetPadding(5).SetBorder(null);
            table.AddHeaderCell(cell);
        }
        else {
            columnNumber++;
            Cell cell = new Cell().Add(new Paragraph(tokenizer.NextToken()));
            cell.SetFont(font).SetBorder(new SolidBorder(Color.BLACK, 0.5f));
        switch (columnNumber) {
            case 4: {
                cell.SetBackgroundColor(greenColor);
            break;
            }
            case 5: {
                cell.SetBackgroundColor(yellowColor);
            break;
            }
            case 6: {
                cell.SetBackgroundColor(redColor);
            break;
            }
            default: {
                cell.SetBackgroundColor(blueColor);
            break;
            }
        }
        table.AddCell(cell);
        }
    }
}
Let's start with the ordinary cells. In lines 17, 21, 25, and 29, we change the background color based on the column number.
In line 14, we set the font of the content of the Cell and we overrule the default border using the setBorder() method. We define the border as a black solid border with a 0.5 user unit line width.
The SolidBorder class extends the Border class; it has siblings such as DashedBorder, DottedBorder, DoubleBorder, and so on. If iText doesn't provide you with the border of your choice, you can either extend the Border class –you can use the existing implementations for inspiration–, or you can create your own CellRenderer implementation.
We use a custom RoundedCornersCellRenderer() in line 7. In line 8, we define a padding for the cell content, and we set the border to null. If setBorder(null) wasn't there, two borders would be drawn: one by iText, one by the cell renderer that we're about to examine.
private class RoundedCornersCellRenderer : CellRenderer {
    public RoundedCornersCellRenderer(C03E02_PremierLeague _enclosing, Cell modelElement)
        : base(modelElement) {
        this._enclosing = _enclosing;
    }

    public override void DrawBorder(DrawContext drawContext) {
            Rectangle rectangle = this.GetOccupiedAreaBBox();
            float llx = rectangle.GetX() + 1;
            float lly = rectangle.GetY() + 1;
            float urx = rectangle.GetX() + this.GetOccupiedAreaBBox().GetWidth() - 1;
            float ury = rectangle.GetY() + this.GetOccupiedAreaBBox().GetHeight() - 1;
            PdfCanvas canvas = drawContext.GetCanvas();
            float r = 4;
            float b = 0.4477f;
            canvas.MoveTo(llx, lly).LineTo(urx, lly).LineTo(urx, ury - r).CurveTo(urx, ury - r * b, urx - r * b, ury,
                urx - r, ury).LineTo(llx + r, ury).CurveTo(llx + r * b, ury, llx, ury - r * b, llx, ury - r).LineTo(llx
                , lly).Stroke();
            base.DrawBorder(drawContext);
        }
    }
}
The CellRenderer class is a special implementation of the BlockRenderer class.
The BlockRenderer class can be used on BlockElements such as Paragraph and List. These renderer classes allow you to create custom functionality by overriding the draw() method. For instance: you could create a custom background for a Paragraph. The CellRenderer also has a drawBorder() method.
We override the drawBorder() method to draw a rectangle that is rounded at the top (line 7-19). The getOccupiedAreaBBox() method returns a Rectangle object that we can use to find the bounding box of the BlockElement (line 8). We use the getX(), getY(), getWidth(), and getHeight() method to define the coordinates of the lower-left and upper-right corner of the Cell (line 9-12).
The drawContext() parameter gives us access to the PdfCanvas instance (line 13). We draw the border as a sequence of lines and curves (line 14-19). This example demonstrates how the high-level approach using a Table consisting of Cells nicely ties in with the low-level approach where we create PDF syntax almost manually to draw a border that meets our needs exactly.
The code that draws the curves requires some knowledge about Math, but it's not rocket science. Most of the common types of borders are covered by iText so that you don't really need to worry about all the Math that takes place on under the hood.
There's much more to say about BlockRenderers, but we'll save that for another tutorial. We'll finish this chapter with an example that demonstrates how we can automatically add backgrounds, headers (or footers), watermarks, and a page number to every page that is created.
Handling events
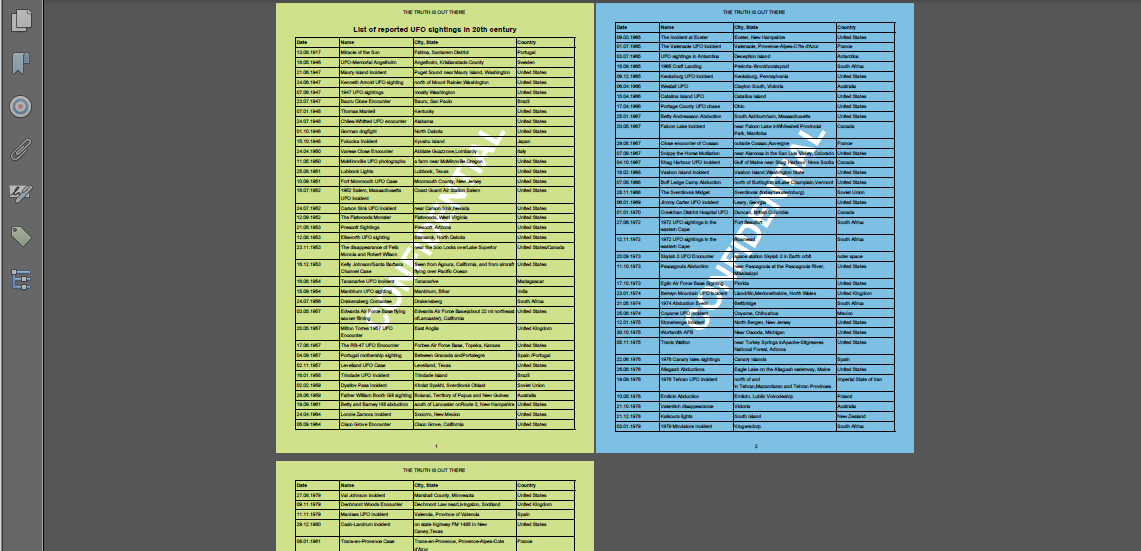
When we add a Table with many rows to a document, there's a high chance that this table will be distributed over different pages. In Figure 3.3, we see a list of UFO sightings stored in ufo.csv. The background of every odd page is colored lime; the background of every even page is blue. There's a header saying "THE TRUTH IS OUT THERE" and a watermark saying "CONFIDENTIAL" under the actual page content. Centered at the bottom of every page, there's a page number.
You've seen the code that creates the table in the UFO example already a couple of times.
//Initialize PDF document
PdfDocument pdf = new PdfDocument(new PdfWriter(dest));
pdf.AddEventHandler(PdfDocumentEvent.END_PAGE, new C03E03_UFO.MyEventHandler(this));
// Initialize document
Document document = new Document(pdf);
Paragraph p = new Paragraph("List of reported UFO sightings in 20th century").SetTextAlignment(TextAlignment
    .CENTER).SetFont(helveticaBold).SetFontSize(14);
document.Add(p);
Table table = new Table(new float[] { 3, 5, 7, 4 });
table.SetWidth(UnitValue.CreatePercentValue(100));
StreamReader sr = File.OpenText(DATA);
String line = sr.ReadLine();
Process(table, line, helveticaBold, true);
while ((line = sr.ReadLine()) != null) {
    Process(table, line, helvetica, false);
}
sr.Close();
document.Add(table);
document.Close();
In the body of this snippet, we add a Paragraph that is centered by setting the text alignment to Property.TextAlignment.CENTER. We loop over a CSV file (DATA) and we process each line the same way we've already processed other lines taken from CSV files.
Line 3 is of special interest to us in the context of this example. We add an event handler MyEventHandler to the PdfDocument. Our MyEventHandler implementation implements AbstractPdfDocumentEventHandler, an interface with a single method: handleEvent(). This method will be triggered every time an event of type PdfDocumentEvent.END_PAGE occurs. That is: every time iText has finished adding content to a page, either because a new page is created, or because the last page has been reached and completed.
Let's examine our AbstractPdfDocumentEventHandler implementation.
protected internal class MyEventHandler : AbstractPdfDocumentEventHandler {
    public virtual void HandleEvent(Event @event) {
        PdfDocumentEvent docEvent = (PdfDocumentEvent)@event;
        PdfDocument pdfDoc = docEvent.GetDocument();
        PdfPage page = docEvent.GetPage();
        int pageNumber = pdfDoc.GetPageNumber(page);
        Rectangle pageSize = page.GetPageSize();
        PdfCanvas pdfCanvas = new PdfCanvas(page.NewContentStreamBefore(), page.GetResources(), pdfDoc);
        //Set background
        Color limeColor = new DeviceCmyk(0.208f, 0, 0.584f, 0);
        Color blueColor = new DeviceCmyk(0.445f, 0.0546f, 0, 0.0667f);
        pdfCanvas.SaveState()
                    .SetFillColor(pageNumber % 2 == 1 ? limeColor : blueColor)
                    .Rectangle(pageSize.GetLeft(), pageSize.GetBottom(), pageSize.GetWidth(), pageSize.GetHeight())
                    .Fill()
                    .RestoreState();
        //Add header and footer
        pdfCanvas.BeginText()
                    .SetFontAndSize(C03E03_UFO.helvetica, 9)
                    .MoveText(pageSize.GetWidth() / 2 - 60, pageSize.GetTop() - 20)
                    .ShowText("THE TRUTH IS OUT THERE")
                    .MoveText(60, -pageSize.GetTop() + 30)
                    .ShowText(pageNumber.ToString())
                    .EndText();
        //Add watermark
        iText.Layout.Canvas canvas = new iText.Layout.Canvas(pdfCanvas, pdfDoc, page.GetPageSize());
        canvas.SetProperty(Property.FONT_COLOR, Color.WHITE);
        canvas.SetProperty(Property.FONT_SIZE, 60);
        canvas.SetProperty(Property.FONT, C03E03_UFO.helveticaBold);
        canvas.ShowTextAligned(new Paragraph("CONFIDENTIAL"), 298, 421, pdfDoc.GetPageNumber(page), TextAlignment.
            CENTER, VerticalAlignment.MIDDLE, 45);
        pdfCanvas.Release();
    }
}
In our implementation of the handleEvent() method, we obtain the PdfDocument instance from the PdfDocumentEvent that is passed as a parameter (line 3-4). The event also gives us access to the PdfPage (line 5). We need those objects, to get the page number (line 6), the page size (line 7), and a PdfCanvas instance (line 8-9).
Different paths and shapes that are drawn on a page can overlap. As a rule, whatever comes first in the content stream is drawn first. Content that is drawn afterwards can cover content that already exists. We want to add a background each time the content of a page has been completely rendered. Each PdfPage object keeps track of an array of content streams. You can use the getContentStream() method with an index as parameter to get each separate content stream. You can use getFirstContentStream() and getLastContentStream() to get the first and the last content stream. You can also create a new content stream with the newContentStreamBefore() and newContentStreamAfter() method.
In our handleEvent() method, we'll work with a PdfCanvas constructor that was created with the following parameters:
-
page.newContentStreamBefore(): if we would draw an opaque rectangle after the page was rendered, that rectangle would cover all the existing content. We need access to a content stream that will be added before the content of a page, so that our background and our watermark don't cover the content in our table. -
page.getResources(): each content stream refers to external resources such as fonts and images. As we are going to add new content to a page, it's important that iText has access to the resources dictionary of that page. -
pdfDoc: We need access to thePdfDocumentso that it can produce the new PDF objects that represent the content we're adding.
What are we adding to the canvas object?
-
line 10-16: we define two colors
limeColorandblueColor. We save the current graphics state, and then change the fill color to either of these colors, depending on the page number. We construct a rectangle and fill it. This will paint the complete page either in lime or blue. We restore the graphics state to return to the original fill color, because don't want the other content to be affected by the color change. -
line 18-24: we begin a text object. We set a font and a font size. We move to a centered position close to the top of the page to write
"THE TRUTH IS OUT THERE". We then move the cursor to the bottom of the page where we write the page number. We end the text object. This adds a header and a footer to our page. -
line 26-29: we create a new
Canvasobject, namedcanvas.Canvasis the high-level equivalent ofPdfCanvas, just likeDocumentis the high-level equivalent forPdfDocument. Instead of having to use PDF syntax to change the font, font size, font color and other properties, we can use thesetProperty()method. ThesetProperty()method can also be used on theDocumentobject, for instance to change the default font of the document. It's available for objects such asParagraph,List,Tablefor the same purpose. -
line 30-31: we use the
showTextAligned()method to add aParagraphthat will be centered at the positionX = 298. Y = 421with an angle of 45 degrees.
Once we've added a background, a header and a footer, and a watermark, we release the PdfCanvas object.
In this example, we used two different approaches to add text at an absolute position. We used some low-level methods we encountered when we discussed text state in the previous chapter for the header and the footer. We could have used similar methods to add the watermark. However: we want to rotate the text and center it in the middle of the page, and that requires quite some Math. To avoid having to calculate the transformation matrix that would put the text at the desired coordinates, we used a convenience method. With showTextAligned(), iText does all the heavy lifting in your place.
Summary
In this chapter, we've found out why it's important to have some understanding of the low-level functionality discussed in the previous chapter. We can use this functionality in combination with basic building blocks to create custom functionality. We've created custom borders to Cell objects. We've added background colors to pages, and we've introduced headers and footers. When we added a watermark, we discovered that we don't really need to know all the ins and outs of PDF syntax. We were able to use a convenience method that took care of defining the transformation matrix to rotate and center text.
In the next example, we'll learn about a different type of content. We'll take a look at annotations, and we'll zoom in on one particular type of annotation that will allow us to create interactive forms.