Which version?
This Tutorial was written with iText 7.0.x in mind, however, if you go to the linked Examples you will find them for the latest available version of iText. If you are looking for a specific version, you can always download these examples from our GitHub repo (Java/.NET).
In the previous chapters, we’ve created PDF documents by adding content to a page. It didn’t matter if we were adding high-level objects (e.g. a 'Paragraph') or low-level instructions (e.g. 'LineTo()', 'MoveTo()', 'Stroke'), iText converted everything to PDF syntax that was written to one or more content streams. In this chapter, we’ll add content of a different nature. We’ll add interactive features, known as annotations. Annotations aren’t part of the content stream. They are usually added on top of the existing content. There are many different types of annotations, many of which allow user interaction.
Adding annotations
We’ll start with a series of simple examples. Figure 4.1 shows a PDF with a 'Paragraph' of text. On top of the text, we’ve added a green text annotation.

Most of the code of the TextAnnotation example is identical to the Hello World example. The only difference is that we create and add an annotation:
//Create text annotation
PdfAnnotation ann = new PdfTextAnnotation(new Rectangle(20, 800, 0, 0))
    .SetColor(Color.GREEN)
    .SetTitle(new PdfString("iText")).SetContents("With iText, you can truly take your documentation needs to the next level.")
    .SetOpen(true);
pdf.GetFirstPage().AddAnnotation(ann);
We define the location of the text annotation using a 'Rectangle'. We set the color, title (a 'PdfString'), contents (a 'String'), and the open status of the annotation. We ask the 'PdfDocument' for its first page and add the annotation.
In Figure 4.2, we created an annotation that is invisible, but that shows an URL if you hover over its location. You can open that URL by clicking the annotation. This is a link annotation.
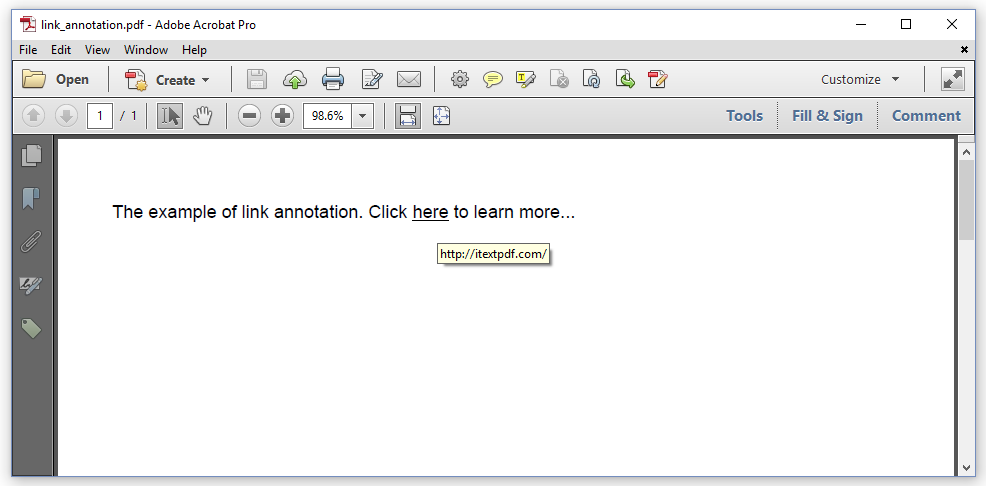
As the annotation is part of a sentence, it wouldn't be convenient if we had to calculate the position of the word "here". Fortunately, we can wrap the link annotation in a Link object and iText will calculate the Rectangle automatically. The LinkAnnotation example shows how it's done.
/Create link annotation
PdfLinkAnnotation annotation = ((PdfLinkAnnotation)new PdfLinkAnnotation(new Rectangle(0, 0))
    .SetAction(PdfAction
    .CreateURI("https://itextpdf.com/")));
Link link = new Link("here", annotation);
Paragraph p = new Paragraph("The example of link annotation. Click ").Add(link.SetUnderline()).Add(" to learn more...");
document.Add(p);
In line 2, we create a URI action that opens the iText web site. We use this action for the link annotation. We then create a 'Link' object. This is a basic building block that accepts a link annotation as parameter. This link annotation won’t be added to the content stream, because annotations aren’t part of the content stream. Instead it will be added to the corresponding page at the corresponding coordinates. Making text clickable doesn’t change the appearance of that text in the content stream. In our example, we underlined the word “here” so that we know where to click.
Every type of annotation requires its own type of parameters. Figure 4.3 shows a page with a line annotation.

The LineAnnotation shows what is needed to create this appearance.
PdfPage page = pdf.AddNewPage();
PdfArray lineEndings = new PdfArray();
lineEndings.Add(new PdfName("Diamond"));
lineEndings.Add(new PdfName("Diamond"));
//Create line annotation with inside caption
PdfAnnotation annotation = new PdfLineAnnotation(new Rectangle(0, 0), new float[] { 20, 790, page.GetPageSize().GetWidth() - 20, 790 })
    .SetLineEndingStyles((lineEndings))
    .SetContentsAsCaption(true)
    .SetTitle(new PdfString("iText"))
    .SetContents("The example of line annotation")
    .SetColor(Color.BLUE);
page.AddAnnotation(annotation);
//Close document
pdf.Close();
In this example, we add the annotation to a newly created page. There’s no 'Document' instance involved in this example.
ISO-32000-2 defines 28 different annotation types, two of which are deprecated in PDF 2.0. With iText, you can add all of these annotation types to a PDF document, but in the context of this tutorial, we’ll only look at one more example before we move on to interactive forms. See figure 4.4.
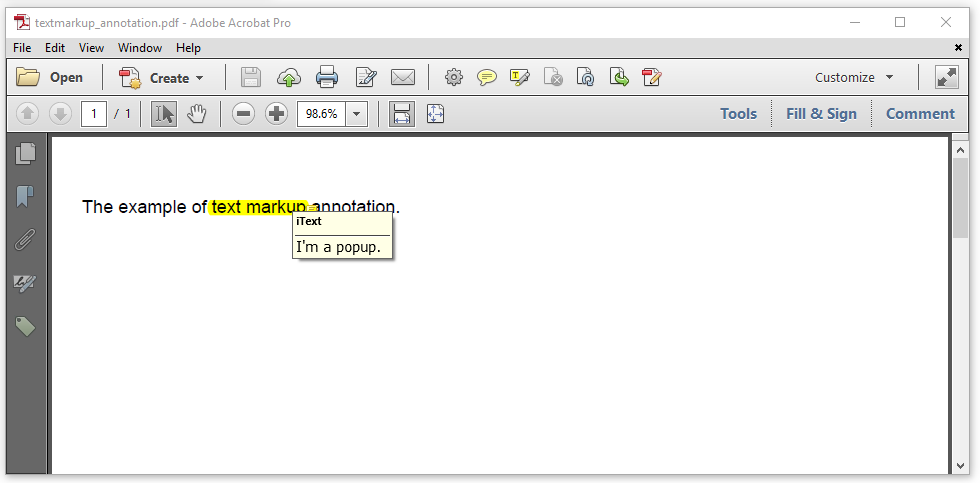
Looking at the TextMarkupAnnotation example, we see that we really need a separate tutorial to understand what all the nuts and bolts used in this code snippet are about.
//Create text markup annotation
PdfAnnotation ann = PdfTextMarkupAnnotation.CreateHighLight(new Rectangle(105, 790, 64, 10), new float[] {169, 790, 105, 790, 169, 800, 105, 800 })
    .SetColor(Color.YELLOW)
    .SetTitle(new PdfString("Hello!"))
    .SetContents(new PdfString("I'm a popup."))
    .SetTitle(new PdfString("iText"))
    .SetOpen(true)
    .SetRectangle(new PdfArray(new float[] { 100, 600, 200, 100 }));
pdf.GetFirstPage().AddAnnotation(ann);
In the next section, we’ll create an interactive form consisting of different form fields. Each form field in that form will correspond with a widget annotation, but those annotations will be created implicitly.
Creating an interactive form
In the next example, we’re going to create an interactive form based on AcroForm technology. This technology was introduced in PDF 1.2 (1996) and allows you to populate a PDF document with form fields such as text fields, choices (combo box or list field), buttons (push buttons, check boxes and radio buttons), and signature fields.
It’s tempting to compare a PDF form with a form in HTML, but that would be wrong. When text doesn’t fit into the available text area of an HTML form, that field can be resized. The content of a list field can be updated on the fly based on a query to the server. In short, an HTML form can be very dynamic.
That isn’t true for interactive forms based on AcroForm technology. Such a form can best be compared with a paper form where every field has its fixed place and its fixed size. The idea of using PDF forms for collecting user data in a web browser has been abandoned over the years. HTML forms are much more user friendly for online data collection.
That doesn’t mean that AcroForm technology has become useless. Interactive PDF forms are very common in two specific use cases:
-
When the form is the equivalent of digital paper. In some cases, there are strict formal requirements with respect to a form. It is important that the digital document is an exact replica of the corresponding form. Every form that is filled out needs to comply to the exact same formal requirements. If this is the case, then it’s better to use PDF forms than HTML forms.
-
When the form isn’t used for data collection, but as a template. For example: you have a form that represents a voucher or an entry ticket for an event. On this form, you have different fields for the name of the person who bought the ticket, the date and the time of the event, the row and the seat number, and so on. When people buy a ticket, you don’t need to regenerate the complete voucher, you can take the form and simply fill it out with the appropriate data.
In both use cases, the form will be created manually, for instance using Adobe software, LibreOffice, or any other tool with a graphical user interface.
You could also create such a form programmatically, but there are very few use cases that would justify using a software library to create a form or a template, instead of using a tool with a GUI. Nevertheless, we’re going to give it a try.
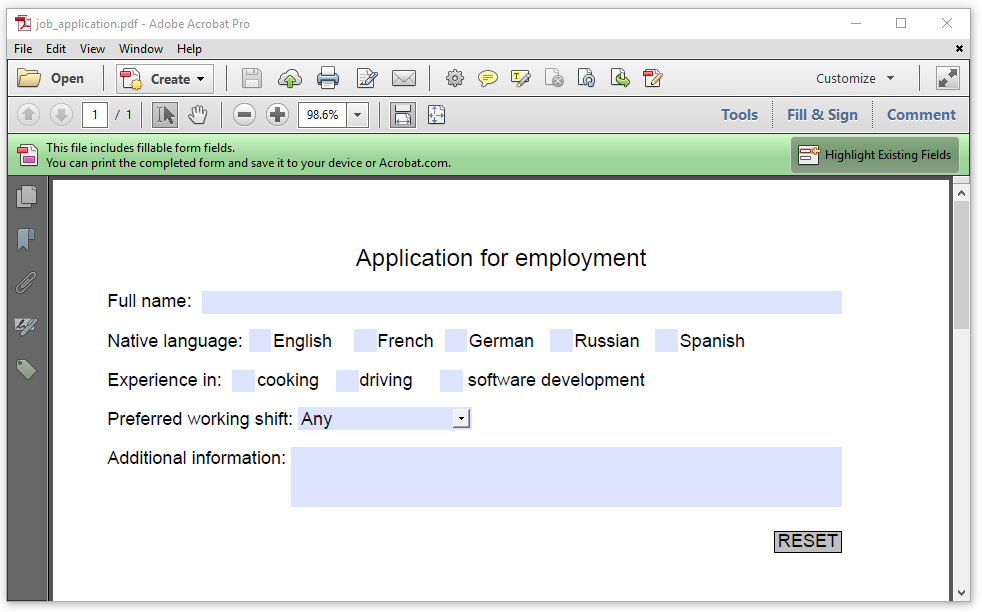
In Figure 4.5, we see text fields, radio buttons, check boxes, a combo box, a multi-line text field, and a push button. We see these fields because they are represented by a widget annotation. This widget annotation is created implicitly when we create a field. In the JobApplication example, we create a 'PdfAcroForm' object, using the 'PdfDocument' instance obtained from the 'Document' object. The second parameter is a 'Boolean' indicating if a new form needs to be created if there is no existing form. As we've just created the 'Document', there is no form present yet, so that parameter should be true:
PdfAcroForm form = PdfAcroForm.GetAcroForm(doc.GetPdfDocument(), true);
Now we can start adding fields. We’ll use a Rectangle to define the dimension of each widget annotation and its position on the page.
Text field
We’ll start with the text field that will be used for the full name.
//Create text field
PdfTextFormField nameField = PdfTextFormField.CreateText(doc.GetPdfDocument(), new Rectangle(99, 753, 425, 15), "name", "");
form.AddField(nameField);
The 'CreateText()' method needs a 'PdfDocument' instance, a 'Rectangle', the name of the field, and a default value (in this case, the default value is an empty 'String'). Note that the label of the field and the widget annotation are two different things. We’ve added “Full name:” using a 'Paragraph'. That 'Paragraph' is part of the content stream. The field itself doesn’t belong in the content stream. It’s represented using a widget annotation.
Radio buttons
We create a radio field for choosing a language. Note that there is one radio group named 'language' with five unnamed button fields, one for each language that can be chosen:
//Create radio buttons
PdfButtonFormField group = PdfFormField.CreateRadioGroup(doc.GetPdfDocument(), "language", "");
PdfFormField.CreateRadioButton(doc.GetPdfDocument(), new Rectangle(130, 728, 15, 15), group, "English");
PdfFormField.CreateRadioButton(doc.GetPdfDocument(), new Rectangle(200, 728, 15, 15), group, "French");
PdfFormField.CreateRadioButton(doc.GetPdfDocument(), new Rectangle(260, 728, 15, 15), group, "German");
PdfFormField.CreateRadioButton(doc.GetPdfDocument(), new Rectangle(330, 728, 15, 15), group, "Russian");
PdfFormField.CreateRadioButton(doc.GetPdfDocument(), new Rectangle(400, 728, 15, 15), group, "Spanish");
form.AddField(group);
Only one language can be selected at a time. If multiple options could apply, we should have used check boxes.
Check boxes
In the next snippet, we’ll introduce three check boxes, named 'experience0', 'experience1', 'experience2':
//Create checkboxes
for (int i = 0; i < 3; i++) {
    PdfButtonFormField checkField = PdfFormField.CreateCheckBox(doc.GetPdfDocument(), new Rectangle(119 + i * 69, 701, 15, 15), String.Concat("experience", (i + 1).ToString()), "Off", PdfFormField.TYPE_CHECK);
    form.AddField(checkField);
}
As you can see, we use the 'CreateCheckBox()' method with the following parameters: the 'PdfDocument' object, a 'Rectangle', the name of the field, the current value of the field, and the appearance of the check mark.
A check box has two possible values: the value of the off state must be '"Off"'; the value of the on state is usually '"Yes"' (it’s the value iText uses by default), but some freedom is allowed here.
It’s also possible to have people select one or more option from a list or a combo box. In PDF terminology, we call this a choice field.
Choice field
Choice fields can be configured in a way that people can select only one of the options, or several options. In our example, we create a combo box.
//Create combobox
String[] options = new String[] { "Any", "6.30 am - 2.30 pm", "1.30 pm - 9.30 pm" };
PdfChoiceFormField choiceField = PdfFormField.CreateComboBox(doc.GetPdfDocument(), new Rectangle(163, 676, 115, 15), "shift", "Any", options);
form.AddField(choiceField);
Our choice field is named '"shift"' and it offers three 'options' of which '"Any"' is selected by default.
Multi-line field
We also see a multi-line field in the form. As opposed to the regular text field, where you can only add text in a single line, text in this field will be wrapped if it doesn’t fit on a single line.
//Create multiline text field
PdfTextFormField infoField = PdfTextFormField.CreateMultilineText(doc.GetPdfDocument(), new Rectangle(158, 625, 366, 40), "info", "");
form.AddField(infoField);
We’ll conclude our form with a push button.
Push button
In a real-world example we’d use a submit button that allows people to submit the data they’ve entered in the form to a server. Such PDF forms have become rare since HTML evolved to HTML 5 and related technologies, introducing much more user-friendly functionality to fill out form. We conclude the example by adding a reset button that will reset a selection of fields to their initial value when the button is clicked.
//Create push button field
PdfButtonFormField button = PdfFormField.CreatePushButton(doc.GetPdfDocument(), new Rectangle(479, 594, 45, 15), "reset", "RESET");
button.SetAction(PdfAction.CreateResetForm(new String[] { "name", "language", "experience1", "experience2", "experience3", "shift", "info" },0));
form.AddField(button);
If you want to create a PDF form using iText, you now have a fair idea of how it’s done. In many cases, it’s a much better idea to create a form manually, using a tool with a graphical user interface. You are then going to use iText to fill out this form automatically, for instance using data from a database.
Filling out a form
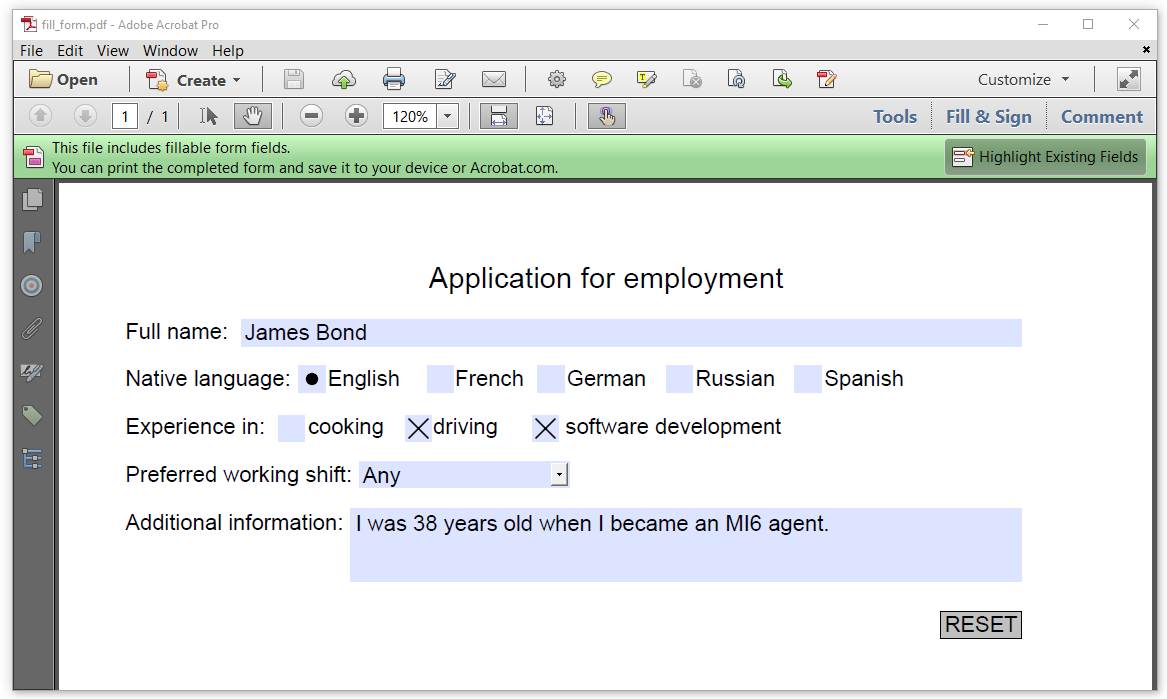
When we created our form, we could have defined default values, so that the form was filled out as shown in Figure 4.6.
We can still add these values after we've created the form. The CreateAndFill example shows us how.
IDictionary<String, PdfFormField> fields = form.GetFormFields();
PdfFormField toSet;
fields.TryGetValue("name", out toSet);
toSet.SetValue("James Bond");
fields["name"].SetValue("007");
fields.TryGetValue("language", out toSet);
toSet.SetValue("English");
fields.TryGetValue("experience1", out toSet);
toSet.SetValue("Off");
fields.TryGetValue("experience2", out toSet);
toSet.SetValue("Yes");
fields.TryGetValue("experience3", out toSet);
toSet.SetValue("Yes");
fields.TryGetValue("shift", out toSet);
toSet.SetValue("Any");
fields.TryGetValue("info", out toSet);
toSet.SetValue("I was 38 years old when I became an MI6 agent.");
doc.Close();
We asked the 'PdfAcroForm' to which we’ve added all the form field for its fields, and we get an'IDictionary' consisting of key-value pairs with the names and 'PdfFormField' objects of each field. We can get the 'PdfFormField' instances one by one, and set their value. Granted, this doesn’t make much sense. It would probably have been smarter to set the correct value right away the moment you create each field. A more common use case is to pre-fill an existing form.
Pre-filling an existing form
In the next example, we'll take an existing form, job_application.pdf, get a PdfAcroForm object from that form, and use the very same code to fill out that existing document. See the FillForm example.
//Initialize PDF document
PdfDocument pdf = new PdfDocument(new PdfReader(src), new PdfWriter(dest));
PdfAcroForm form = PdfAcroForm.GetAcroForm(pdf, true);
IDictionary<String, PdfFormField> fields = form.GetFormFields();
PdfFormField toSet;
fields.TryGetValue("name", out toSet);
toSet.SetValue("James Bond");
fields.TryGetValue("language", out toSet);
toSet.SetValue("English");
fields.TryGetValue("experience1", out toSet);
toSet.SetValue("Off");
fields.TryGetValue("experience2", out toSet);
toSet.SetValue("Yes");
fields.TryGetValue("experience3", out toSet);
toSet.SetValue("Yes");
fields.TryGetValue("shift", out toSet);
toSet.SetValue("Any");
fields.TryGetValue("info", out toSet);
toSet.SetValue("I was 38 years old when I became an MI6 agent.");
pdf.Close();
We introduce a new object in line 2. 'PdfReader' is a class that allows iText to access a PDF file and read the different PDF objects stored in a PDF file. In this case, 'src' holds the path to an existing form.
I/O is handled by two classes in iText.
-
PdfReaderis the input class; -
PdfWriteris the output class.
In line 2, we create a PdfWriter that will write a new version of the source file. Line 1 and 2 are different from what we did before. We now create a PdfDocument object using the reader and the writer object as parameters. We obtain a PdfAcroForm instance using the same getAcroForm() method as before. Lines 4 to 11 are identical to the lines we used to fill out the values of the fields we created from scratch. When we close the PdfDocument (line 12), we have a PDF that is identical to the one shown in Figure 4.6.
The form is still interactive: people can still change values if they want to. iText has been used in many applications to pre-fill forms. For instance: when people log in into an online service, a lot of information (e.g. name, address, phone number) is already known about them on the server side. When they need to fill out a form online, it doesn't make much sense to present them a blank file where they have to fill out their name, address and phone number all over again. Plenty of time can be saved if these values are already present in the form. This can be achieved by pre-filling the form with iText. People can check if the information is correct and if it isn't (for instance because their phone number changed), they can still change the content of the field.
Sometimes you don't want an end user to change information on a PDF. For instance: if the form is a voucher with a specific date and time, you don't want the end user to change that date and time. In that case, you'll flatten the form.
Flattening a form
When we add a single line to the previous code snippet, we get a PDF that is no longer interactive. The bar with the message "This file includes fillable form fields" has disappeared in Figure 4.7. When you click the name "James Bond", you can no longer manually change it.
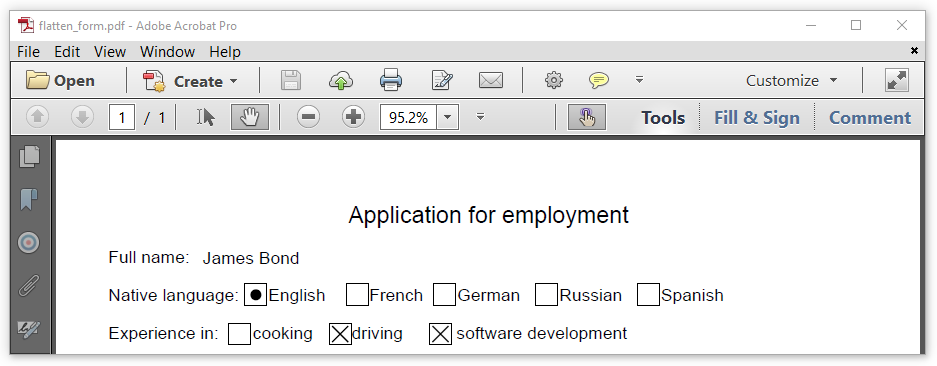
This extra line was added in the FlattenForm example.
//Initialize PDF document
PdfDocument pdf = new PdfDocument(new PdfReader(src), new PdfWriter(dest));
PdfAcroForm form = PdfAcroForm.GetAcroForm(pdf, true);
IDictionary<String, PdfFormField> fields = form.GetFormFields();
PdfFormField toSet;
fields.TryGetValue("name", out toSet);
toSet.SetValue("James Bond");
fields.TryGetValue("language", out toSet);
toSet.SetValue("English");
fields.TryGetValue("experience1", out toSet);
toSet.SetValue("Off");
fields.TryGetValue("experience2", out toSet);
toSet.SetValue("Yes");
fields.TryGetValue("experience3", out toSet);
toSet.SetValue("Yes");
fields.TryGetValue("shift", out toSet);
toSet.SetValue("Any");
fields.TryGetValue("info", out toSet);
toSet.SetValue("I was 38 years old when I became an MI6 agent.");
form.FlattenFields();
pdf.Close();
Summary
We started this chapter by looking as a handful of annotation types:
-
a text annotation,
-
a link annotation,
-
a line annotation, and
-
a text markup annotation.
We also mentioned widget annotations. This led us to the subject of interactive forms. We learned how to create a form, but more importantly how to fill out and flatten a form.
In the fill and flatten examples, we encountered a new class, PdfReader. In the next chapter, we'll take a look at some more examples that use this class.