Chapter 4: Adding AbstractElement objects (part 1)
Which version?
This Tutorial was written with iText 7.0.x in mind, however, if you go to the linked Examples you will find them for the latest available version of iText. If you are looking for a specific version, you can always download these examples from our GitHub repo (Java/.NET).
In previous chapters, we've already discussed five classes that implement the AbstractElement class. We've discussed the AreaBreak class in chapter 2, and we've discussed the four classes implementing the ILeafElement -Tab, Link, Text, and Image - in chapter 3. In this chapter, we'll start with a first series of AbstractElement implementations. We'll take a look at the Div class to group elements and at the LineSeparator to draw lines between elements. We've already used the Paragraph class many times in previous chapters, but we'll revisit it in this chapter. Finally, we'll introduce the List and the ListItem class. We'll save the Table and Cell class for the next chapter.
Grouping elements with the Div class
The Div class is a BlockElement implementation that can be used to group different elements. In Figure 4.1, we see an overview of movies based on the Jekyll and Hyde story. Each entry consists of at most three elements:
a
Paragraphshowing the title of the movie,a
Paragraphshowing the director, the country, and a year,an
Imageshowing the movie poster (if any).
We combined these three elements in a Div and we defined a left border, left padding and bottom margin for that Div.
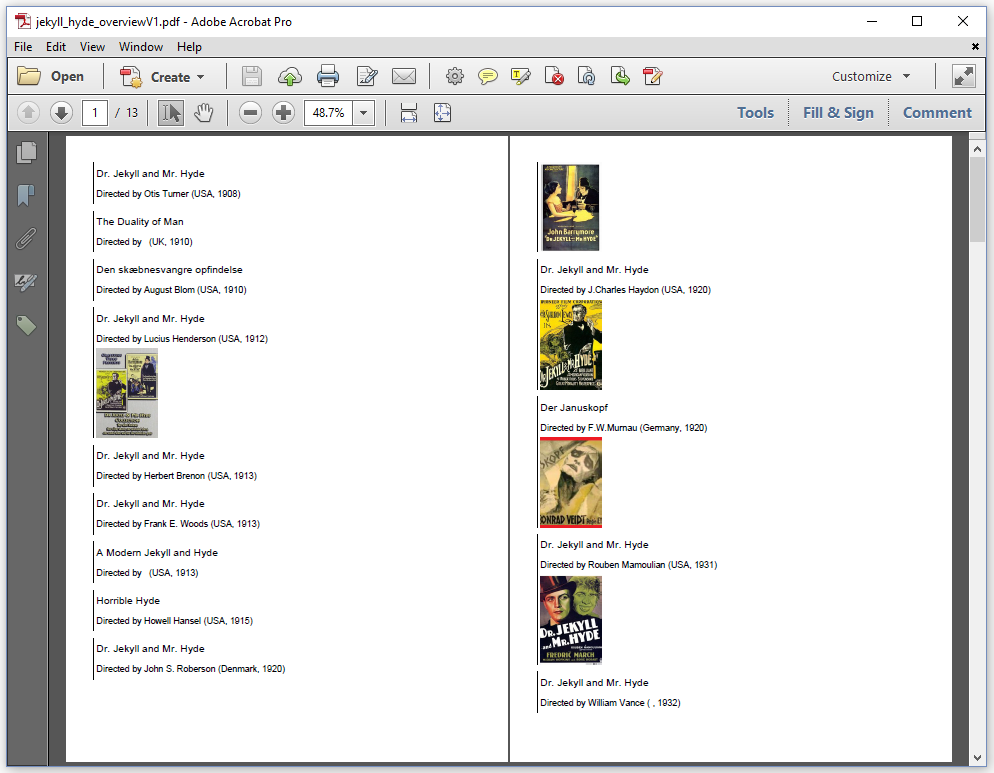
Figure 4.1: Grouping elements in a Div
The DivExample1 example shows how this is done:
public void createPdf(String dest) throws IOException {
    PdfDocument pdf = new PdfDocument(new PdfWriter(dest));
    Document document = new Document(pdf);
    List> resultSet = CsvTo2DList.convert(SRC, "|");
    resultSet.remove(0);
    for (List record : resultSet) {
        Div div = new Div()
            .setBorderLeft(new SolidBorder(2))
            .setPaddingLeft(3)
            .setMarginBottom(10);
        String url = String.format(
            "https://www.imdb.com/title/tt%s", record.get(0));
        Link movie = new Link(record.get(2), PdfAction.createURI(url));
        div.add(new Paragraph(movie.setFontSize(14)))
            .add(new Paragraph(String.format(
                "Directed by %s (%s, %s)",
                record.get(3), record.get(4), record.get(1))));
        File file = new File(String.format(
            "src/main/resources/img/%s.jpg", record.get(0)));
        if (file.exists()) {
            Image img = new Image(
                ImageDataFactory.create(file.getPath()));
            img.scaleToFit(10000, 120);
            div.add(img);
        }
        document.add(div);
    }
    document.close();
}
As usual, we create a PdfDocument and a Document instance (line 2-3). We reuse the CSV file that was introduced in the previous chapter, and we loop over all the movies listed in that CSV file, excluding the header row (line 4-6). We create a new Div object (line 7) and we define the left border as a solid border with a thickness of 2 user units (line 8), we set the left padding to 3 user units (line 9), and we introduce a bottom margin of 10 user units (line 10). We add the title Paragraph to this Div (line 14), as well as a Paragraph with additional info (line 15 - 17). If we find a movie poster, we add it as an Image (line 24). We add each Div to the document (line 26) and we close the document (line 28).
If we look at the bottom of the first page and at the top of the second page in Figure 4.1, we see that the Div containing the information about the movie "Dr. Jekyll and Mr. Hyde" directed by John S. Roberson, is distributed over two pages. The movie poster didn't fit on the first page, so it was forwarded to the second page. Maybe this isn't the behavior we desire. Maybe we want to keep the elements added to the same Div together as shown in figure 4.2.
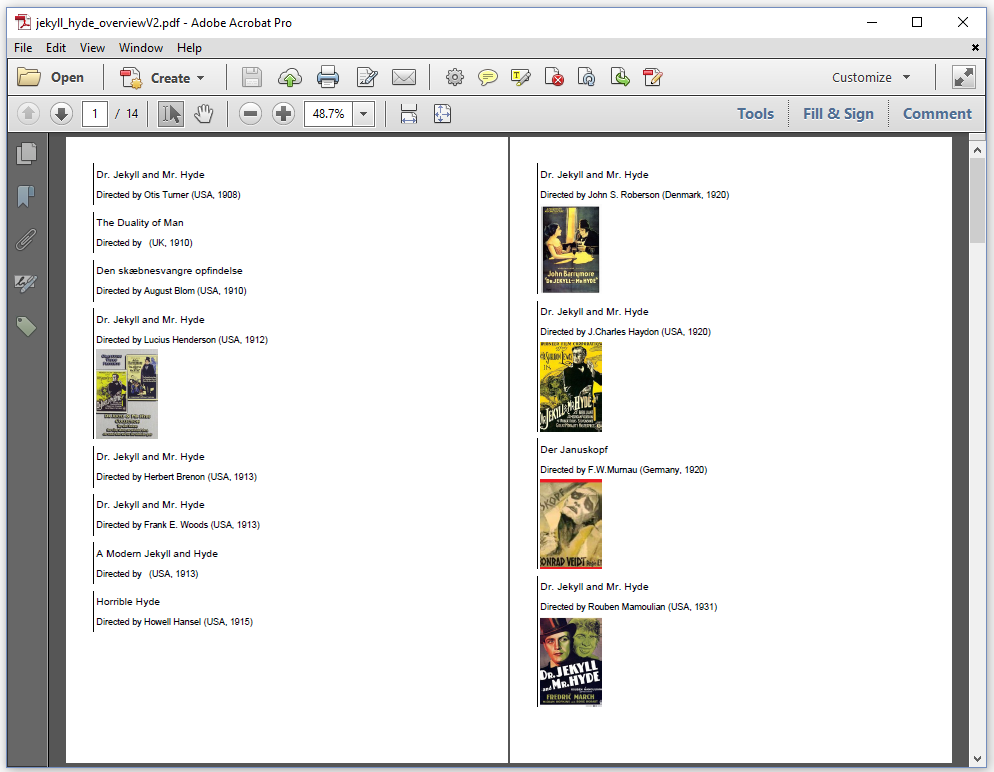
Figure 4.2: Keeping a Div on one page
We use only one extra method to achieve this; see the DivExample2 example.
Div div = new Div()
    .setKeepTogether(true)
    .setBorderLeft(new SolidBorder(2))
    .setPaddingLeft(3)
    .setMarginBottom(10);
By adding setKeepTogether(true), we tell iText to try to keep the content of a Div on the same page. If the content of that Div fits on the next page, all the elements in the Div will be forwarded to the next page. This is the case in figure 4.2 where the title and the info about the 1920 movie "Dr. Jekyll and Mr. Hyde" directed by John S. Roberson is no longer added on the first page. Instead it's forwarded to the next page.
This approach won't work if the content of a Div doesn't fit on the next page. In that case, the elements are distributed over the current page and subsequent pages as if the setKeepTogether() method wasn't used. There's a workaround in case you really want to keep one element on the same page as the next element. We'll look at an example demonstrating this workaround after we've discussed the LineSeparator object.
Drawing horizontal lines with the LineSeparator object
The building blocks created for iText are inspired by the tags that are available for HTML. That's not a secret. The Text object roughly corresponds with <span>, Paragraph corresponds with <p>, Div corresponds with <div>, and so on. The best way to explain what the LineSeparator is about, is to say that it corresponds with the <hr> tag. Figure 4.3 shows a horizontal rule consisting of a red line, 1 user unit thick, that takes 50% of the available width, for which a top margin of 5 user units was defined.
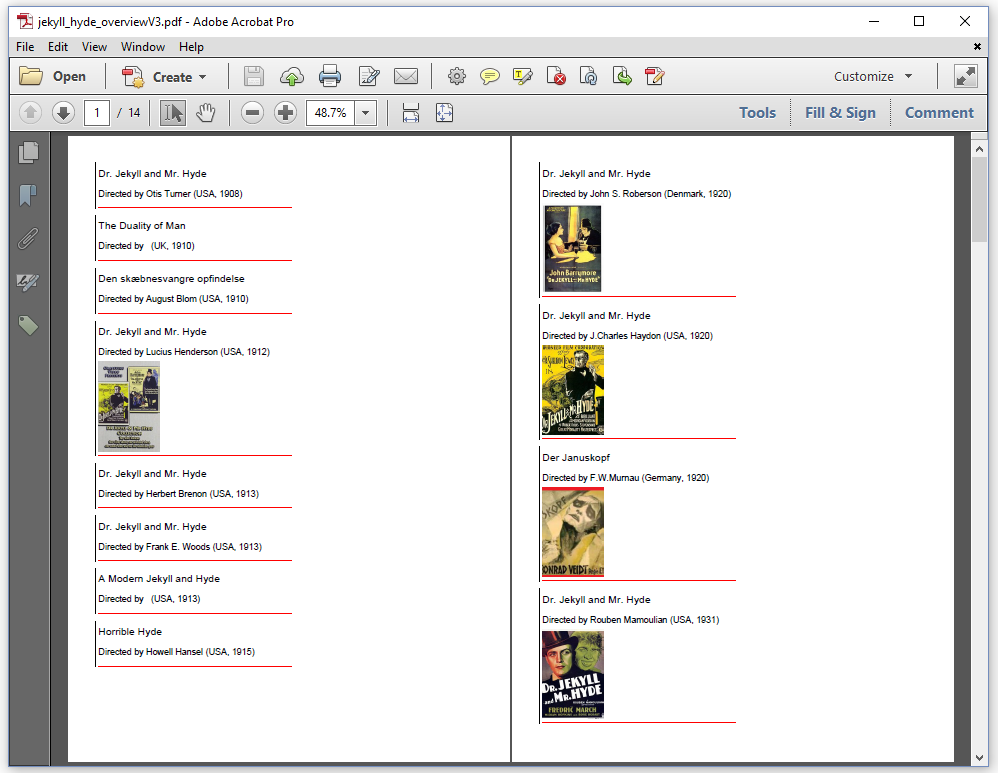
Figure 4.3: Using a LineSeparator
The LineSeparatorExample example shows how it's done.
SolidLine line = new SolidLine(1f);
line.setColor(Color.RED);
LineSeparator ls = new LineSeparator(line);
ls.setWidthPercent(50);
ls.setMarginTop(5);
We create a SolidLine object, passing a parameter that defines the thickness. We remember from the previous chapter that SolidLine is one of the implementations of the ILineDrawer interface. We set its color to red and we use this ILineDrawer to create a LineSeparator instance. In this case, we define the width of the line using the setWidthPercent() method. We could also have used the setWidth() method to define an absolute width expressed in user units. Finally, we set the top margin to 5 user units.
In the LineSeparatorExample, we add the ls object to our Div element containing information about a movie.
div.add(ls);There isn't much more to be said about LineSeparator. Just make sure that you use the right methods to set properties. For instance: you can't change the color of a line at the level of the LineSeparator, you have to set it at the level of the ILineDrawer. The same goes for the thickness of the line. Check Appendix B to find out which AbstractElement methods are implemented for the LineSeparator class, and which methods are ignored.
Keeping content together
We've been working with the Paragraph class many times in previous examples. For instance: in chapter 2, we've used the Paragraph class to convert a text file to PDF by creating a Paragraph object for each line in the text file, and by adding all of these Paragraph objects to a Document instance one way or another. The screen shots in the previous chapters showed that we can make some really nice PDF documents, but there's always room for improvement.
Figure 4.4 demonstrates one of the flaws that we still need to fix: we have the title of a chapter on page 3, but the content of that chapter starts on page 4.
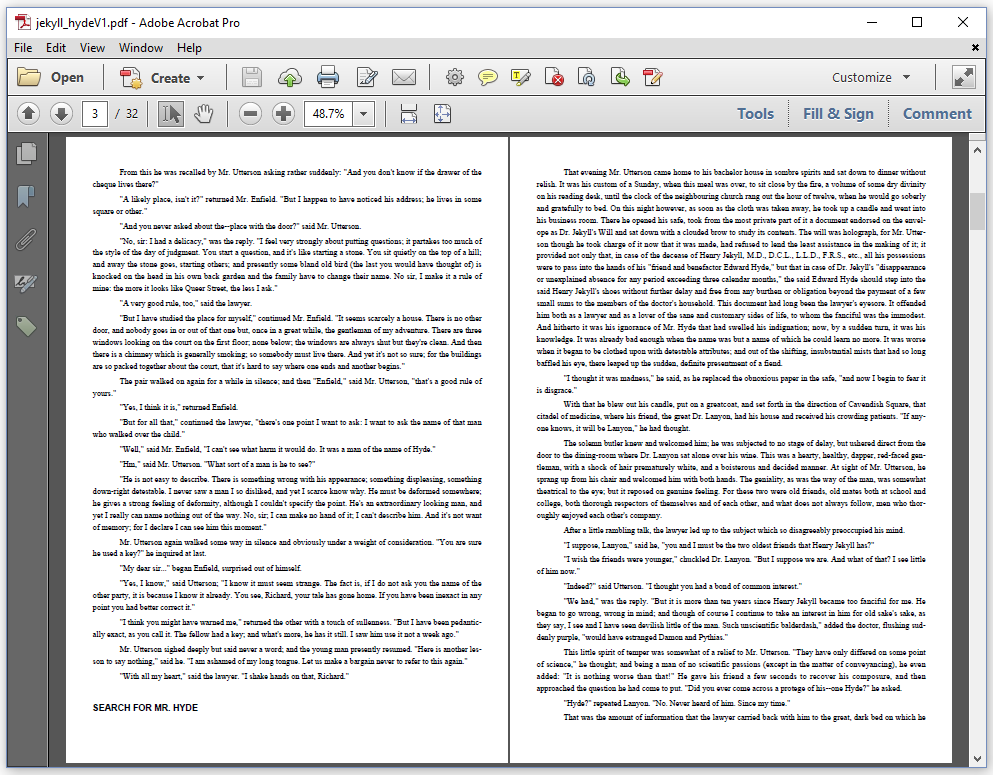
Figure 4.4: a widowed title
We'd like to avoid this kind of behavior. We'd like the title to be on the same page as the start of the content of the chapter. We do a first attempt to fix this problem in the ParagraphAndDiv1 example.
public void createPdf(String dest) throws IOException {
    PdfDocument pdf = new PdfDocument(new PdfWriter(dest));
    Document document = new Document(pdf);
    PdfFont font = PdfFontFactory.createFont(FontConstants.TIMES_ROMAN);
    PdfFont bold = PdfFontFactory.createFont(FontConstants.HELVETICA_BOLD);
    document.setTextAlignment(TextAlignment.JUSTIFIED)
        .setHyphenation(new HyphenationConfig("en", "uk", 3, 3));
    BufferedReader br = new BufferedReader(new FileReader(SRC));
    String line;
    Div div = new Div();
    while ((line = br.readLine()) != null) {
        Paragraph title = new Paragraph(line)
            .setFont(bold).setFontSize(12)
            .setMarginBottom(0);
        div = new Div()
            .add(title)
            .setFont(font).setFontSize(11)
            .setMarginBottom(18);
        while ((line = br.readLine()) != null) {
            div.add(
                new Paragraph(line)
                    .setMarginBottom(0)
                    .setFirstLineIndent(36)
            );
            if (line.isEmpty()) {
                document.add(div);
                break;
            }
        }
    }
    document.add(div);
    document.close();
}
This example is very similar to the examples we made in chapter 2. The main difference is that we no longer add the Paragraph objects straight to the Document. Instead, we store the Paragraph objects in a Div object, and we add the Div object to the Document at the end of each chapter.
We could add .setKeepTogether(true) between line 15 and 16, but that wouldn't have any effect as the full content of the Div doesn't fit on a single page. As documented before, the setKeepTogether() method is ignored. We've had long discussions at iText on how to solve this problem. We decided that the most elegant way to avoid widowed objects consisted of introducing a setKeepWithNext() method.
The setKeepWithNext() method was introduced in iText 7.0.1. You won't find it in the very first iText 7 release. We're investigating if we could support the method for nested objects. We're reluctant to do this because this could have a significant negative impact on the overall performance of the library.
The ParagraphAndDiv2 example shows how it's used.
BufferedReader br = new BufferedReader(new FileReader(SRC));
String line;
Div div = new Div();
while ((line = br.readLine()) != null) {
    document.add(new Paragraph(line)
        .setFont(bold).setFontSize(12)
        .setMarginBottom(0)
        .setKeepWithNext(true));
    div = new Div()
        .setFont(font).setFontSize(11)
        .setMarginBottom(18);
    while ((line = br.readLine()) != null) {
        div.add(
            new Paragraph(line)
                .setMarginBottom(0)
                .setFirstLineIndent(36)
        );
        if (line.isEmpty()) {
            document.add(div);
            break;
        }
    }
}
document.add(div);
We use a Paragraph added straight to the Document for the title (line 5); we create a Div to combine the rest of the content in the chapter (line 9). We indicate that the Paragraph needs to be kept on the same page as (the first part of) the Div by adding setKeepWithNext(true). The result is shown in figure 4.5. The title "SEARCH FOR MR. HYDE" is now forwarded to the next page when compared to figure 4.4.
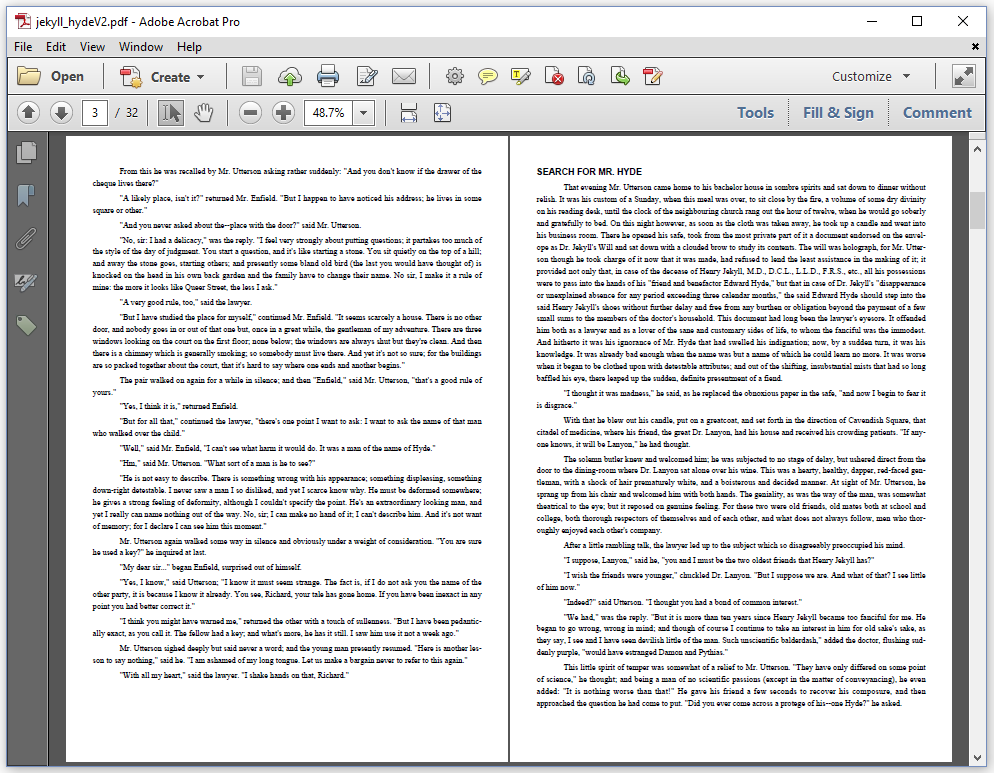
Figure 4.5: keeping the title together with the text
The setKeepWithNext() method can be used with all other AbstractElement implementations, except Cell. The method only works for elements added straight to the Document instance. It doesn't work for nested objects such as a Cell that is always added to a Table and never straight to a Document. In the case of our example, it wouldn't work if the title Paragraph was added to the Div instead of to the Document.
Changing the leading of a Paragraph
The Paragraph class has some extra methods on top of the methods defined at the AbstractElement level. We've already used the methods involving TabStops in the previous chapter. We also introduced the setFirstLineIndent() method on the sly. Now we are going to look at a method to change the leading.
The word leading is pronounced as ledding, and it's derived from the word lead (the metal). When type was set by hand for printing presses, strips of lead were placed between lines of type to add space. The word originally referred to the thickness of these strips of lead that were placed between the lines. The PDF standard redefines the leading as "the vertical distance between the baselines of adjacent lines of text" (ISO-32000-1, section 9.3.5).
There are two ways to change the leading of a Paragraph:
setFixedLeading()- changes the leading to an absolute value. For instance: if you define a fixed leading of 18, the distance between the baseline of two lines of text will be 18 user units.setMultipliedLeading- changes the leading to a value relative to the font size. For instance, if you define a multiplied leading of 1.5f and the font is 12 pt, then the leading will be 18 user units (which is 1.5 times 12).
These methods are mutually exclusive. If you use both methods on the same Paragraph, the last method that was invoked will prevail. Figure 4.6 shows yet another conversion of the story to PDF. The total number of pages is lower because we changed the distance between the lines by adding .setMultipliedLeading(1.2f).
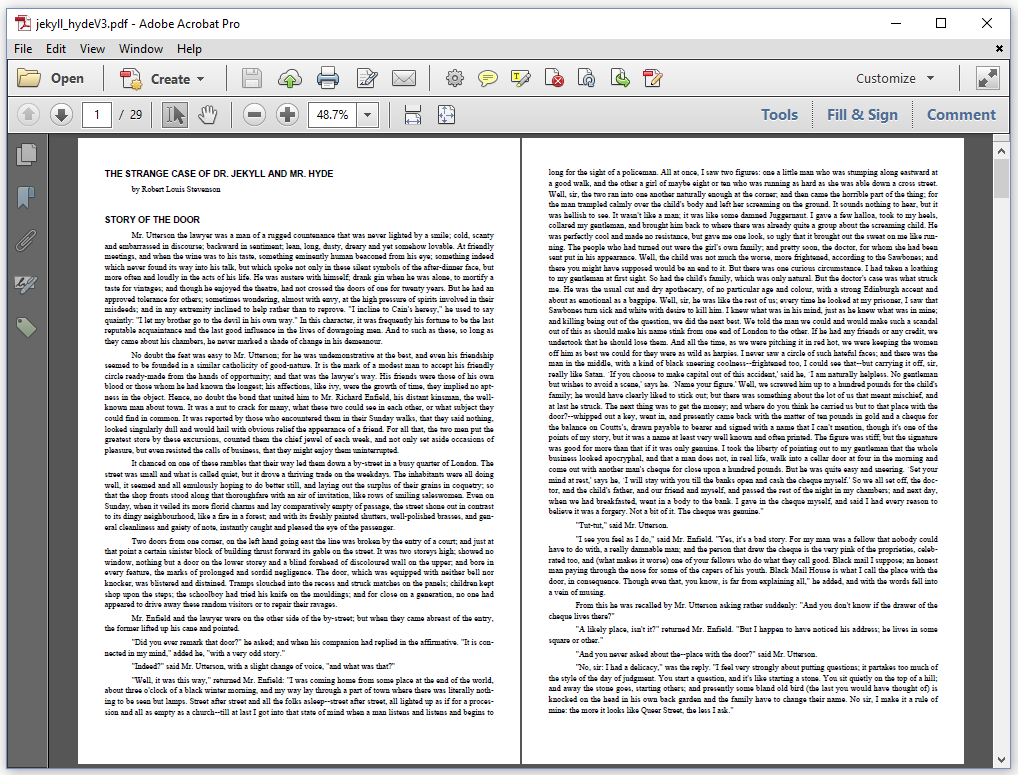
Figure 4.6: changing indentation and leading
The code of the ParagraphAndDiv3 example is identical to what we had in the previous example, except for the following snippet.
div.add(
    new Paragraph(line)
        .setMarginBottom(0)
        .setFirstLineIndent(36)
        .setMultipliedLeading(1.2f)
);
When we add an object to a Document either directly or indirectly (e.g. through a Div), iText uses the appropriate IRenderer to render this object to PDF. In the "Before we start" section of this book, figure 0.4 shows an overview of the different renderers. Normal use of iText hardly ever requires creating a custom renderer, but we'll take a look at one example in which we create a MyParagraphRenderer extending the default ParagraphRenderer.
Creating a custom renderer
When we look at figure 4.7, we see two Paragraphs with a different background. For the first Paragraph, we used the .setBackgroundColor() method. This method draws a rectangle based on the position of the Paragraph. For the second Paragraph, we wanted a rectangle with rounded corners. As iText doesn't have a method to achieve this, we wrote a custom ParagraphRenderer class.
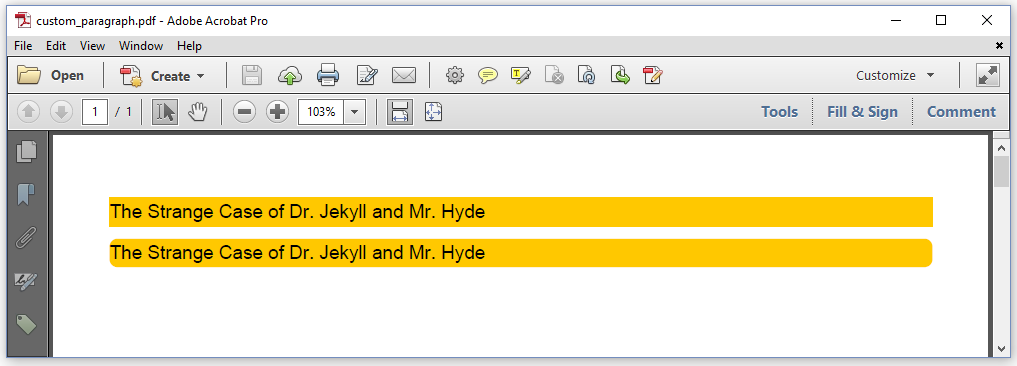
Figure 4.7: default and custom background for a Paragraph
Let's take a look at the CustomParagraph example to see the difference between the two approaches. The first Paragraph was added like this:
Paragraph p1 = new Paragraph(
    "The Strange Case of Dr. Jekyll and Mr. Hyde");
p1.setBackgroundColor(Color.ORANGE);
document.add(p1);


The second Paragraph was added like this:

Paragraph p2 = new Paragraph(
    "The Strange Case of Dr. Jekyll and Mr. Hyde");
p2.setBackgroundColor(Color.ORANGE);
p2.setNextRenderer(new MyParagraphRenderer(p2));
document.add(p2);


This second approach requires an extra class:

class MyParagraphRenderer extends ParagraphRenderer {
    public MyParagraphRenderer(Paragraph modelElement) {
        super(modelElement);
    }
    @Override
    public void drawBackground(DrawContext drawContext) {
        Background background =
            this.<Background>getProperty(Property.BACKGROUND);
        if (background != null) {
            Rectangle bBox = getOccupiedAreaBBox();
            boolean isTagged =
                drawContext.isTaggingEnabled()
                && getModelElement() instanceof IAccessibleElement;
            if (isTagged) {
                drawContext.getCanvas().openTag(new CanvasArtifact());
            }
            Rectangle bgArea = applyMargins(bBox, false);
            if (bgArea.getWidth() <= 0 || bgArea.getHeight() <= 0) {
                return;
            }
            drawContext.getCanvas().saveState()
                .setFillColor(background.getColor())
                .roundRectangle(
                (double)bgArea.getX() - background.getExtraLeft(),
                (double)bgArea.getY() - background.getExtraBottom(),
                (double)bgArea.getWidth()
                    + background.getExtraLeft() + background.getExtraRight(),
                (double)bgArea.getHeight()
                    + background.getExtraTop() + background.getExtraBottom(),
                5)
                .fill().restoreState();
            if (isTagged) {
                drawContext.getCanvas().closeTag();
            }
        }
    }
}
We extend the existing ParagraphRenderer class and we override one single method. We take the original drawBackground() method from the AbstractRenderer class, and we replace the rectangle() method with the roundRectangle() method (line 23). As you can see in line 24-29. the dimension of the rectangle can be fine-tuned with extra space to the left, right, top, and bottom. These values can be passed to the internal Background object by using a different flavor of the setBackgroundColor() method that takes 4 extra float values (extraLeft, extraTop, extraRight, and extraBottom).
We'll conclude this chapter with some examples involving the List and ListItem class.
Lists and list symbols
Figure 4.8 shows the different types of lists that are available by default. We recognized numbered lists (Roman and Arabic numbers), lists with letters of the alphabet (lowercase, uppercase, Latin, Greek), and so on.
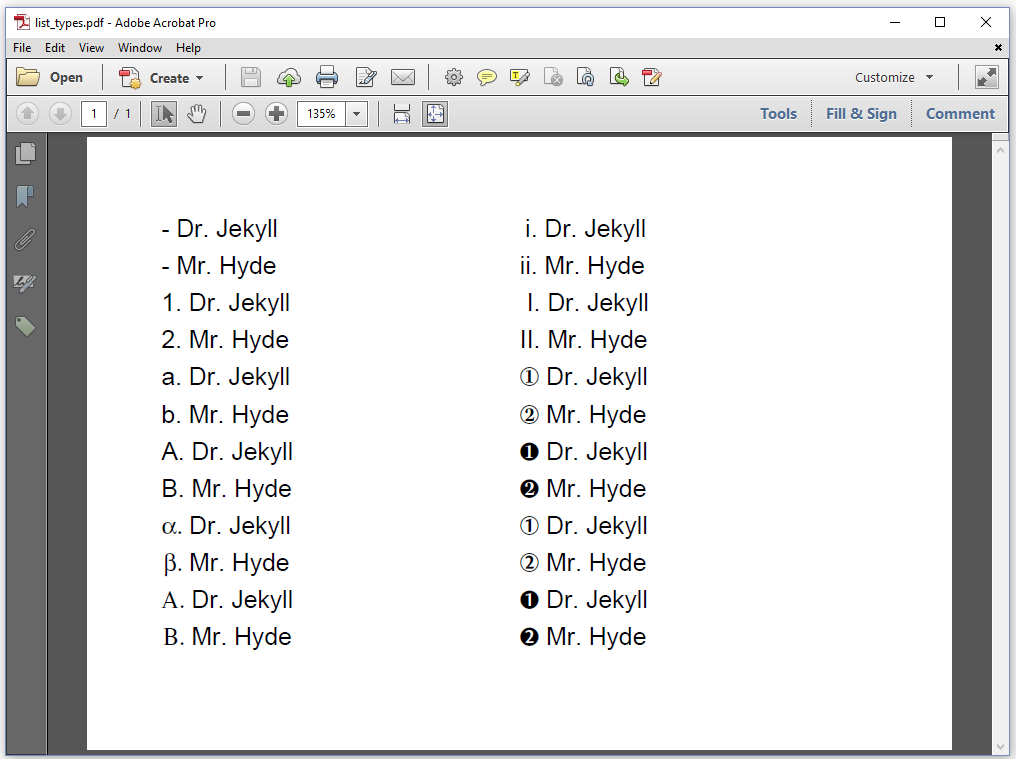
Figure 4.8: different types of lists
The ListTypes example shows how the first three lists are added.
List list = new List();
list.add("Dr. Jekyll");
list.add("Mr. Hyde");
document.add(list);
list = new List(ListNumberingType.DECIMAL);
list.add("Dr. Jekyll");
list.add("Mr. Hyde");
document.add(list);
list = new List(ListNumberingType.ENGLISH_LOWER);
list.add("Dr. Jekyll");
list.add("Mr. Hyde");
document.add(list);
In line 1, we create a list without specifying a type. By default, this will result in a list with hyphens as list symbols. We add two list items the quick and dirty way in line 2-3; then we add the list to the Document in line 4. We repeat these four lines many times, first we create a decimal list (line 5), then we define an alphabetic list with lowercase letters (line 9).
The parameters we use to create different types of lists are stored in an enum. This ListNumberingType enumeration consists of the following values:
DECIMAL -the list symbols are Arabic numbers: 1, 2, 3, 4, 5,...ROMAN_LOWER -the list symbols are lowercase Roman numbers: i, ii, iii, iv, v,...ROMAN_UPPER -the list symbols are uppercase Roman numbers: I, II, III, IV, V,...ENGLISH_LOWER -the list symbols are lowercase alphabetic letters (using the English alphabet): a, b, c, d, e,...ENGLISH_UPPER -the list symbols are uppercase alphabetic letters (using the English alphabet): A, B, C, D, E,...GREEK_LOWER -the list symbols are lowercase Greek letters: α, β, γ, δ, ε,...GREEK_UPPER -the list symbols are uppercase Greek letters: Α, Β, Γ, Δ, Ε,...ZAPF_DINGBATS_1 -the list symbols are bullets from the Zapfdingbats font, more specifically characters in the range [172; 181].ZAPF_DINGBATS_2 -the list symbols are bullets from the Zapfdingbats font, more specifically characters in the range [182; 191].ZAPF_DINGBATS_3 -the list symbols are bullets from the Zapfdingbats font, more specifically characters in the range [192; 201].ZAPF_DINGBATS_4 -the list symbols are bullets from the Zapfdingbats font, more specifically characters in the range [202; 221].
Obviously, we can also define our own custom list symbols, or we can use a combination of the default list symbols (e.g. numbers) and combine them with a prefix or a suffix. That's demonstrated in figure 4.9.
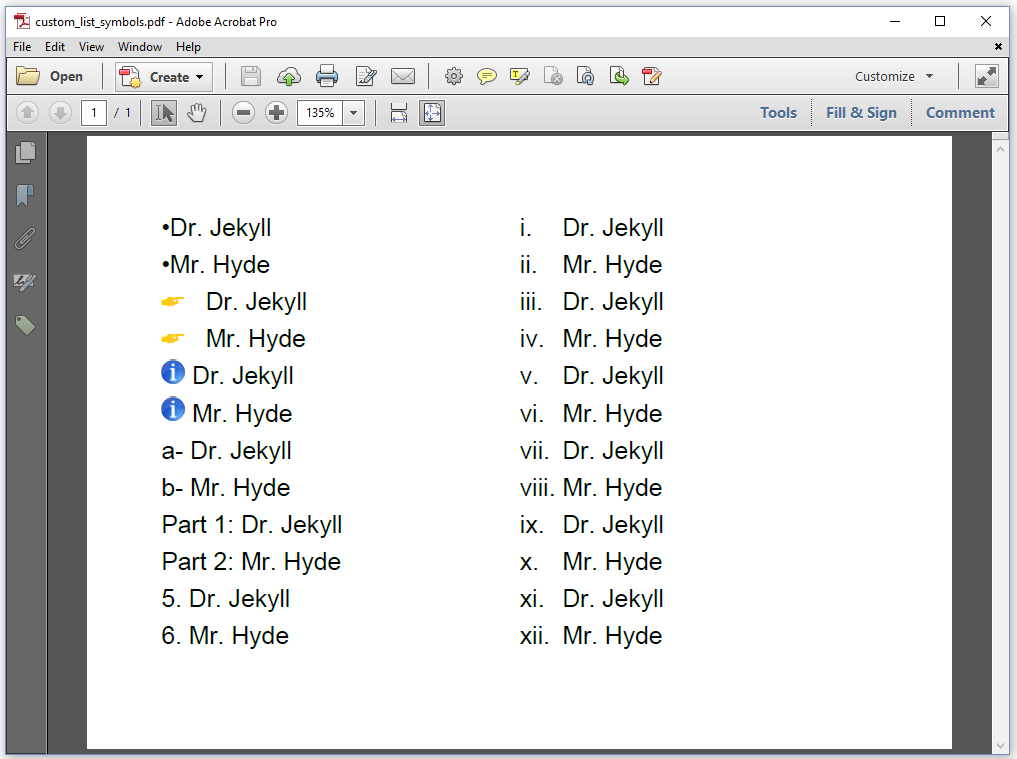
Figure 4.9: custom list symbols
The PDF in the screen shot of figure 4.9 was the result of the CustomListSymbols example. We'll examine this example snippet by snippet.
First we take a look at how we can introduce a simple bullet as list symbol, instead of the default hyphen.
List list = new List();
list.setListSymbol("\u2022");
list.add("Dr. Jekyll");
list.add("Mr. Hyde");
document.add(list);
We create a List and we use the setListSymbol() method to change the list symbol. We can use any String as list symbol. In our case, we want a single bullet. The Unicode value of the bullet character is /u2022. If you examine the screen shot, you notice that the bullet is rather close to the content of the list items. We can change this by defining an indentation using the setSymbolIndent() method as is done in the next code snippet.
list = new List();
PdfFont font = PdfFontFactory.createFont(FontConstants.ZAPFDINGBATS);
list.setListSymbol(new Text("*").setFont(font).setFontColor(Color.ORANGE));
list.setSymbolIndent(10);
list.add("Dr. Jekyll");
list.add("Mr. Hyde");
document.add(list);
Here we set the list symbol to *, but we use a Text object instead of a String. and we set the font to ZapfDingbats. We also change the font color to orange. This results in a list symbol that looks as an orange pointing finger. In the next snippet, we use an Image object as a list symbol.
Image info = new Image(ImageDataFactory.create(INFO));
info.scaleAbsolute(12, 12);
list = new List().setSymbolIndent(3);
list.setListSymbol(info);
list.add("Dr. Jekyll");
list.add("Mr. Hyde");
document.add(list);
In line 1. we create an Image object; INFO contains the path to a blue info bullet. We scale the image so that it measures 12 by 12 user units, and we pass the Image as a parameter of the setListSymbol() method.
In the default list types, iText always added a dot after the list symbol of numbered lists: a., b., c., and so on. Maybe we don't want this dot. Maybe we want the list symbols to look like this: a-, b-, c-, and so on. The following code snippet shows how to achieve this.
list = new List();
list.setListSymbol(ListNumberingType.ENGLISH_LOWER);
list.setPostSymbolText("- ");
list.add("Dr. Jekyll");
list.add("Mr. Hyde");
document.add(list);
Line 1 and 2 are the equivalent of list = new List(ListNumberingType.ENGLISH_LOWER); It results in a numbered list using the English alphabet. We use the setPostSymbolText() method to replace the dot that is automatically added after each letter with "- ".
There's also a setPreSymbolText() method to add text in front of the default list symbol. The following code snippet creates a decimal list (1., 2., 3.,...), but by adding a pre- and a post-symbol, the list symbols have become list labels that look like this: Part 1:, Part 2:, Part 3:, and so on.
list = new List(ListNumberingType.DECIMAL);
list.setPreSymbolText("Part ");
list.setPostSymbolText(": ");
list.add("Dr. Jekyll");
list.add("Mr. Hyde");
document.add(list);
Not every numbered list needs to start with 1, i, a, and so on. You can also choose to start with a higher number (or letter) using the setItemStartIndex() method. In the following code sample, we start counting at 5.
list = new List(ListNumberingType.DECIMAL);
list.setItemStartIndex(5);
list.add("Dr. Jekyll");
list.add("Mr. Hyde");
document.add(list);
Finally, we'll use the setListSymbolAlignment() to change the alignment of the labels. If you compare the lowercase Roman numbers list in figure 4.8 with the one in figure 4.9, you'll see a difference in the way the list labels are aligned.
list = new List(ListNumberingType.ROMAN_LOWER);
list.setListSymbolAlignment(ListSymbolAlignment.LEFT);
for (int i = 0; i < 6; i++) {
    list.add("Dr. Jekyll");
    list.add("Mr. Hyde");
}
document.add(list);
So far, we've always added list items to a list using Strings. These String values are changed into ListItems internally.
Adding ListItem objects to a List
Looking at the class diagram in the "Before we start" section of this book, we notice that ListItem is a subclass of the Div class. We can add different objects to a ListItem just like we did with the Div object, but now we do so in the context of a list.
Let's do the test and adapt one of the first examples of this chapter to use ListItems instead of Divs. Figure 4.10 shows the result.
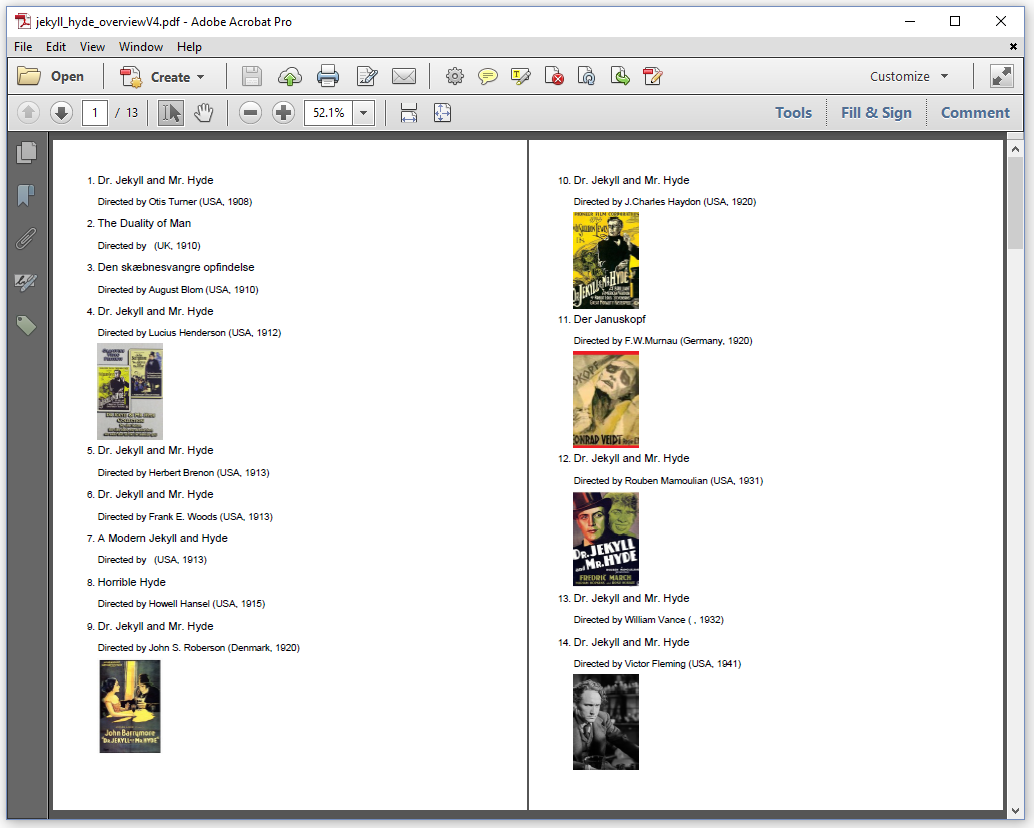
Figure 4.10: List items
The code of the ListItemExample example is very similar to the code of the Div examples.
public void createPdf(String dest) throws IOException {
    PdfDocument pdf = new PdfDocument(new PdfWriter(dest));
    Document document = new Document(pdf);
    List> resultSet = CsvTo2DList.convert(SRC, "|");
    resultSet.remove(0);
    com.itextpdf.layout.element.List list =
        new com.itextpdf.layout.element.List(ListNumberingType.DECIMAL);
    for (List record : resultSet) {
        ListItem li = new ListItem();
        li.setKeepTogether(true);
        String url = String.format(
            "https://www.imdb.com/title/tt%s", record.get(0));
        Link movie = new Link(record.get(2), PdfAction.createURI(url));
        li.add(new Paragraph(movie.setFontSize(14)))
            .add(new Paragraph(String.format(
                "Directed by %s (%s, %s)",
                record.get(3), record.get(4), record.get(1))));
        File file = new File(String.format(
            "src/main/resources/img/%s.jpg", record.get(0)));
        if (file.exists()) {
            Image img = new Image(ImageDataFactory.create(file.getPath()));
            img.scaleToFit(10000, 120);
            li.add(img);
        }
        list.add(li);
    }
    document.add(list);
    document.close();
}
As we already use a java.util.List (line 4), we need to fully qualify com.itextpdf.layout.element.List (line 6) to avoid ambiguity for our compiler. We use iText's List class to create a numbered list (line 7). We create a ListItem for every item in the java.util.List (line 9). We add Paragraphs and an Image (if present) to each ListItem (line 11-24). We add each ListItem to the List (line 25), and eventually we add the List to the Document (line 27).
Nested lists
In the final example of this chapter, we'll create nested lists as shown in figure 4.11.
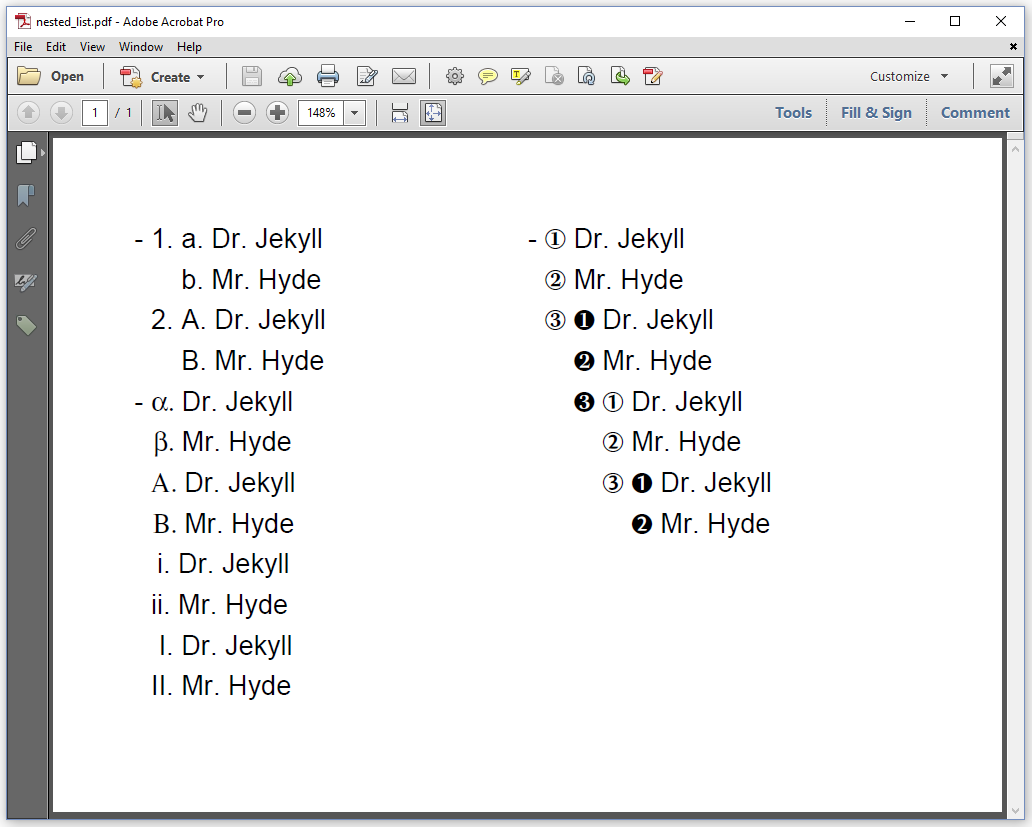
Figure 4.11: nested lists
The NestedLists example is rather artificial, so please bear with me. We start with an ordinary list, named list. That's the list with the hyphens as list symbols.
List list = new List();We create a numbered list list1 (line 1). This list will have two ListItems, liEL (line 5) and liEU (line 11). We create a new List to be added to each of these list items respectively: listEL (line 2; lowercase English letters) and listEU (line 8, uppercase English letters). We add list items "Dr. Jekyll" and "Mr. Hyde" to each of these lists (line 3-4; line 9-10).
List list1 = new List(ListNumberingType.DECIMAL);
List listEL = new List(ListNumberingType.ENGLISH_LOWER);
listEL.add("Dr. Jekyll");
listEL.add("Mr. Hyde");
ListItem liEL = new ListItem();
liEL.add(listEL);
list1.add(liEL);
List listEU = new List(ListNumberingType.ENGLISH_UPPER);
listEU.add("Dr. Jekyll");
listEU.add("Mr. Hyde");
ListItem liEU = new ListItem();
liUL.add(listEU);
list1.add(liEU);
ListItem li1 = new ListItem();
li1.add(list1);
list.add(li1);
When we look at figure 4.11, we see the hyphen, we see a numbered list with list symbols 1. and 2.. Nested inside these lists are two lists using the English alphabet (lower- and uppercase).
In the next snippet, we create an extra ListItem for list, more specifically li (line 1). We add four lists to this ListItem: listGL (line 2), listGU (line 6), listRL (line 10), and listRU (line 14). These lists are added one after the other (Greek lowercase, Greek uppercase, Roman numbers lowercase, Roman number uppercase) to the list item with the default list symbol.
ListItem li = new ListItem();
List listGL = new List(ListNumberingType.GREEK_LOWER);
listGL.add("Dr. Jekyll");
listGL.add("Mr. Hyde");
li.add(listGL);
List listGU = new List(ListNumberingType.GREEK_UPPER);
listGU.add("Dr. Jekyll");
listGU.add("Mr. Hyde");
li.add(listGU);
List listRL = new List(ListNumberingType.ROMAN_LOWER);
listRL.add("Dr. Jekyll");
listRL.add("Mr. Hyde");
li.add(listRL);
List listRU = new List(ListNumberingType.ROMAN_UPPER);
listRU.add("Dr. Jekyll");
listRU.add("Mr. Hyde");
li.add(listRU);
list.add(li);
Furthermore, we create a list listZ1 with numbered ZapfDingbats bullets. We add this list to a list item named listZ1.
List listZ1 = new List(ListNumberingType.ZAPF_DINGBATS_1);
listZ1.add("Dr. Jekyll");
listZ1.add("Mr. Hyde");
ListItem liZ1 = new ListItem();
liZ1.add(listZ1);
We create a second list listZ2 with a different set of ZapfDingbats bullets. We add this list to a list item named listZ2.
List listZ2 = new List(ListNumberingType.ZAPF_DINGBATS_2);
listZ2.add("Dr. Jekyll");
listZ2.add("Mr. Hyde");
ListItem liZ2 = new ListItem();
liZ2.add(listZ2);
We create a second list listZ3 with another set of ZapfDingbats bullets. We add this list to a list item named listZ3.
List listZ3 = new List(ListNumberingType.ZAPF_DINGBATS_3);
listZ3.add("Dr. Jekyll");
listZ3.add("Mr. Hyde");
ListItem liZ3 = new ListItem();
liZ3.add(listZ3);
We create a final list listZ4 with yet another set of ZapfDingbats bullets. We add this list to a list item named listZ4.
List listZ4 = new List(ListNumberingType.ZAPF_DINGBATS_4);
listZ4.add("Dr. Jekyll");
listZ4.add("Mr. Hyde");
ListItem liZ4 = new ListItem();
liZ4.add(listZ4);
Now we nest these lists as follows:
we add
liZ4tolistZ3, which was already added toliZ3,we add
liZ3tolistZ2, which was already added toliZ2,we add
liZ2tolistZ1, which was already added toliZ1.we add
liZ1tolist, which is the original list we created (the one with the hyphen as list symbol).
Finally, we add list to the Document.
listZ3.add(liZ4);
listZ2.add(liZ3);
listZ1.add(liZ2);
list.add(liZ1);
document.add(list);
The nested ZapfDingbats list is shown to the right in figure 4.11. As you can see, the different list items are indented exactly the way one would expect. This concludes the first series of AbstractElement examples.
Summary
In this chapter, we discussed the building blocks Div, LineSeparator, Paragraph, List, and ListItem. We used Div to group other building blocks and LineSeparator to draw horizontal lines. We fixed a problem with the chapter 2 examples we weren't aware of: we learned how to keep specific elements together on one page. We didn't go into detail regarding the IRenderer implementations, but we looked at an example in which we changed the way a background is drawn for a Paragraph. We created a custom ParagraphRenderer to achieve this. Finally, we created a handful of List examples demonstrating different types of lists (numbered, unnumbered, straight-forward, nested, and so on).
The next chapter will be dedicated entirely to tables, more specifically to the Table and Cell class.
