Chapter 7: Handling events; setting viewer preferences and printer properties
Which version?
This Tutorial was written with iText 7.0.x in mind, however, if you go to the linked Examples you will find them for the latest available version of iText. If you are looking for a specific version, you can always download these examples from our GitHub repo (Java/.NET).
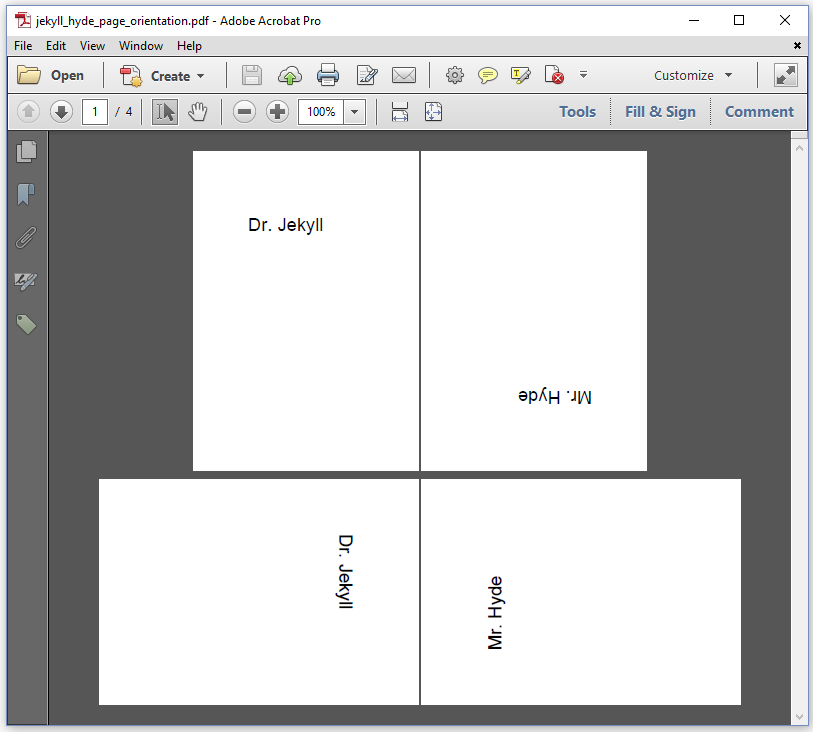
Figure 7.1: Pages with different orientations
We started with a chapter about fonts. In the chapters that followed, we discussed the default behavior of every element: Paragraph, Text, Image, and so on. We discovered that these elements can be used in a very intuitive way, but also that we can change their default behavior by creating custom renderer implementations –which isn't always trivial, depending on what you want to achieve. In the previous chapter, we discussed interactivity. We introduced actions and added links and bookmarks that help us navigate through a document.
We'll use this final chapter to introduce a couple of concepts that weren't discussed before. iText creates a new page automatically when elements don't fit the current page, but what if we want to add a watermark, background, header or footer to every page? How do we know when a new page is created? We'll need to look at the IEventHandler interface to find out. In the previous chapter, we changed a viewer preference so that the bookmarks panel is open by default. We'll look at some other viewer preferences that can be set. Finally, we'll learn how to change the settings of the PdfWriter, for instance to create a PDF of a version that is different from the default PDF version used by iText.
Implementing the IEventHandler interface
In previous examples, we used the rotate() method to switch a page from portrait to landscape. For instance, when we created PDF with tables in chapter 5, we created our Document object like this new Document(pdf, PageSize.A4.rotate()). In figure 7.1, we also see pages that are rotated, but they are rotated with a different purpose. In chapter 5, we wanted to take advantage of the fact that the width of the page is greater than the height when using landscape orientation. When using the rotate() method, it was our purpose to rotate the page, but not its content as is done in figure 7.1.

Figure 7.1: Pages with different orientations
In the EventHandlers example, we create four A6 pages to which we add content as if the page is in portrait. We change the rotation of the page at the page level in an IEventHandler. As defined in the ISO standard for PDF, the rotation of a page needs to be a multiple of 90. This leaves us four possible orientations when we divide the rotation by 360: portrait (rotation 0), landscape (rotation 90), inverted portrait (rotation 180) and seascape (rotation 270).
public static final PdfNumber PORTRAIT = new PdfNumber(0);
public static final PdfNumber LANDSCAPE = new PdfNumber(90);
public static final PdfNumber INVERTEDPORTRAIT = new PdfNumber(180);
public static final PdfNumber SEASCAPE = new PdfNumber(270);
We create a PageRotationEventHandler that allows us to change the rotation of a page, while we are creating a document.
protected class PageRotationEventHandler implements IEventHandler {
    protected PdfNumber rotation = PORTRAIT;
    public void setRotation(PdfNumber orientation) {
        this.rotation = orientation;
    }
    @Override
    public void handleEvent(Event event) {
        PdfDocumentEvent docEvent = (PdfDocumentEvent) event;
        docEvent.getPage().put(PdfName.Rotate, rotation);
    }
}
The default orientation will be portrait (line 2), but we can change this default using the setRotation() method (line 4-6). We override the handleEvent() method that is triggered when an event occurs. We can get the PdfPage instance of the page on which the event is triggered from the PdfDocumentEvent. This PdfPage object represents the page dictionary. One of the possible entries of a page dictionary, is its rotation. We change this entry to the current value of rotation (line 9) every time the event is triggered.
The following snippet shows how we can introduce this event handler in the PDF creation process.
public void createPdf(String dest) throws IOException {
    PdfDocument pdf = new PdfDocument(new PdfWriter(dest));
    pdf.getCatalog().setPageLayout(PdfName.TwoColumnLeft);
    PageRotationEventHandler eventHandler =
        new PageRotationEventHandler();
    pdf.addEventHandler(
        PdfDocumentEvent.START_PAGE, eventHandler);
    Document document = new Document(pdf, PageSize.A8);
    document.add(new Paragraph("Dr. Jekyll"));
    eventHandler.setRotation(INVERTEDPORTRAIT);
    document.add(new AreaBreak());
    document.add(new Paragraph("Mr. Hyde"));
    eventHandler.setRotation(LANDSCAPE);
    document.add(new AreaBreak());
    document.add(new Paragraph("Dr. Jekyll"));
    eventHandler.setRotation(SEASCAPE);
    document.add(new AreaBreak());
    document.add(new Paragraph("Mr. Hyde"));
    document.close();
}
We create an instance of the PageRotationEventHandler (line 4-5). We declare this eventHandler as an event that needs to be triggered every time a new page is started (PdfDocumentEvent.START_PAGE) in the PdfDocument (line 6-7). We create a PDF with tiny pages (line 8). We add a first paragraph (line 9) on a page that will use the default orientation. The START_PAGE event has already happened, when we change this default to inverted portrait (line 10). Only when a new page is created, after introducing a page break (line 11), the new orientation will become active. In this example, we repeat this a couple of times to demonstrate every possible page orientation.
There are four types of events that can be triggered:
START_PAGE– triggered when a new page is started,END_PAGE– triggered right before a new page is started,INSERT_PAGE– triggered when a page is inserted, andREMOVE_PAGE– triggered when a page is removed.
We'll try all of these types in the next handful of examples.
Adding a background and text to every page
We have created many documents in which we rendered a novel by Robert Louis Stevenson to PDF. We reused the code of one of these examples to create the PDF shown in figure 7.2, and we introduced an event handler to create a lime-colored background for the odd pages and a blue-colored background for the even pages. Starting on page 2, we also added a running header with the title of the novel and a footer with the page number.
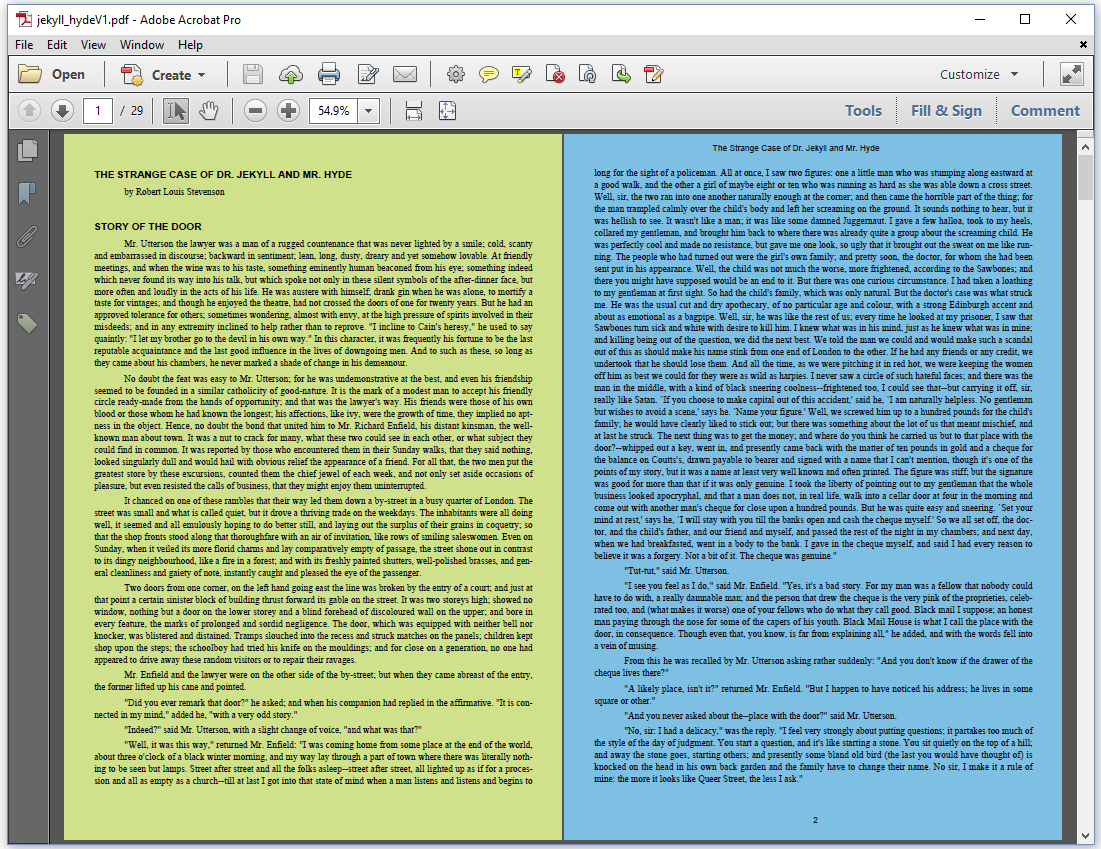
Figure 7.2: Colored background and running header
For this TextWatermark example, we added an END_PAGE event for a change.
pdf.addEventHandler(
    PdfDocumentEvent.END_PAGE,
    new TextWatermark());
This choice for the END_PAGE event has an impact on the TextWatermark class.
protected class TextWatermark implements IEventHandler {
    Color lime, blue;
    PdfFont helvetica;
    protected TextWatermark() throws IOException {
        helvetica = PdfFontFactory.createFont(FontConstants.HELVETICA);
        lime = new DeviceCmyk(0.208f, 0, 0.584f, 0);
        blue = new DeviceCmyk(0.445f, 0.0546f, 0, 0.0667f);
    }
    @Override
    public void handleEvent(Event event) {
        PdfDocumentEvent docEvent = (PdfDocumentEvent) event;
        PdfDocument pdf = docEvent.getDocument();
        PdfPage page = docEvent.getPage();
        int pageNumber = pdf.getPageNumber(page);
        Rectangle pageSize = page.getPageSize();
        PdfCanvas pdfCanvas = new PdfCanvas(
            page.newContentStreamBefore(), page.getResources(), pdf);
        pdfCanvas.saveState()
            .setFillColor(pageNumber % 2 == 1 ? lime : blue)
            .rectangle(pageSize.getLeft(), pageSize.getBottom(),
                pageSize.getWidth(), pageSize.getHeight())
            .fill().restoreState();
        if (pageNumber > 1) {
            pdfCanvas.beginText()
                .setFontAndSize(helvetica, 10)
                .moveText(pageSize.getWidth() / 2 - 120, pageSize.getTop() - 20)
                .showText("The Strange Case of Dr. Jekyll and Mr. Hyde")
                .moveText(120, -pageSize.getTop() + 40)
                .showText(String.valueOf(pageNumber))
                .endText();
        }
        pdfCanvas.release();
    }
}
We create color objects (line 2) and a font (line 3) in the constructor (line 4-8), so that we can reuse these objects every time the event is triggered.
The PdfDocumentEvent (line 11) gives us access to the PdfDocument (line 12) and the PdfPage (line 13) on which the event was triggered. We get the current page number (line 14) and the page size (line 15) from the PdfPage. In this example, we will add all the content using low-level PDF functionality. We need a PdfCanvas object to do this (line 16-17). We draw the background using a rectangle() and fill() method (line 18-22). For pages with page number greater than 1 (line 23), We create a text object marked by beginText() and endText() with two snippets of text that are positioned using the moveText() method and added with showText() method (line 24-30).
As we add this content after the current page has been completed and right before a new page is created, we have to be careful not to overwrite already existing content. For instance: to create a colored background, we draw an opaque rectangle. If we do this after we have added content to the page, this content won't be visible anymore: it will be covered by the opaque rectangle. We can solve this by creating the PdfCanvas using the page.newContentStreamBefore() method. This will allow us to write PDF syntax to a content stream that will be parsed before the rest of the content of the page is parsed.
In iText 5, we used page events to add content when a specific event occurred. It was forbidden to add content in an onStartPage() event. One could only add content to a page using the onEndPage() method. This often led to confusion among developers who assumed that headers needed to be added in the onStartPage() method, whereas footers needed to be added in the onEndPage() method. Although this was a misconception, we fixed this problem anyway. Actually, in the case of this example, it would probably be a better idea to add the back ground in the START_PAGE event. We can use page.getLastContentStream() to create the content stream needed for the PdfCanvas object.
In the next example, we'll add a header using a START_PAGE event and a footer using an END_PAGE event. The footer will show the page number as well as the total number of pages.
Solving the "Page X of Y" problem
In figure 7.3, we see a running header that starts on page 2. We also see a footer formatted as "page X of Y" where X is the current page and Y the total number of pages.
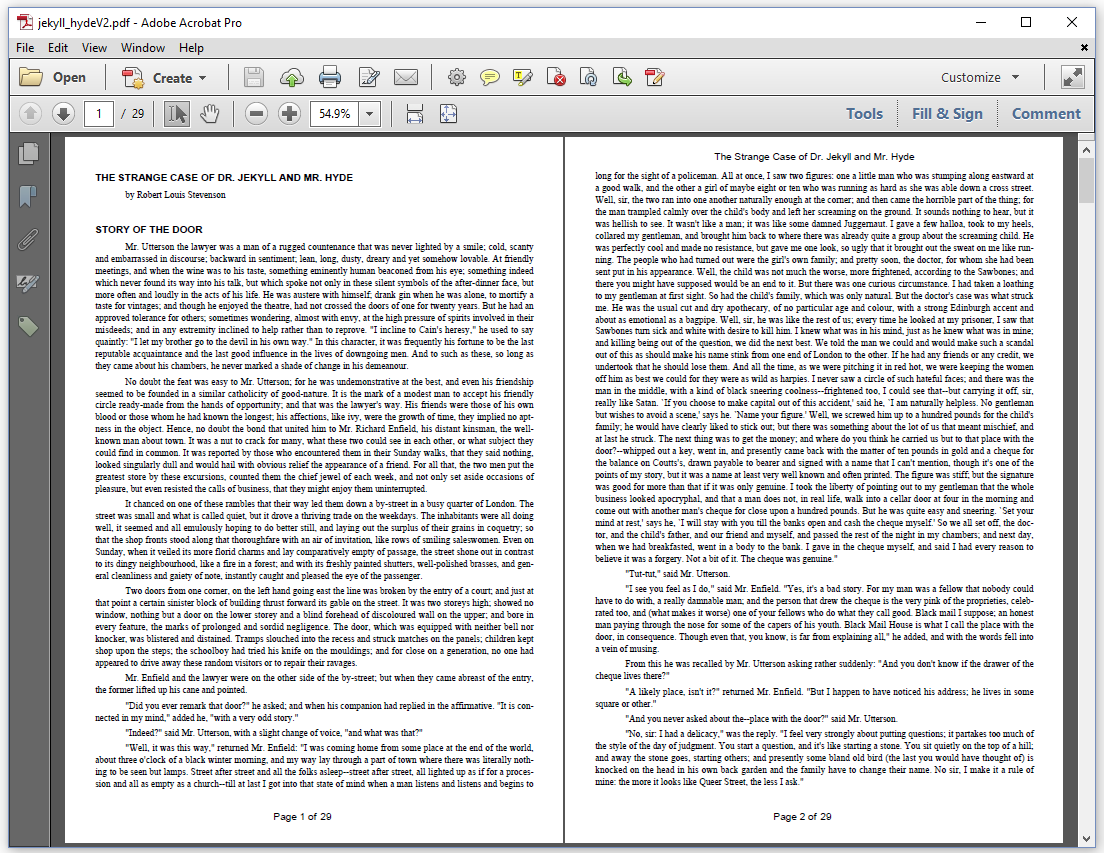
Figure 7.3: Page X of Y footer
The event handlers in the PageXofY example are added like this:
PdfDocument pdf = new PdfDocument(new PdfWriter(dest));
pdf.addEventHandler(PdfDocumentEvent.START_PAGE,
    new Header("The Strange Case of Dr. Jekyll and Mr. Hyde"));
PageXofY event = new PageXofY(pdf);
pdf.addEventHandler(PdfDocumentEvent.END_PAGE, event);
Instead of using low-level PDF operators to create the text object, we use the showTextAligned() method that was introduced when we talked about the Canvas object. See for instance the handleEvent implementation of the Header class.
protected class Header implements IEventHandler {
    String header;
    public Header(String header) {
        this.header = header;
    }
    @Override
    public void handleEvent(Event event) {
        PdfDocumentEvent docEvent = (PdfDocumentEvent) event;
        PdfDocument pdf = docEvent.getDocument();
        PdfPage page = docEvent.getPage();
        if (pdf.getPageNumber(page) == 1) return;
        Rectangle pageSize = page.getPageSize();
        PdfCanvas pdfCanvas = new PdfCanvas(
            page.getLastContentStream(), page.getResources(), pdf);
        Canvas canvas = new Canvas(pdfCanvas, pdf, pageSize);
        canvas.showTextAligned(header,
            pageSize.getWidth() / 2,
            pageSize.getTop() - 30, TextAlignment.CENTER);
    }
}
This time, we use the getLastContentStream() method (line 14). As we use this class to create a START_PAGE event, the header will be the first thing that is written in the total content stream of the page.
The "Page X of Y" footer confronts us with a problem we've already solved once in chapter 2. In the JekyllHydeV8 example, we wanted to add the total number of pages of the document on the first page. However, at the moment we wrote that first page, we didn't know the total number of pages in advance. We used a placeholder instead of the final number, and we instructed iText not to flush any content to the OutputStream until all pages were created. At that moment, we used a TextRenderer to replace the place holder with the total number of pages, and we recreated the layout using the relayout() method.
There is one major disadvantage with this approach: it requires that we keep a lot of content in memory before we flush it to the OutputStream. The more pages, the more we'll risk an OutOfMemoryException. We can solve this problem by using a PdfFormXObject as placeholder.
A form XObject is a snippet of PDF syntax stored in a separate stream that is external to the content stream of a page. It can be referred to from different pages. If we create one form XObject as a placeholder, and we add it to multiple pages, we have to update it only once, and that change will be reflected on every page. We can update the content of a form XObject as long as it hasn't been written to the OutputStream. This is what we'll do in the PageXofY class.
protected class PageXofY implements IEventHandler {
    protected PdfFormXObject placeholder;
    protected float side = 20;
    protected float x = 300;
    protected float y = 25;
    protected float space = 4.5f;
    protected float descent = 3;
    public PageXofY(PdfDocument pdf) {
        placeholder =
            new PdfFormXObject(new Rectangle(0, 0, side, side));
    }
    @Override
    public void handleEvent(Event event) {
        PdfDocumentEvent docEvent = (PdfDocumentEvent) event;
        PdfDocument pdf = docEvent.getDocument();
        PdfPage page = docEvent.getPage();
        int pageNumber = pdf.getPageNumber(page);
        Rectangle pageSize = page.getPageSize();
        PdfCanvas pdfCanvas = new PdfCanvas(
            page.getLastContentStream(), page.getResources(), pdf);
        Canvas canvas = new Canvas(pdfCanvas, pdf, pageSize);
        Paragraph p = new Paragraph()
            .add("Page ").add(String.valueOf(pageNumber)).add(" of");
        canvas.showTextAligned(p, x, y, TextAlignment.RIGHT);
        pdfCanvas.addXObject(placeholder, x + space, y - descent);
        pdfCanvas.release();
    }
    public void writeTotal(PdfDocument pdf) {
        Canvas canvas = new Canvas(placeholder, pdf);
        canvas.showTextAligned(String.valueOf(pdf.getNumberOfPages()),
            0, descent, TextAlignment.LEFT);
    }
}
We define a member-variable name placeholder in line 2, and we initialize this PdfFormXObject in the constructor of our IEventHandler implementation (line 9-10). The other member-variables in line 3-7 are there for our convenience. They reflect the dimension of the placeholder (side is the side of the square that defines the placeholder), the position of the footer (x and y), the space between the "Page X of" and "Y" part (space) of the footer, and the space we will allow under the baseline of the "Y" value (descent).
Lines 14 to 21 are identical to what we had in the Header class. We create the "Page X of" part of the footer in line 21 and 22. We add this Paragraph to the left of the coordinates x and y (line 24). We add the placeholder at the coordinates x + space and y - descent. We release the Canvas, but we don't release the placeholder yet. Once the complete document is generated, we call the writeTotal() method, right before we close the document.
document.add(div);
event.writeTotal(pdf);
document.close();
In this writeTotal() method, we add the total number of pages at the coordinate x = 0; y = descent (line 30-31). This way, the "Page X of Y" text will always be nicely aligned with `x' and 'y' as the coordinate that has "Page X of" to the left and "Y" to the right.
Adding a transparent background image
In figure 7.4, we've added a transparent image in the background of each page of text. You could use this technique to add watermarks to a document.
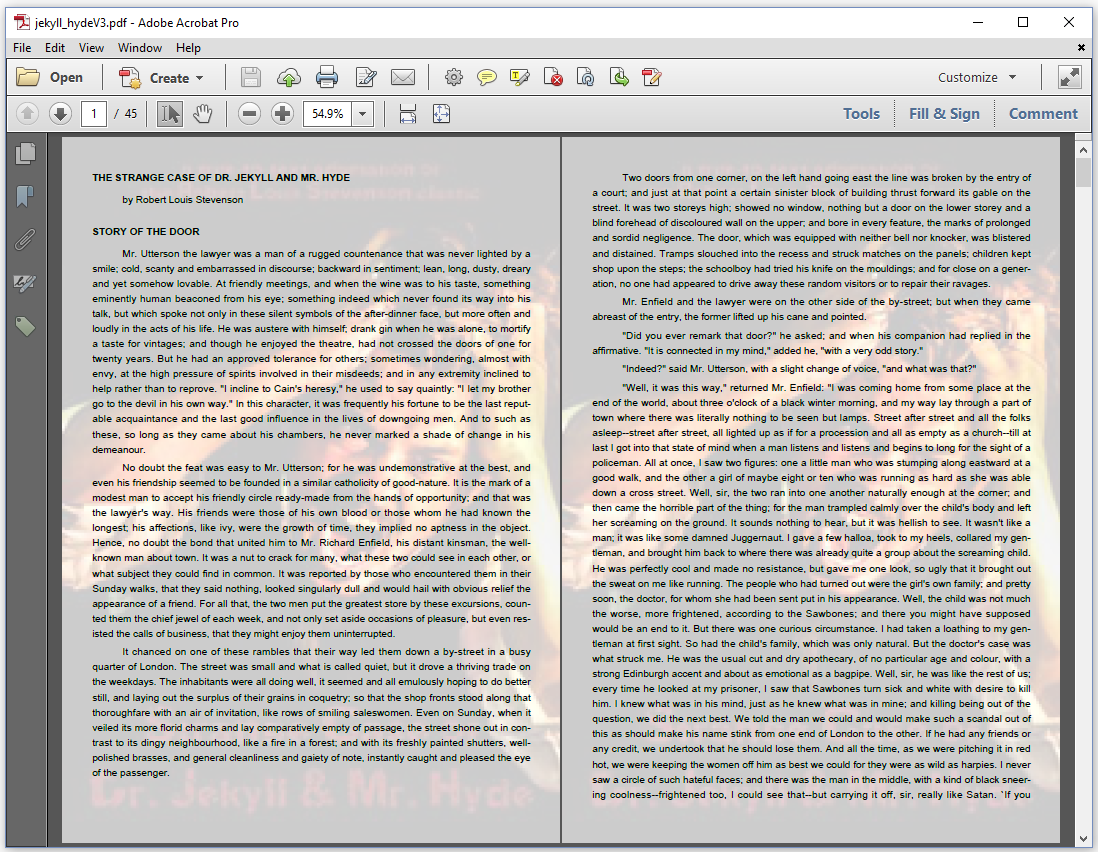
Figure 7.4: Transparent background image
Let's take a look at the TransparentImage class in the ImageWatermark example.
protected class TransparentImage implements IEventHandler {
    protected PdfExtGState gState;
    protected Image img;
    public TransparentImage(Image img) {
        this.img = img;
        gState = new PdfExtGState().setFillOpacity(0.2f);
    }
    @Override
    public void handleEvent(Event event) {
        PdfDocumentEvent docEvent = (PdfDocumentEvent) event;
        PdfDocument pdf = docEvent.getDocument();
        PdfPage page = docEvent.getPage();
        Rectangle pageSize = page.getPageSize();
        PdfCanvas pdfCanvas = new PdfCanvas(
            page.getLastContentStream(), page.getResources(), pdf);
        pdfCanvas.saveState().setExtGState(gState);
        Canvas canvas = new Canvas(pdfCanvas, pdf, page.getPageSize());
        canvas.add(img
            .scaleAbsolute(pageSize.getWidth(), pageSize.getHeight()));
        pdfCanvas.restoreState();
        pdfCanvas.release();
    }
}
Note that we store the Image object as a member-variable; this way, we can use it as many times we want and the bytes of the image will be added to the PDF document only once.
Creating a new Image instance of the same image in the handleEvent would result in a bloated PDF document. The same image bytes would be added to the document as many times as there are pages. This was already explained in chapter 3.
We also reuse the PdfExtGState object. This is a graphics state object that is external to the content stream. We use it to set the fill opacity to 20%.
In this example, we use a mix of PdfCanvas and Canvas. We use PdfCanvas to save, change, and restore the graphics state. We use Canvas to add the image resized to the dimensions of the page.
In this example, we didn't want the background image to appear for the table of contents. See figure 7.5.
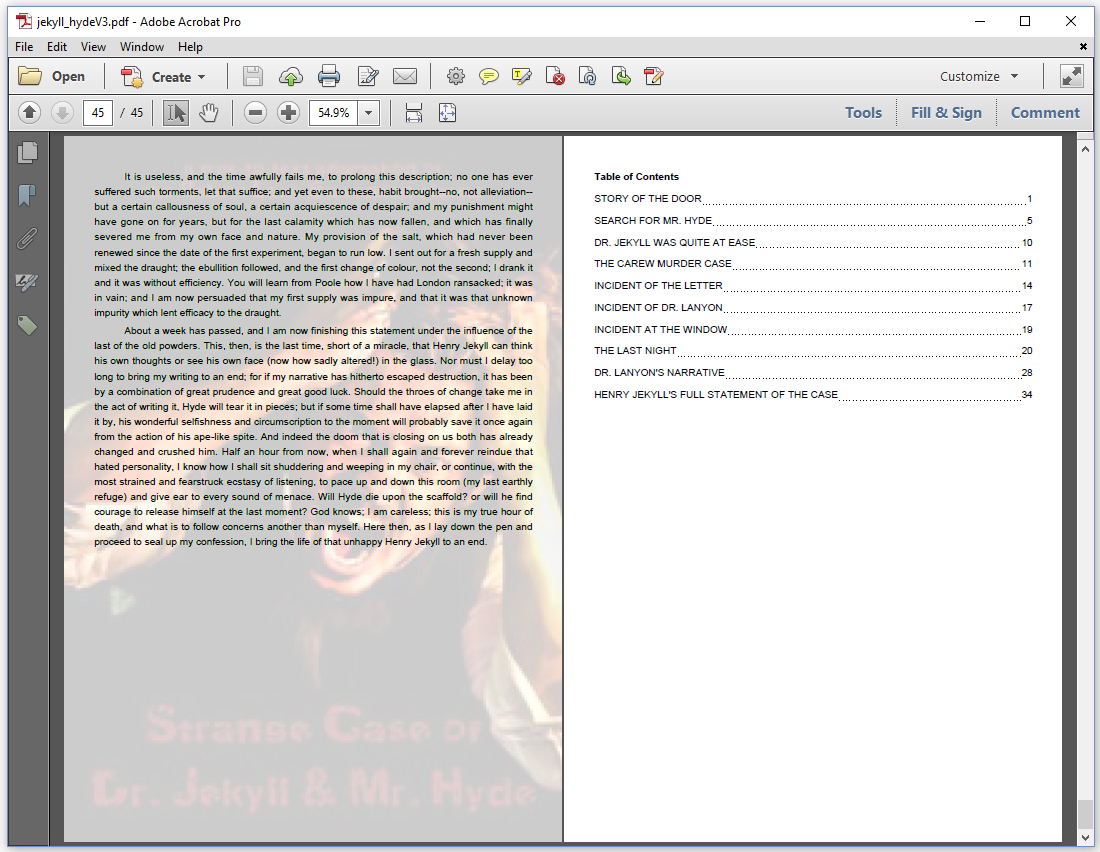
Figure 7.5: Removing a specific handler
We achieve this by removing the event handler, right before we add the table of contents.
PdfDocument pdf = new PdfDocument(new PdfWriter(dest));
Image img = new Image(ImageDataFactory.create(IMG));
IEventHandler handler = new TransparentImage(img);
pdf.addEventHandler(PdfDocumentEvent.START_PAGE, handler);
Document document = new Document(pdf);
... // Code that adds the text of the novel
pdf.removeEventHandler(
    PdfDocumentEvent.START_PAGE, handler);
document.add(new AreaBreak(AreaBreakType.NEXT_PAGE));
... // code that adds the TOC
document.close();
We can remove a specific handler, using the removeEventHandler() method. We can remove all handlers using the removeAllHandlers() method. That's what we're going to do in the next example.
Insert and remove page events
To obtain the PDF shown in figure 7.6, we took an existing PDF generated by one of the examples in the previous chapter. We inserted one page to be the new page 1. We removed all pages starting with the third chapter. As you can see, the bookmarks were updated accordingly.
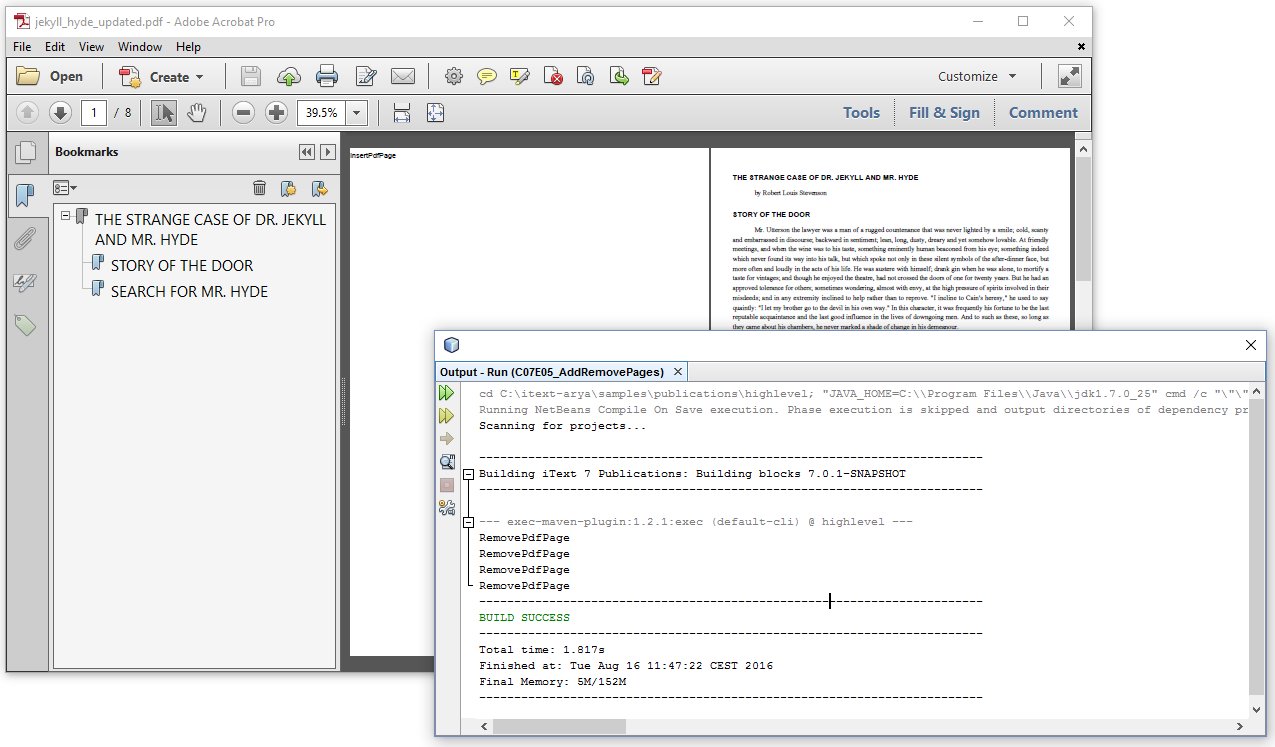
Figure 7.6: Insert and remove page events
The AddRemovePages example uses the INSERT_PAGE event to add content to the inserted page, and the REMOVE_PAGE method to write something to the System.out. At some point, we remove all handlers.
public void manipulatePdf(String src, String dest) throws IOException {
    PdfReader reader = new PdfReader(src);
    PdfWriter writer = new PdfWriter(dest);
    PdfDocument pdf = new PdfDocument(reader, writer);
    pdf.addEventHandler(
        PdfDocumentEvent.INSERT_PAGE, new AddPageHandler());
    pdf.addEventHandler(
        PdfDocumentEvent.REMOVE_PAGE, new RemovePageHandler());
    pdf.addNewPage(1, PageSize.A4);
    int total = pdf.getNumberOfPages();
    for (int i = 9; i <= total; i++) {
        pdf.removePage(9);
        if (i == 12)
            pdf.removeAllHandlers();
    }
    pdf.close();
}
protected class AddPageHandler implements IEventHandler {
    @Override
    public void handleEvent(Event event) {
        PdfDocumentEvent docEvent = (PdfDocumentEvent) event;
        PdfDocument pdf = docEvent.getDocument();
        PdfPage page = docEvent.getPage();
        PdfCanvas pdfCanvas = new PdfCanvas(page);
        Canvas canvas = new Canvas(pdfCanvas, pdf, page.getPageSize());
        canvas.add(new Paragraph().add(docEvent.getType()));
    }
}
protected class RemovePageHandler implements IEventHandler {
    @Override
    public void handleEvent(Event event) {
        PdfDocumentEvent docEvent = (PdfDocumentEvent) event;
        System.out.println(docEvent.getType());
    }
}
In this example, we have an AddPageHandler (line 18-28) and a RemovePageHandler (line 29-35). We declare these handlers to the PdfDocument as INSERT_PAGE and REMOVE_PAGE event respectively (line 5-8). The AddPageHandler will be triggered only once, when we add a new page (line 9). The remove page will be triggered four times. We remove all pages from page 9 to the total number of pages. We do this by removing page 9 over and over again (line 12), until no pages are left. As soon as we've removed page 12, we remove all handlers (line 13-14), which means that the event is triggered after we removed pages 9, 10, 11, and 12.
In the next example, we're going to define page labels.
Page labels
Figure 7.7 shows a document with 38 pages. In the toolbar above the document, Adobe Acrobat shows that we're on page "i" or page 1 of 38. We have opened the Page Thumbnails panel to see a thumbnail for each page. We see that the first three pages are number i, ii, iii. Then we have 34 pages numbered from 1 to 34. Finally, we have a page with page label TOC.
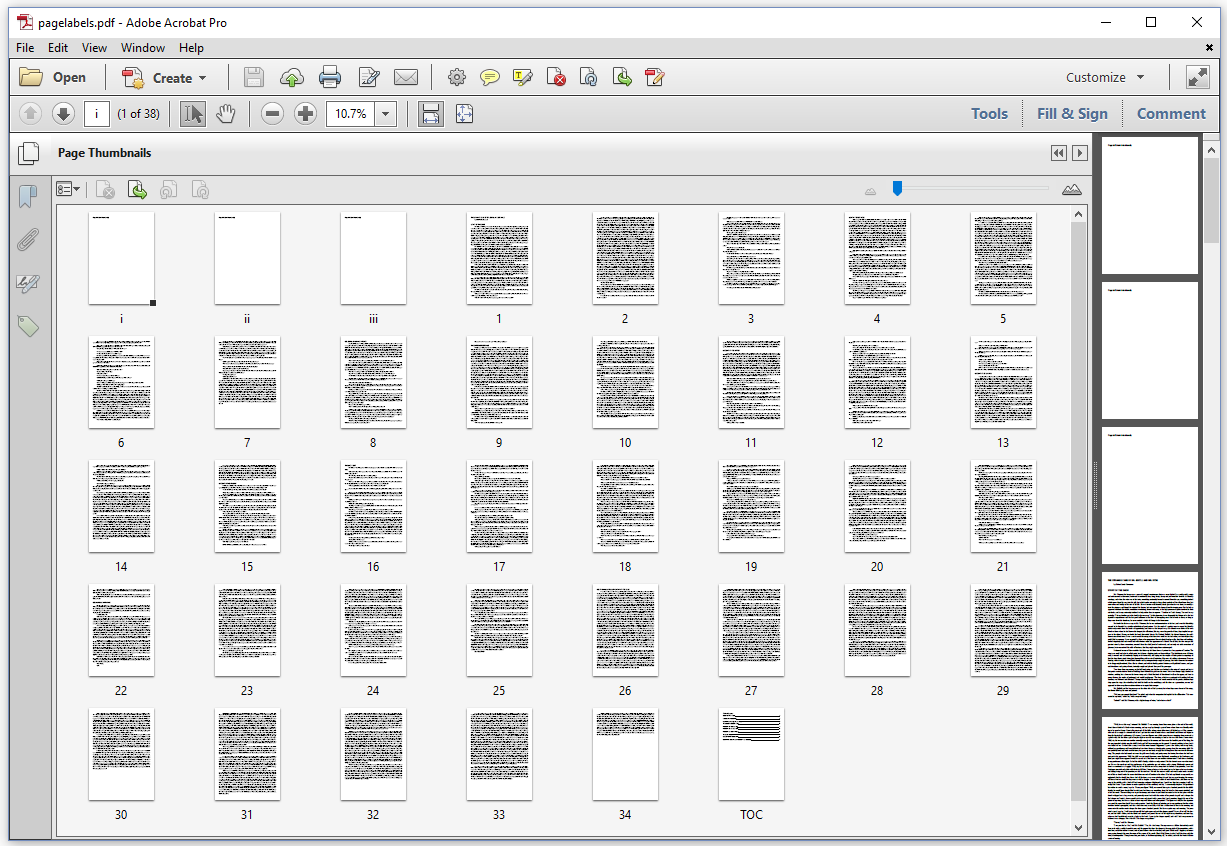
Figure 7.7: Page labels
These page labels aren't part of the actual content. For instance: you won't see them when you print the document. They are only visible in the PDF viewer –that is: if the PDF viewer supports page labels. The PDF in figure 7.7 was created using the PageLabels example.
PdfDocument pdf = new PdfDocument(new PdfWriter(dest));
PdfPage page = pdf.addNewPage();
page.setPageLabel(PageLabelNumberingStyleConstants
        .LOWERCASE_ROMAN_NUMERALS, null);
Document document = new Document(pdf);
document.add(new Paragraph().add("Page left blank intentionally"));
... // add some more pages left blank intentionally
page = pdf.getLastPage();
page.setPageLabel(PageLabelNumberingStyleConstants
    .DECIMAL_ARABIC_NUMERALS, null, 1);
... // add content of the novel
document.add(new AreaBreak(AreaBreakType.NEXT_PAGE));
p = new Paragraph().setFont(bold)
    .add("Table of Contents").setDestination("toc");
document.add(p);
page = pdf.getLastPage();
page.setPageLabel(null, "TOC", 1);
... // add table of contents
document.close();
We change the page label style three times in this code snippet:
We create the first page in line 2 and we set the page label style for this page to
LOWERCASE_ROMAN_NUMERALS. We don't define a prefix. All the pages that follow this first page will be numbered like this: i, ii, iii, iv, v,... until we change the page label style. This happens in line 9.In line 8, we get the last page that was added so far, and we change the page labels to
DECIMAL_ARABIC_NUMERALSin line 9. Once more we don't define a prefix, and we tell the current page to start the page count with 1. We didn't really have to do this, because the page count always restart when you change the page labels. You can use this method if you don't want that to happen. For instance: we could pass 4 instead of 1 if we want the first page that follows the pages with Roman numerals to be page 4.In line 17, we change the page label style to
null. This means that no numbering will be used, even if we pass a value for the first page after the page label change. In this case, we do pass a prefix. That's the page label we see when we reach the table of contents of our document. The prefix can be combined with a page number, for instance if you have Arabic numerals for page numbers and the prefix is "X-", then the pages will be numbered as "X-1", "X-2", "X-3", and so on.
In this example, we had to manually open the Page Thumbnails panel to see the thumbnail overview of all the pages. We could have instructed the document to open that panel by default. In the next example, we'll change the page display and the page mode.
Page display and page mode
The file page_mode_page_layout.pdf is almost identical to the file with the page labels we created in the previous example, but when we open it, we see that the panel with the page thumbnails is open by default. This is the page mode. We also see that the first page only takes half of the space that is available horizontally and that it's pushed to the right. At the bottom, we see that the second and third page are shown next to each other. This is the page layout.
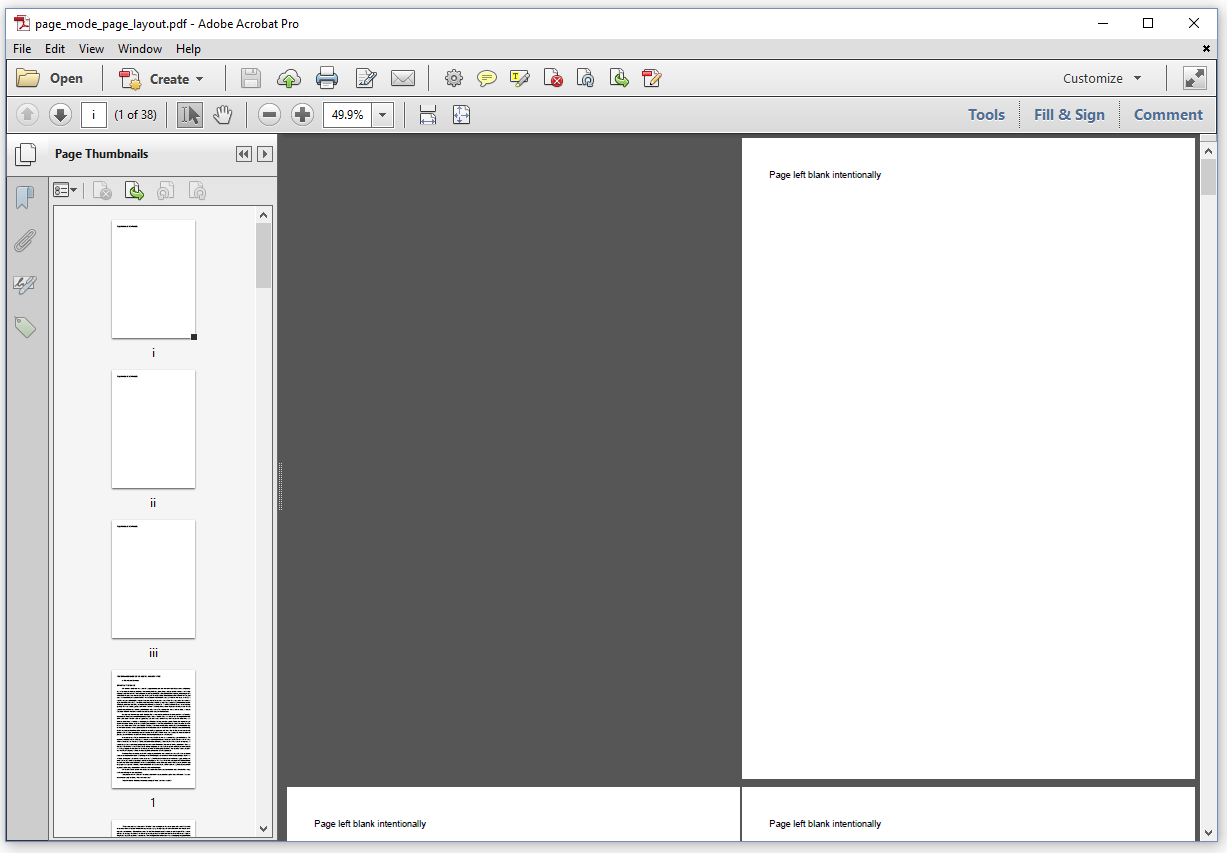
Figure 7.8: Page layout and page mode
The PageLayoutPageMode example is identical to the previous example, except for the following lines.
pdf.getCatalog().setPageLayout(PdfName.TwoColumnRight);
pdf.getCatalog().setPageMode(PdfName.UseThumbs);
We get the catalog from the PdfDocument. The catalog is also known as the root dictionary of the PDF file. It's the first object that is read when a parser reads a PDF document.
We can set the page layout for the document with the setPageLayout() method using one of the following parameters:
PdfName.SinglePage– Display one page at a time.PdfName.OneColumn– Display the pages in one column.PdfName.TwoColumnLeft– Display the pages in two columns, with the odd-numbered pages on the left.PdfName.TwoColumnRight– Display the pages in two columns, with the odd-numbered pages on the right.PdfName.TwoPageLeft– Display the pages two at a time, with the odd-numbered pages on the left.PdfName.TwoPageRight– Display the pages two at a time, with the odd-numbered pages on the right.
We can set the page mode for the document with the setPageMode() method using one of the following parameters
PdfName.UseNone– No panel is visible by default.PdfName.UseOutlines– The bookmarks panel is visible, showing the outline tree.PdfName.UseThumbs– A panel with pages visualized as thumbnails is visible.PdfName.FullScreen– The document is shown in full screen mode.PdfName.UseOC– The panel with the optional content structure is open.PdfName.UseAttachments– The attachments panel is visible.
We haven't discussed optional content yet, nor attachments. That's something we'll save for another tutorial.
When we use PdfName.FullScreen, the PDF will try to open in full screen mode. Many viewers won't do this without showing a warning first.
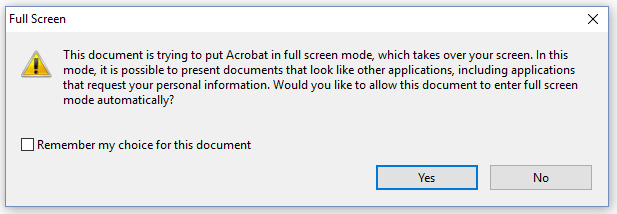
Figure 7.9: Warning before switching to full screen mode
The warning shown in figure 7.9 was triggered by the PDF created with the FullScreen example.
pdf.getCatalog().setPageMode(PdfName.FullScreen);
PdfViewerPreferences preferences = new PdfViewerPreferences();
preferences.setNonFullScreenPageMode(
    PdfViewerPreferencesConstants.USE_THUMBS);
pdf.getCatalog().setViewerPreferences(preferences);
In this example, we also create a PdfViewerPreferences instance (line 2). We set the viewer preference that tells the viewer what to do when we exit full screen mode. The possible values for the setNonFullScreenPageMode() are:
PdfViewerPreferencesConstants.USE_NONE– No panel is opened when we return from full screen mode.PdfViewerPreferencesConstants.USE_OUTLINES– The bookmarks panel is visible, showing the outline tree.PdfViewerPreferencesConstants.USE_THUMBS– A panel with pages visualized as thumbnails is visible.PdfViewerPreferencesConstants.USE_OC– The panel with the optional content structure is open.
We used PdfViewerPreferencesConstants.USE_THUMBS which means that we see the PDF as shown in figure 7.10.
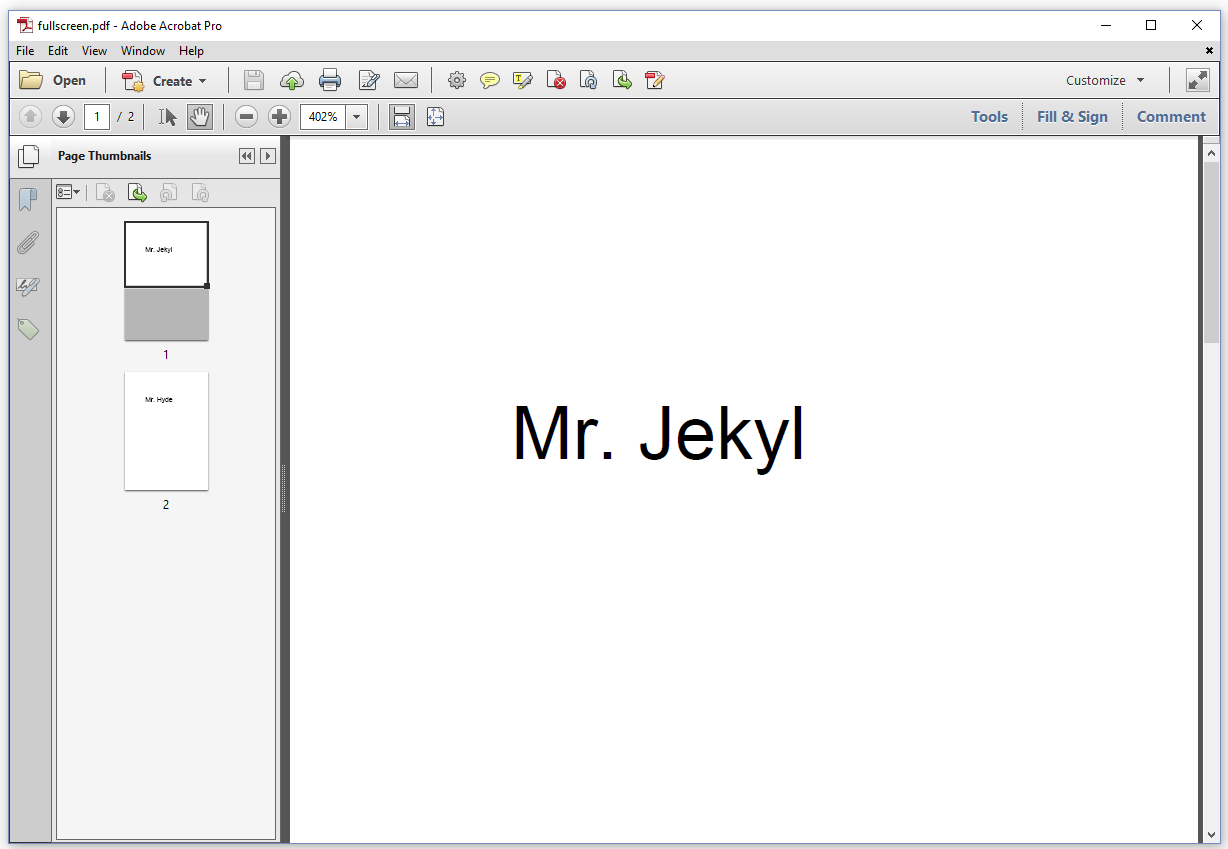
Figure 7.10: Viewer after exiting full screen mode
Let's take a look at some other viewer preferences that are available in the PDF specification.
Viewer preferences
When we open the PDF shown in figure 7.11, we don't see a menu bar, we don't see a tool bar, we see the title of the document in the top bar, and so on.
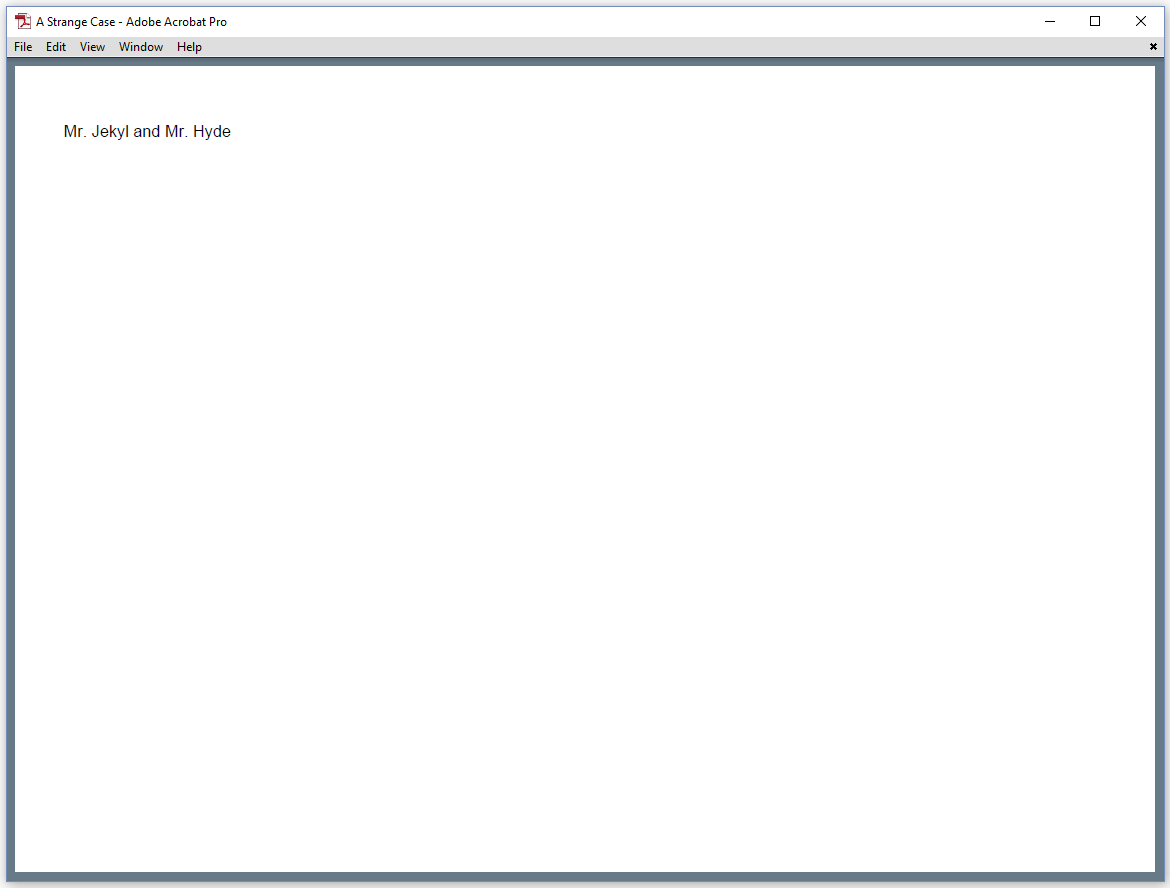
Figure 7.11: Different viewer preferences at work in one document
The ViewerPreferences example shows us which viewer preferences have been set for this document.
public void createPdf(String dest) throws IOException {
    PdfDocument pdf = new PdfDocument(new PdfWriter(dest));
    PdfViewerPreferences preferences = new PdfViewerPreferences();
    preferences.setFitWindow(true);
    preferences.setHideMenubar(true);
    preferences.setHideToolbar(true);
    preferences.setHideWindowUI(true);
    preferences.setCenterWindow(true);
    preferences.setDisplayDocTitle(true);
    pdf.getCatalog().setViewerPreferences(preferences);
    PdfDocumentInfo info = pdf.getDocumentInfo();
    info.setTitle("A Strange Case");
    Document document = new Document(pdf, PageSize.A4.rotate());
    document.add(new Paragraph("Mr. Jekyl and Mr. Hyde"));
    document.close();
}
All of these preferences expect true or false as a parameter; false being the default value if no preference is chosen.
Line 4: with
setFitWindow(), we tell the viewer to resize the document's window to fit the size of the first displayed page.Line 5: with
setHideMenubar(), we tell the viewer to hide the menu bar; that is the bar with menu items such as File, Edit, View,...Line 6: with
setHideToolbar(), we tell the viewer to hide the tool bar; that is the bar with the icons that give us direct access to some features also available through the menu items.Line 7: with
setHideWindowUI(), we tell the viewer to hide all user interface elements such as scroll bars and other navigational controls.Line 8: with
setCenterWindow(), we tell the viewer to position the document's window in the center of the screen.Line 9: with
setDisplayDocTitle(), we tell the viewer to show the title of the document in the title bar.
Setting the title in the title bar requires that we define a title in the metadata. We do this in line 11-12. We'll have a closer look at metadata in a moment.
You can also use the PdfViewerPreferences class to define the predominant reading order of text using the setDirection() method, the view area using the setViewArea() and setViewClip() method. We won't do that in this tutorial, we'll skip to some printer preferences.
Printer preferences
The mechanism of viewer preferences can also be used to set some printer preferences. For instance: we can select the area that will be printed by default using the setPrintArea() and the setPrintClip() method. Specific printer settings can be selected using the setDuplex() and setPickTrayByPDFSize() method. You can select a default page range that needs to be printed using the setPrintPageRange() method.
Figure 7.12 shows the default settings in the Print Dialog after using the setPrintScaling() and setNumCopies() method.
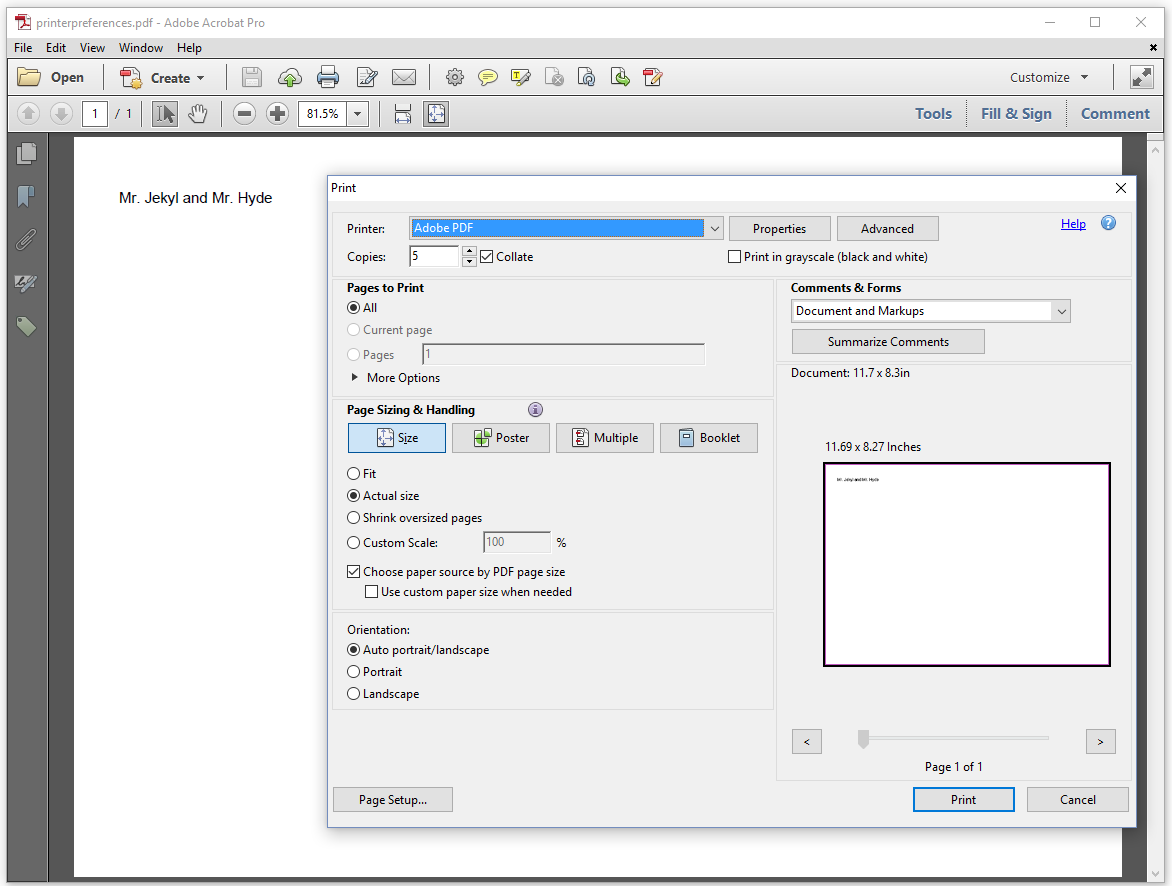
Figure 7.12: Printer preferences
The values in the screen shot correspond with the code of the PrinterPreferences example.
PdfViewerPreferences preferences = new PdfViewerPreferences();
preferences.setPrintScaling(
    PdfViewerPreferencesConstants.NONE);
preferences.setNumCopies(5);
pdf.getCatalog().setViewerPreferences(preferences);
Although PDF viewers nowadays offer many print-scaling options, the PDF specification only allows you to choose between NONE (no print scaling; the actual size of the document is preserved) and APP_DEFAULT (the default scaling of the viewer application). We set the number of copies to 5, which is reflected in the Print Dialog.
As you can see, setting a printer preference doesn't enforce the preference that is chosen. For instance, if we set the number of copies to 5, a user can easily change this to any other number in the dialog. ISO 32000-2 (aka PDF 2.0) introduces an extra viewer preference, an array named /Enforce. A PDF 2.0 viewer should check the entries of this array, and enforce all the viewer preferences that are present. Currently, PDF 2.0 only defines one possible entry for the array: /PrintScaling provides a way to enforce the print scaling. Later versions of the PDF specification may introduce more possible values.
Note that PDF 2.0 is supported in iText 7.1 and later. This functionality isn't available in earlier versions of iText.
Once in a while, we get the question if it's possible to set a viewer preference to open a document at a certain page. It's possible to jump to a specific page when opening a document, but that isn't achieved using a viewer preference. We need an open action to do this.
Open action and additional actions
The PDF document shown in figure 7.13 jumps straight to the last page when we open it. But there's more: when we leave the last page, we get a message saying "Goodbye last page!"
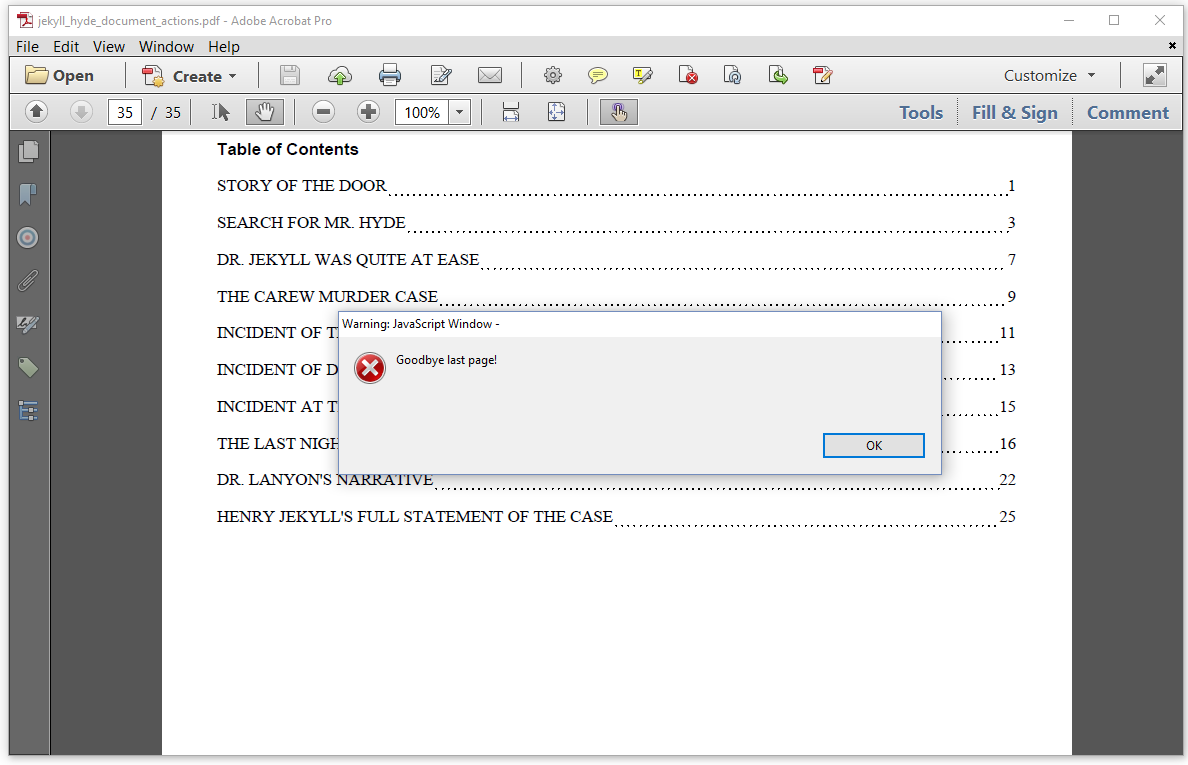
Figure 7.13: Document opens on last page and page says goodbye when we leave it
When we go to the first page, the document shows another alert: "This is where it starts!"
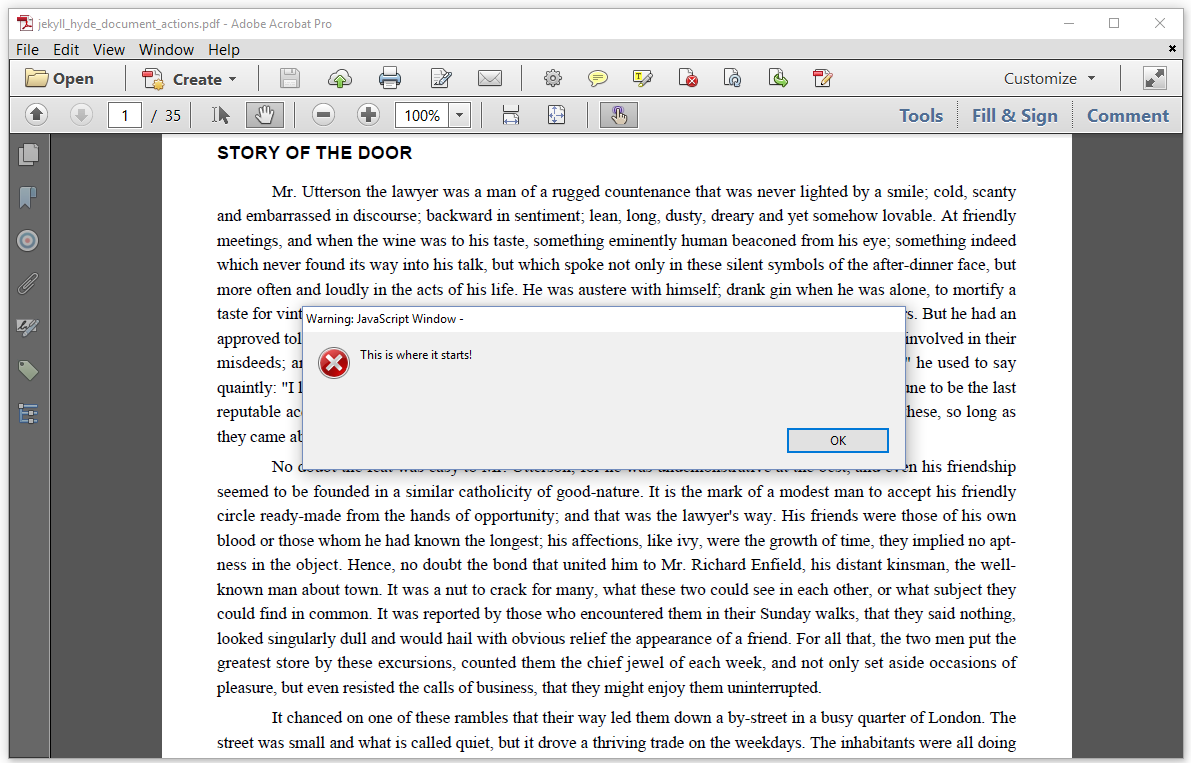
Figure 7.14: The first page says "This is where it starts!"
Finally, when we close the document, it says: "Thank you for reading".
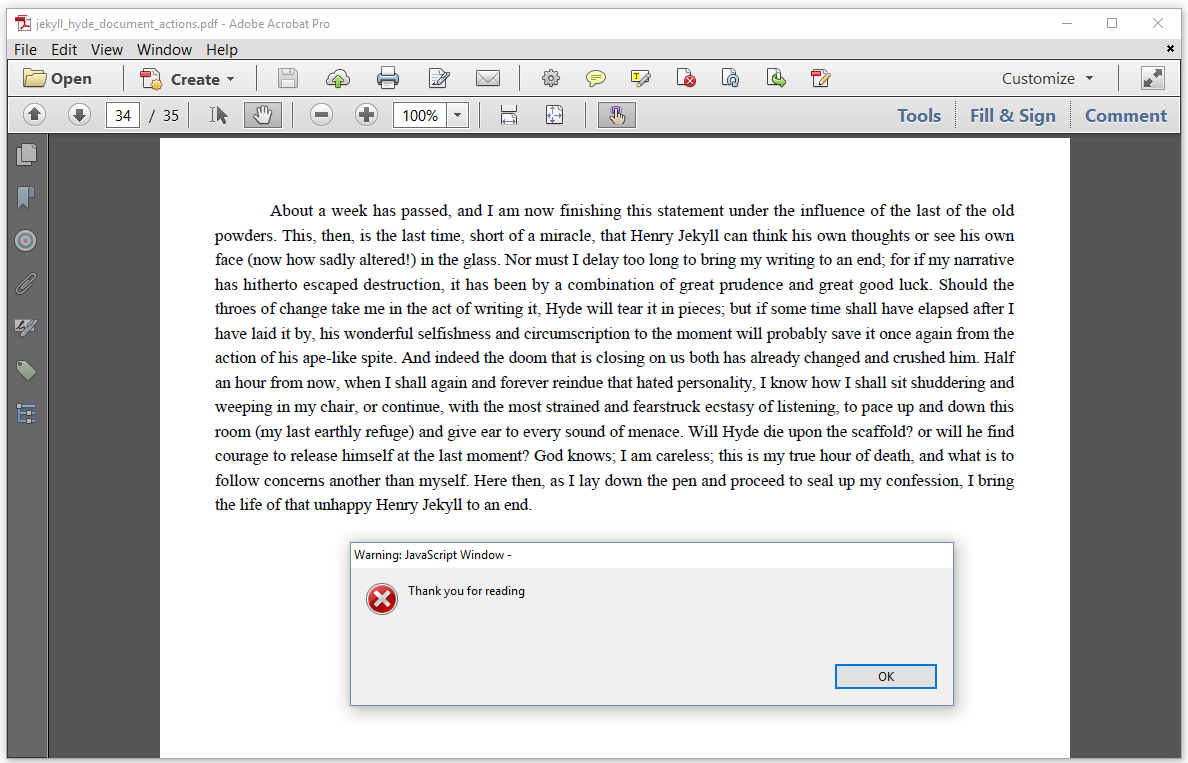
Figure 7.15: The document says "Thank you for reading" upon closing it
The action that jumps to the last page is an open action; all the other actions are additional actions with respect to events triggered on the document or on a page. The Actions example shows us what it's all about.
public void createPdf(String dest) throws IOException {
    PdfDocument pdf = new PdfDocument(new PdfWriter(dest));
    pdf.getCatalog().setOpenAction(
            PdfDestination.makeDestination(new PdfString("toc")));
    pdf.getCatalog().setAdditionalAction(PdfName.WC,
        PdfAction.createJavaScript("app.alert('Thank you for reading');"));
    pdf.addNewPage().setAdditionalAction(PdfName.O,
        PdfAction.createJavaScript("app.alert('This is where it starts!');"));
    Document document = new Document(pdf);
    PdfPage page = pdf.getLastPage();
    page.setAdditionalAction(PdfName.C,
        PdfAction.createJavaScript("app.alert('Goodbye last page!');"));
    document.close();
}
Let's start with the open action (line 3-4). This action is added to the catalog using the setOpenAction() method. This method accepts an instance of the PdfDestination class –in this case a link to a named destination– or of the PdfAction class.
The next action is an additional action for the document (line 5-6). This action is also added to the catalog, using the setAdditionalAction() method. The second parameter has to be a PdfAction object. The first parameter is one of the following names:
PdfName.WC– which stands for Will Close. This action will be performed right before closing a document.PdfName.WS– which stands for Will Save. This action will be performed right before saving a document. Note that this will only work for viewers that allow you to save a document; and that save isn't the same as save as in this context.PdfName.DS– which stands for Did Save. This action will be performed right after saving a document. Note that this will only work for viewers that allow you to save a document; and that save isn't the same as save as in this context.PdfName.WP– which stands for Will Print. This action will be performed right before printing a document.PdfName.DP– which stands for Did Print. This action will be performed right after printing a document.
The next two additional actions are actions that are added to a PdfPage object (line 7-8; line 11-12). The parameters of this setAdditionalAction() method are again an instance of the PdfAction class as the second parameter, but the first parameter has to be one of the following names:
PdfName.O– the action will be performed when the page is opened, for instance when a user navigates to it from the next or previous page, or by clicking a link. If this page is the first page that opens when opening a document, and if there's also an open action, the open action will be triggered first.PdfName.C– the action will be performed when the page is closed, for instance when a user navigates away from it by going to the next or previous page, or by clicking a link that moves away from this page.
There are more types of additional actions, especially in the context of interactive forms. Those actions are out of the scope of this tutorial and will be discussed in a tutorial about forms. We'll finish this chapter by looking at some writer properties.
Writer properties
In one of the previous examples, we added some metadata to a PdfDocumentInfo object. We obtained this object from the PdfDocument using the getDocumentInfo() method. This PdfDocumentInfo object corresponds with the info dictionary of the PDF; that's a dictionary containing metadata in the form of key-value pairs. This is how metadata was originally stored inside a PDF, but soon it turned out that it was a better idea to store metadata as XML inside a PDF file. This is shown in figure 7.16.
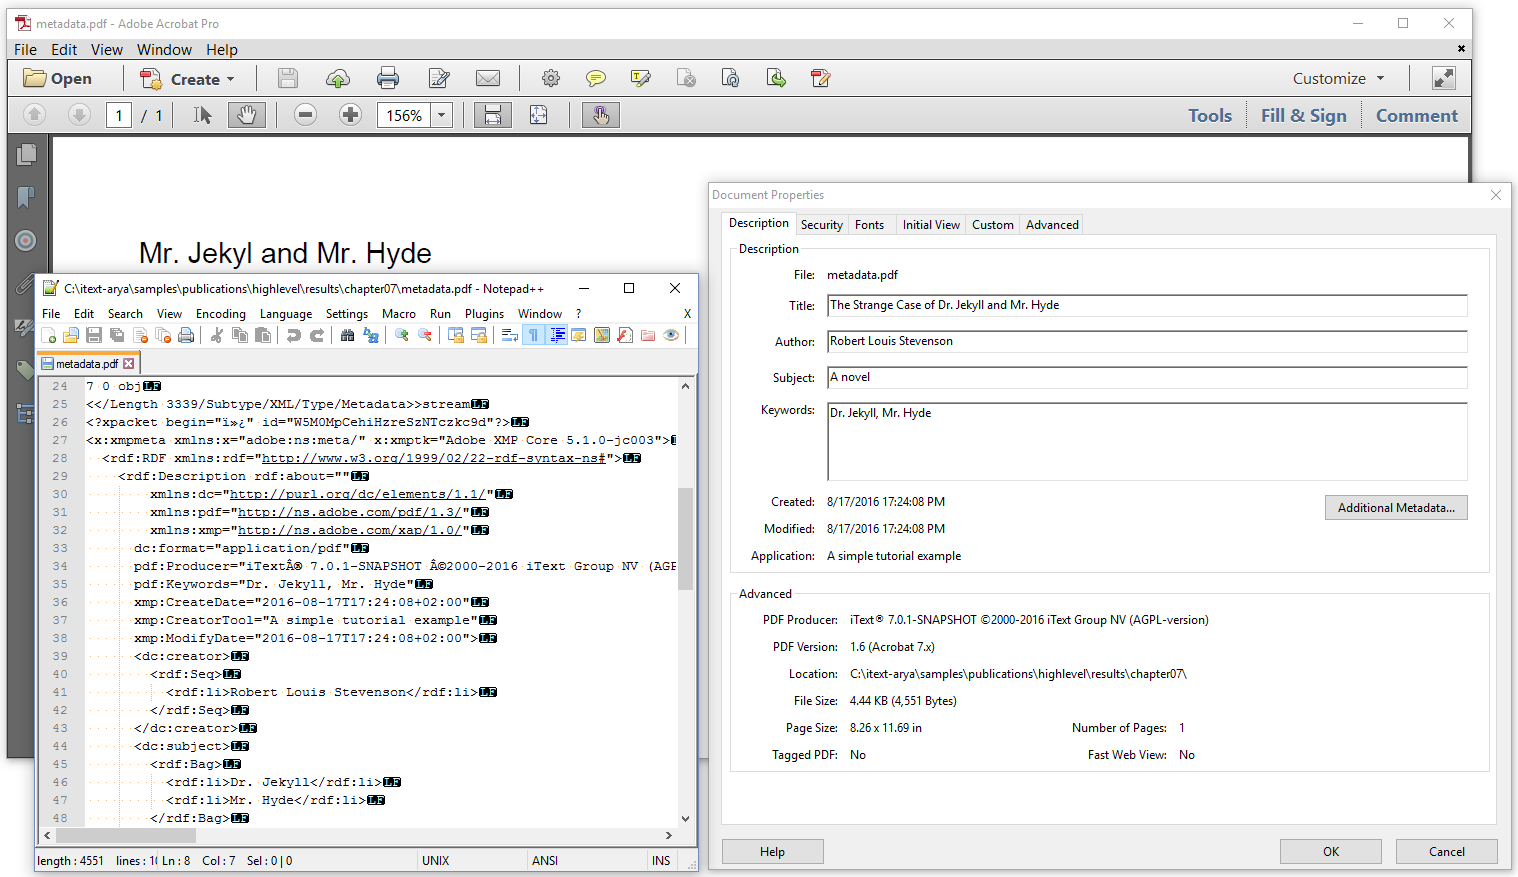
Figure 7.16: PDF and metadata
The XML is added as an uncompressed stream, which allows software that doesn't understand PDF syntax to extract the XML stream anyway and interpret it. The format of the XML is defined in the eXtensible Metadata Platform (XMP) standard. This standard allows much more flexibility than a simple key-value pair dictionary.
XMP metadata
When you create a document, you can create your own XMP metadata using the XMPMeta class and then add this metadata to the PdfDocument by passing it as a parameter with the setXmpMetadata() method. But you can also ask iText to create the metadata automatically, based on the entries in the info dictionary. That's what we did in the Metadata example.
public void createPdf(String dest) throws IOException {
    PdfDocument pdf = new PdfDocument(
        new PdfWriter(dest,
            new WriterProperties()
                .addXmpMetadata()
                .setPdfVersion(PdfVersion.PDF_1_6)));
    PdfDocumentInfo info = pdf.getDocumentInfo();
    info.setTitle("The Strange Case of Dr. Jekyll and Mr. Hyde");
    info.setAuthor("Robert Louis Stevenson");
    info.setSubject("A novel");
    info.setKeywords("Dr. Jekyll, Mr. Hyde");
    info.setCreator("A simple tutorial example");
    Document document = new Document(pdf);
    document.add(new Paragraph("Mr. Jekyl and Mr. Hyde"));
    document.close();
}
We create a WriterProperties object (line 4) that is used as a second parameter of the PdfWriter class (line 3). We use the addXmpMetadata() method (line 5) to instruct iText to create an XMP stream based on the metadata added to the PdfDocumentInfo object: the title (line 8), the author (line 9), the subject (line 10), the keywords (line 11), and the creator application (line 12). The producer, creation time and modification time are set automatically. You can't change them.
iText 5 generated PDF 1.4 files by default. In some cases, this version was changed automatically when you used specific functionality, For instance: when using full compression, the version was changed to PDF 1.5. Full compression means that the cross-reference table and possibly some indirect objects will be compressed. That wasn't possible in PDF 1.4. iText 7 creates PDF 1.7 files (ISO-32000-1) by default. In the previous example, we changed the version to PDF 1.6 using the setPdfVersion() method on the WriterProperties.
You can also change the compression in the WriterProperties.
Compression
In one of the event handler examples, we created a document with an image as background. The size of this PDF was 134 KB. In figure 7.17, you see another version of a document with the exact same content. The size of that PDF is only 125 KB.

Figure 7.17: PDF and compression
This difference in size is caused by the way some content is stored inside the PDF. For small files, without many objects, the effect of full compression won't be significant. All content streams with PDF syntax are compressed by default by iText. Starting with PDF 1.5, more objects can be compressed, but that doesn't always make sense. A fully compressed file can count more bytes than an ordinary PDF 1.4 file if the PDF consists of only a dozen objects. The effect is more significant the more objects are needed in the PDF. If you plan to create large PDF files with many pages and many objects, you should take a look at the Compressed example.
PdfDocument pdf = new PdfDocument(new PdfWriter(dest,
    new WriterProperties().setFullCompressionMode(true)));
Once again, we use the WriterProperties object, now in combination with the setFullCompressionMode() method. There's also a setCompressionLevel() method that allows you to set a compression level ranging from 0 (best speed) to 9 (best compression), or you can set it to the default value -1.
We'll conclude this chapter with a small encryption example.
Encryption
There are two ways to encrypt a PDF file. You can encrypt a PDF file using the public key of a public/private key pair. In that case, the PDF can only be viewed by the person who has access to the corresponding private key. This is very secure.
Using passwords is another way to encrypt a file. You can define two passwords for a PDF file: an owner password and a user password.
If a PDF is encrypted with an owner password, the PDF can be opened and viewed without that password, but some permissions can be in place. In theory, only the person who knows the owner password can change the permissions.
The concept of protecting a document using only an owner password is flawed. Many tools, including iText, can remove an owner password if there's no user password in place.
If a PDF is also encrypted with a user password, the PDF can't be opened without a password. Figure 7.18 shows what happens when you try to open such a file.

Figure 7.18: A PDF that requires a password
The document only opens when we pass one of the two passwords, the user password in which case the permissions will be in place, or the owner password in which case we can change the permissions.
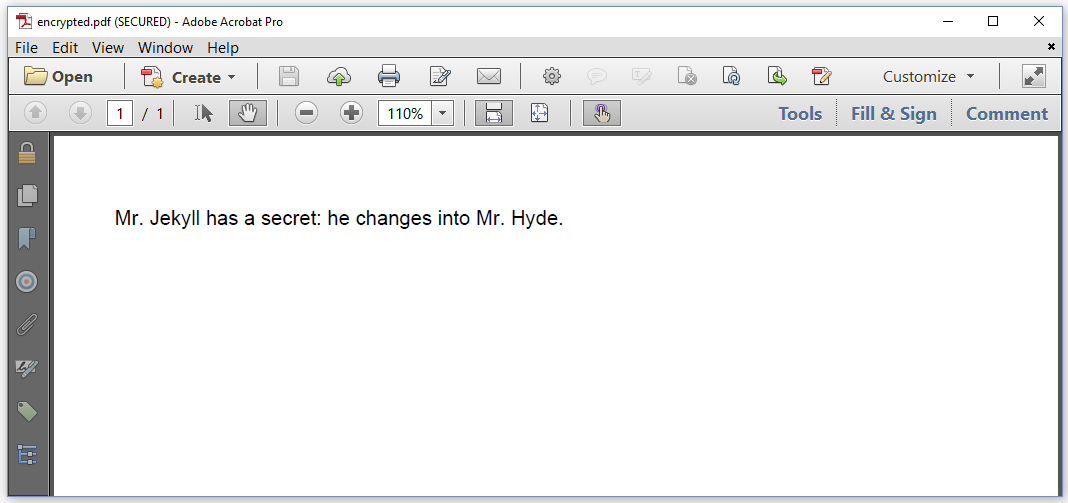
Figure 7.19: A secured PDF
As we can see in the Encrypted example, the passwords and the permissions were defined using WriterProperties.
byte[] user = "It's Hyde".getBytes();
byte[] owner = "abcdefg".getBytes();
PdfDocument pdf = new PdfDocument(new PdfWriter(dest,
    new WriterProperties().setStandardEncryption(user, owner,
        EncryptionConstants.ALLOW_PRINTING
            | EncryptionConstants.ALLOW_ASSEMBLY,
        EncryptionConstants.ENCRYPTION_AES_256)));
We define a user password and an owner password as a byte array (line 1-2). Those are the first two parameters of the setStandardEncryption() method. The third parameter can be used to define permissions. In our example, we allow printing and document assembly –that is: splitting and merging. Finally, we define the encryption algorithm: AES 256.
The possible values for the permissions are:
ALLOW_DEGRADED_PRINTING– Allow printing at a low resolution only,ALLOW_PRINTING– Allow printing at a low as well as at high resolution,ALLOW_SCREENREADERS– Allows the extraction of text for accessibility purposes,ALLOW_COPY– Allow copy/paste of text and images,ALLOW_FILL_IN– Allow filling out interactive form fields,ALLOW_MODIFY_ANNOTATIONS– Allow the modification of text annotations and filling out interactive form fields,ALLOW_ASSEMBLY– Allow the insertion, rotation and deletion of pages, as well as the creation of outline items and thumbnail images,ALLOW_MODIFY_CONTENTS– Allow the modification of the document by operations other than those controlled byALLOW_FILL_IN,ALLOW_MODIFY_ANNOTATIONS, andALLOW_ASSEMBLY.
If you want to combine different permissions, always use the "or" (|) operator because some permissions overlap. For instance ALLOW_PRINTING sets the bit for printing as well as for degraded printing.
iText supports the following encryption algorithms, to be used for the fourth parameter:
STANDARD_ENCRYPTION_40– encrypt using the 40-bit alleged RC4 (ARC4) algorithm,STANDARD_ENCRYPTION_128– encrypt using the 128-bit alleged RC4 (ARC4) algorithm.AES_128– encrypt using the 128-bit AES algorithm,AES_256– encrypt using the 256-bit AES algorithm.
You can also add one of the following extra parameters to the encryption algorithm using an "or" (|) operation:
DO_NOT_ENCRYPT_METADATA– if you want to avoid that the metadata will also be encrypted. Encrypting the metadata doesn't make sense if you want the metadata to be accessible for your document management system, but be aware that this option is ignored when using 40-bit ARC encryption.EMBEDDED_FILES_ONLY– if you want to encrypt the embedded files only, and not the actual PDF document. For instance: if the PDF document itself is a wrapper for other documents, such as a cover note explaining that it's not possible to open the document without having the right credentials at hand immediately. In this case the PDF is an unencrypted wrapper for encrypted documents.
All of these parameters can also be used for the setPublicKeyEncryption() method, in which case the first parameter is an array of Certificate objects, the second parameter an array with the corresponding permissions, and the third parameter the encryption mode –that is: the encryption algorithm and the option to not encrypt the metadata and to encrypt only the embedded files.
With this last example, we have given away the punch line of The Strange Case of Dr. Jekyll and Mr. Hyde: "Dr. Jekyll has a secret: he changes into Mr. Hyde." But you probably already knew that after all the Jekyll and Hyde examples we've made in this book.
Summary
In this final chapter of the "iText: Building Blocks", we have covered the IEventHandler functionality that allows us to take action when specific events – such as starting, ending, inserting, and removing a page – occur. We looked at viewer preferences that allowed us to tell PDF viewers how to present the document when we open it. We could also use the mechanism of viewer preferences to set some printer preferences. Finally, we looked at some writer properties. We discussed these properties in the context of metadata, compression, and encryption.
We've covered a lot of ground in this tutorial. You should now have a clear understanding of the basic building blocks that are available when you want to create a document from scratch. You also know how to establish document interactivity (actions) and navigation (links, destinations, bookmarks). You know the mechanism to handle events, and you can set viewer preferences and writer properties. You're all set to create some really cool PDFs.
Finally, don't forget to check out the ebooks page for more iText tutorials.
