Which version?
This Tutorial was written with iText 7.0.x in mind, however, if you go to the linked Examples you will find them for the latest available version of iText. If you are looking for a specific version, you can always download these examples from our GitHub repo (Java/.NET).
When I created iText back in the year 2000, I tried to solve two very specific problems.
-
In the nineties, most PDF documents were created manually on the Desktop using tools like Adobe Illustrator or Acrobat Distiller. I needed to serve PDFs automatically in unattended mode, either in a batch process, or (preferably) on the fly, served to the browser by a web application. These PDF documents couldn't be produced manually due to the volume (the high number of pages and files) and because the content wasn't available in advance (it needed to be calculated, based on user input and/or real-time results from database queries). In 1998, I wrote a first PDF library that solved this problem. I deployed this library on a web server and it created thousands of PDF documents in a server-side Java application.
-
I soon faced a second problem: a developer couldn't use my first PDF library without consulting the PDF specification. As it turned out, I was the only member in my team who understood my code. This also meant that I was the only person who could fix my code if something broke. That's not a healthy situation in a software project. I solved this problem by rewriting my first PDF library from scratch, ensuring that knowing the PDF specification inside-out became optional instead of mandatory. I achieved this by introducing the concept of a
Documentto which a developer can addParagraph,List,Image,Chunk, and other high-level objects. By combining these intuitive building blocks, a developer could easily create a PDF document programmatically. The code to create a PDF document became easier to read and easier to understand, especially by people who didn't write that code.
This is a jump-start tutorial to iText 7. We won't go into much detail, but let's start with some examples that involve some of these basic building blocks.
Introducing iText's basic building blocks
Many programming tutorials start with a Hello World example. This tutorial isn't any different.
This is the HelloWorld example for iText 7:
PdfWriter writer = new PdfWriter(dest);
PdfDocument pdf = new PdfDocument(writer);
Document document = new Document(pdf);
document.add(new Paragraph("Hello World!"));
document.close();
Let's examine this example line by line:
-
We create a
PdfWriterinstance.PdfWriteris an object that can write a PDF file. It doesn't know much about the actual content of the PDF document it is writing. ThePdfWriterdoesn't know what the document is about, it just writes different file parts and different objects that make up a valid document once the file structure is completed. In this case, we pass aStringparameter, nameddest, that contains a path to a file, for instanceresults/chapter01/hello_world.pdf. The constructor also accepts anOutputStreamas parameter. For instance: if we wanted to write a web application, we could have created aServletOutputStream; if we wanted to create a PDF document in memory, we could have used aByteArrayOutputStream; and so on. -
The
PdfWriterknows what to write because it listens to aPdfDocument. ThePdfDocumentmanages the content that is added, distributes that content over different pages, and keeps track of whatever information is relevant for that content. In chapter 7, we'll discover that there are various flavors ofPdfDocumentclasses aPdfWritercan listen to. -
Once we've created a
PdfWriterand aPdfDocument, we're done with all the low-level, PDF-specific code. We create aDocumentthat takes thePdfDocumentas parameter. Now that we have thedocumentobject, we can forget that we're creating PDF. -
We create a
Paragraphcontaining the text"Hello World"and we add that paragraph to thedocumentobject. -
We close the
document. Our PDF has been created.
Figure 1.1 shows what the resulting PDF document looks like:
Let's add some complexity. Let's pick a different font and let's organize some text as a list; see Figure 1.2.
The RickAstley example shows how this is done:
PdfWriter writer = new PdfWriter(dest);
PdfDocument pdf = new PdfDocument(writer);
Document document = new Document(pdf);
// Create a PdfFont
PdfFont font = PdfFontFactory.createFont(FontConstants.TIMES_ROMAN);
// Add a Paragraph
document.add(new Paragraph("iText is:").setFont(font));
// Create a List
List list = new List()
    .setSymbolIndent(12)
    .setListSymbol("\u2022")
    .setFont(font);
// Add ListItem objects
list.add(new ListItem("Never gonna give you up"))
    .add(new ListItem("Never gonna let you down"))
    .add(new ListItem("Never gonna run around and desert you"))
    .add(new ListItem("Never gonna make you cry"))
    .add(new ListItem("Never gonna say goodbye"))
    .add(new ListItem("Never gonna tell a lie and hurt you"));
// Add the list
document.add(list);
document.close();
Lines 1 to 3 and line 22 are identical to the Hello World example, but now we add more than just a Paragraph. iText always uses Helvetica as the default font for text content. If you want to change this, you have to create a PdfFont instance. You can do this by obtaining a font from the PdfFontFactory (line 5). We use this font object to change the font of a Paragraph (line 7) and a List (line 9). This List is a bullet list (line 11) and the list items are indented by 12 user units (line 10). We add six ListItem objects (line 14-19) and add the list to the document.
This is fun, isn't it? Let's introduce some images. Figure 1.3 shows what happens if we add an Image of a fox and a dog to a Paragraph.
If we remove the boiler-plate code from the QuickBrownFox example, the following lines remain:
Image fox = new Image(ImageDataFactory.create(FOX));
Image dog = new Image(ImageDataFactory.create(DOG));
Paragraph p = new Paragraph("The quick brown ")
            .add(fox)
            .add(" jumps over the lazy ")
            .add(dog);
document.add(p);
We pass a path to an image to an ImageDataFactory that will return an object that can be used to create an iText Image object. The task of the ImageDataFactory is to detect the type of image that is passed (jpg, png, gif. bmp,...) and to process it so that it can be used in a PDF. In this case, we are adding the images so that they are part of a Paragraph. They replace the words "fox" and "dog".
Publishing a database
Many developers use iText to publish the results of a database query to a PDF document. Suppose that we have a database containing all the states of the United States of America and that we want to create a PDF that lists these states and some information about each one in a table as shown in Figure 1.4.
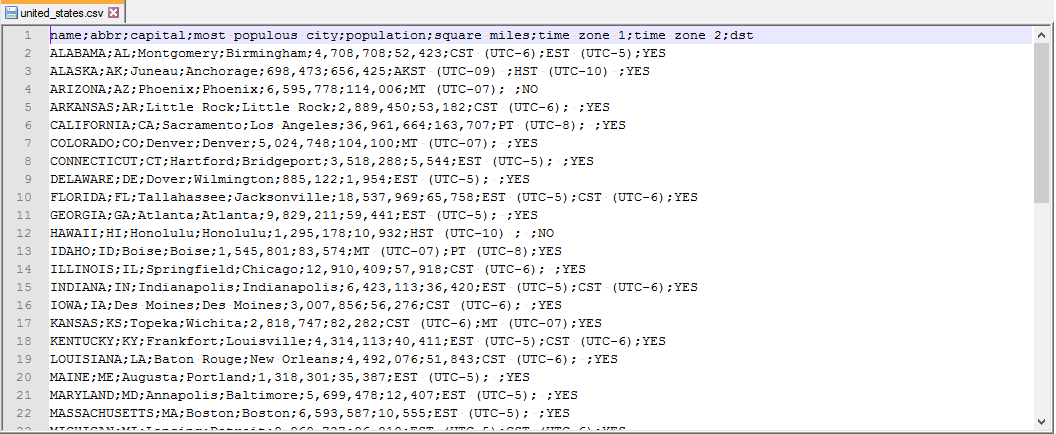
Using a real database would probably increase the complexity of these simple examples, so we'll use a CSV file instead: united_states.csv (see figure 1.5).
If you take a closer look at the boilerplate code in the UnitedStates example, you'll discover that we've made a small change to the line that creates the Document (line 4). We've added an extra parameter that defines the size of the pages in the Document. The default page size is A4 and by default that page is used in portrait. In this example, we also use A4, but we rotate the page (PageSize.A4.rotate()) so that it is used in landscape as shown in Figure 1.4. We've also changed the margins (line 5). By default iText uses a margin of 36 user units (half an inch). We change all margins to 20 user units (this term will be explained further down in the text).
PdfWriter writer = new PdfWriter(dest);
PdfDocument pdf = new PdfDocument(writer);
Document document = new Document(pdf, PageSize.A4.rotate());
document.setMargins(20, 20, 20, 20);
PdfFont font = PdfFontFactory.createFont(FontConstants.HELVETICA);
PdfFont bold = PdfFontFactory.createFont(FontConstants.HELVETICA_BOLD);
Table table = new Table(new float[]{4, 1, 3, 4, 3, 3, 3, 3, 1});
table.setWidth(UnitValue.createPercentValue(100));
BufferedReader br = new BufferedReader(new FileReader(DATA));
String line = br.readLine();
process(table, line, bold, true);
while ((line = br.readLine()) != null) {
    process(table, line, font, false);
}
br.close();
document.add(table);
document.close();
In this example, we read this CSV file line by line, and we put all the data that is present in the CSV file in a Table object.
We start by creating two PdfFont objects of the same family: Helvetica regular (line 5) and Helvetica bold (line 6). We create a Table object for which we define nine columns by defining a float array with nine elements (line 7). Each float defines the relative width of a column. The first column is four times as wide as the second column; the third column is three times as wide as the second column; and so on. We also define the width of the table relative to the available width of the page (line 8). In this case, the table will use 100% of the width of the page, minus the page margins.
We then start to read the CSV file whose path is stored in the DATA constant (line 9). We read the first line to obtain the column headers (line 10) and we process that line (line 11). We wrote a process() method that adds the line to the table using a specific font and defining whether or not line contains the contents of a header row.
public void process(Table table, String line, PdfFont font, boolean isHeader) {
    StringTokenizer tokenizer = new StringTokenizer(line, ";");
    while (tokenizer.hasMoreTokens()) {
        if (isHeader) {
            table.addHeaderCell(
                new Cell().add(
                    new Paragraph(tokenizer.nextToken()).setFont(font)));
        } else {
            table.addCell(
                new Cell().add(
                    new Paragraph(tokenizer.nextToken()).setFont(font)));
        }
    }
}
We use a StringTokenizer to loop over all the fields that are stored in each line of our CSV file. We create a Paragraph in a specific font. We add that Paragraph to a new Cell object. Depending on whether or not we're dealing with a header row, we add this Cell to the table as a header cell or as an ordinary cell.
After we've processed the header row (line 11), we loop over the rest of the lines (line 12) and we process the rest of the rows (line 13). As you can tell from Figure 1.4, the table doesn't fit on a single page. There's no need to worry about that: iText will create as many new pages as necessary until the complete table was rendered. iText will also repeat the header row because we added the cells of that row using the addHeaderCell() method instead of using the addCell() method.
Once we've finished reading the data (line 14), we add the table to the document (line 16) and we close it (line 17). We have successfully published our CSV file as a PDF.
That was easy. With only a limited number of lines of code, we have already created quite a nice table in PDF.
Summary
With just a few examples, we have already seen a glimpse of the power of iText. We discovered that it's very easy to create a document programmatically. In this first chapter, we've discussed high-level objects such as Paragraph, List, Image, Table and Cell, which are iText's basic building blocks.
However, it's sometimes necessary to create a PDF with a lower-level syntax. iText makes this possible through its low-level API. We'll take a look at some examples that use these low-level methods in chapter 2.